Hikvision Installer Configuration
This guide provides step-by-step instructions for configuring Hikvision IP cameras and NVRs to integrate with GCXONE. Follow these steps in order to ensure proper video streaming, event detection, and device connectivity.
Configuration
Step-by-Step
Step 1: System Configuration (Time Management)
Step 1: System Configuration (Time Management)
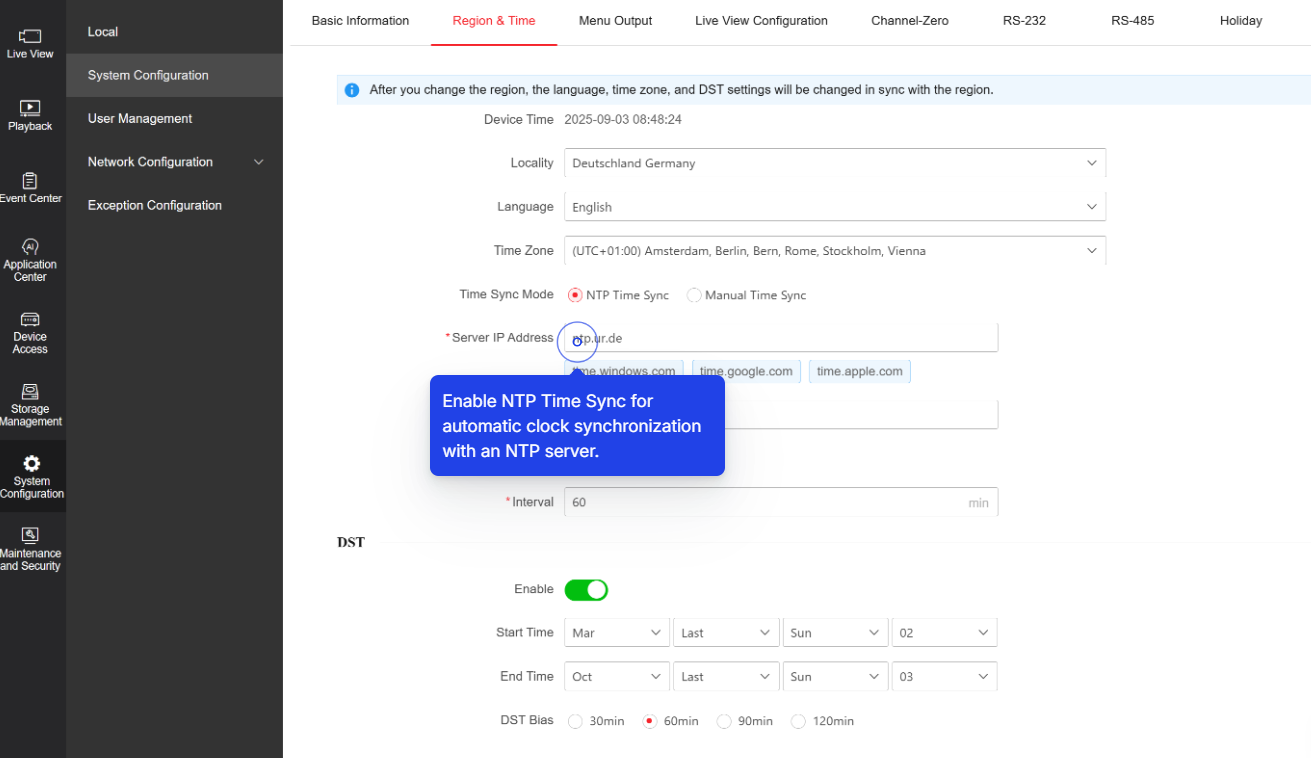
UI path: Configuration → System → System Settings → Time Settings
Configuration Steps
- Login into your Hikvision portal by providing the credentials needed
- Navigate to the Configuration page, then select System
- Proceed to System Settings and choose Time Settings
- Choose the time zone of your device and make sure to enable the NTP
- If your device supports DST we recommend you also have it enabled
Time Configuration
NTP Settings
- NTP is a protocol used to synchronize the clocks of computers and other devices over a network
- The primary goal of DST is to make better use of daylight during the longer days of summer
Expected result: Time zone configured with NTP and DST enabled
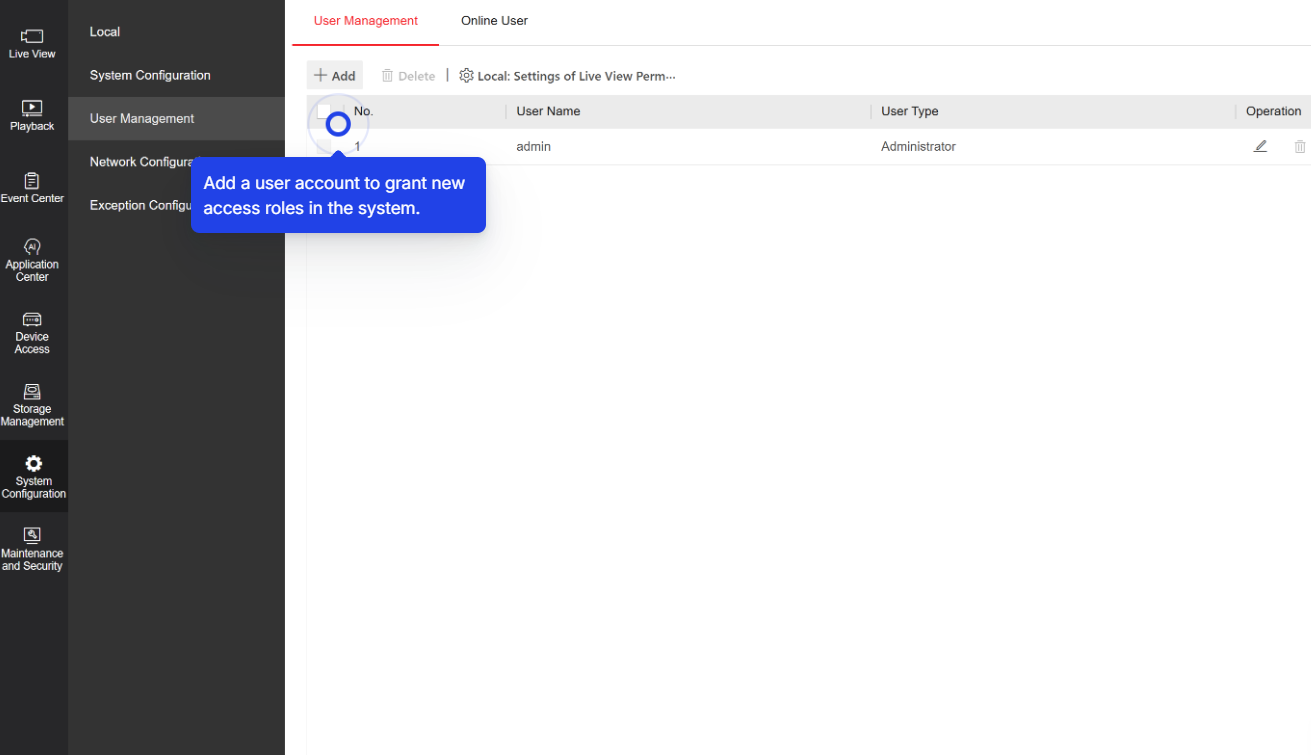
Step 2: User Management
Step 2: User Management
UI path: Configuration → System → User management → Add
Configuration Steps
- Navigate to the Configuration page, then select System
- Proceed to User management then click on "Add"
- Enter the username and password for NXGEN
- We recommend setting the username to "NXG" with the specified permissions
- Select the specific cameras you want to apply these permissions to
- Don't forget to click on "OK" to save the changes
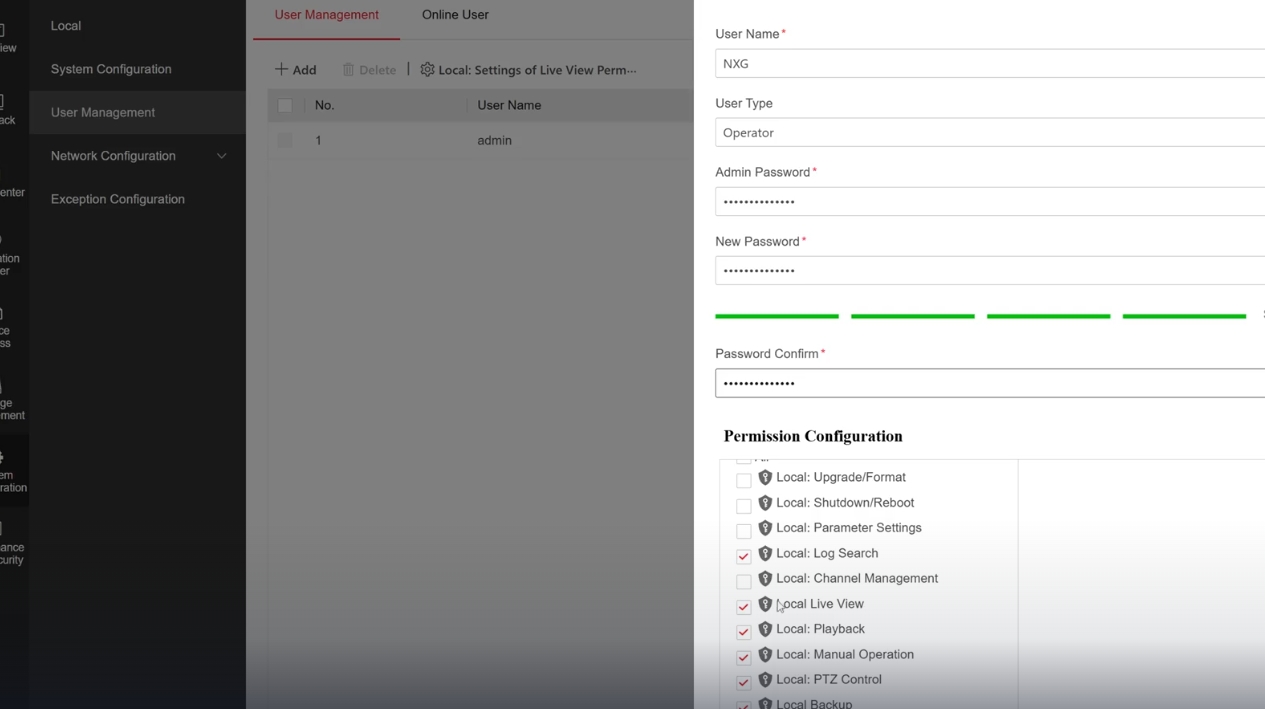
Required Permissions for "NXG" user
Local Permissions
- Parameters Settings
- Log Search
- Playback
- Manual Operation
- PTZ Control
- Video Export
Remote Permissions
- Parameters Settings
- Log Search / Interrogate Working
- Two-way Audio
- Notify Surveillance Center / Trigger
- Video Output Control
- Live View
- PTZ Control
- Playback/Download
Expected result: NXG user created with proper permissions
Step 3: Security Configuration
Step 3: Security Configuration
UI path: Configuration → System → Security
Configuration Steps
- Configure both RTSP and WEB authentication as Digest
- This enhances security by ensuring that your credentials are protected with stronger encryption, reducing the risk of unauthorized access
Important: We highly recommend configuring both RTSP and WEB authentication as Digest for enhanced security. This is a critical security best practice.
Expected result: Authentication set to Digest for enhanced security
Step 4: Network Configuration (Integration Protocol)
Step 4: Network Configuration (Integration Protocol)
UI path: Configuration → Network → Advanced Settings → Integration Protocol
Configuration Steps
- Under "Network," go to "Advanced Settings," and then select "Integration Protocol"
- Enable the ISAPI by simply clicking on the check box
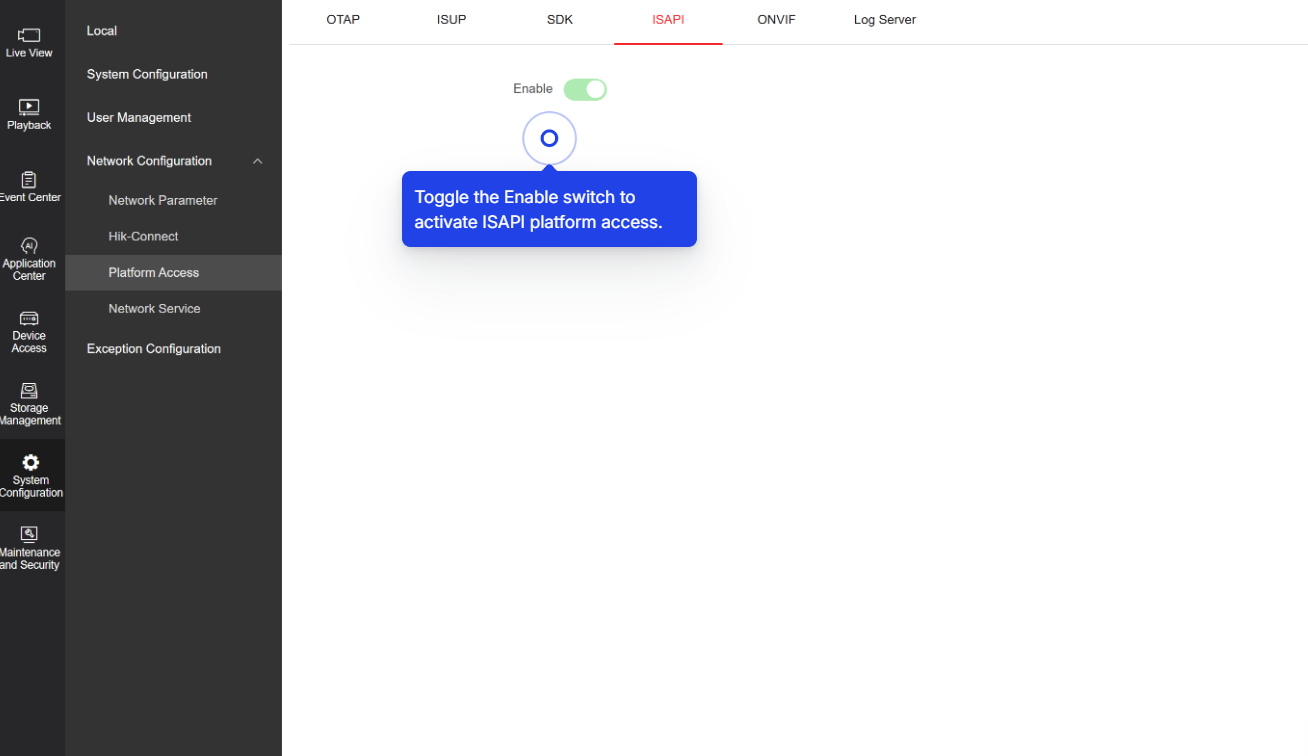
ISAPI Protocol: The Internet Server Application Programming Interface (ISAPI) is required for GCXONE to communicate with Hikvision devices. This protocol enables device discovery, configuration, and event transmission.
Expected result: ISAPI protocol enabled
Step 5: Basic Events Configuration
Step 5: Basic Events Configuration
UI path: Configuration → Event → Basic Event
Configuration Steps
- On the "Configuration" page, under the "Event" application, click on "Basic Event"
- Choose the camera you want to configure
- Draw your area of interest
- Choose the Arming Schedule under the "Arming Schedule" tab
- In the "Linkage Method" tab, enable the checkbox under the camera and check "Notify Surveillance Center"
- To trigger alarms from other cameras, use the "Trigger Alarm Output" options in the "Normal Linkage" section
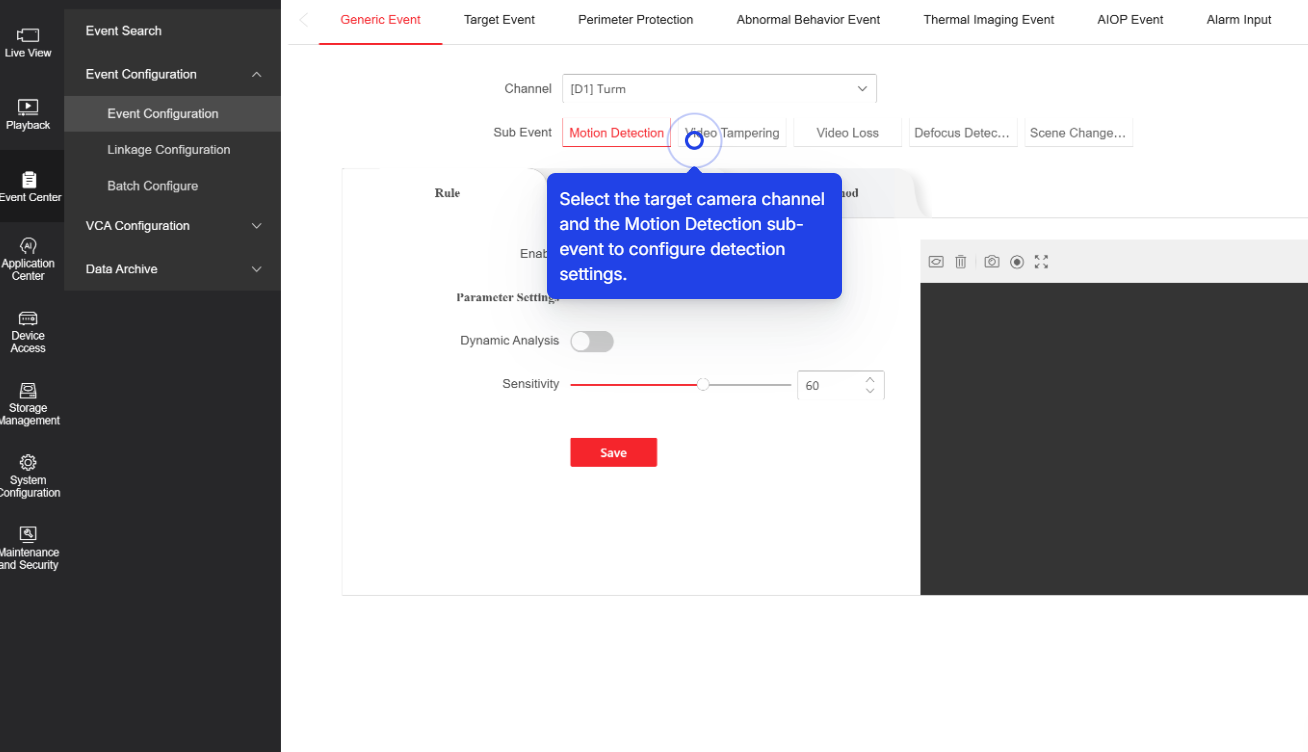
Important Note: Avoid setting up Motion events; they can trigger too many alarms and cause issues. Use Basic Events like Video Tampering instead.
Expected result: Basic events configured for selected cameras
Step 6: Smart Events Configuration
Step 6: Smart Events Configuration
UI path: Configuration → Event → Smart Event
Available Smart Events
Line Crossing Detection
This feature identifies when an object crosses a predefined virtual line, useful for monitoring entry and exit points
Intrusion Detection
It detects when an object enters or moves within a designated area, ideal for securing restricted zones
Configuration Steps
- On the "Configuration" page, under the "Event" application, click on "Smart Event"
- Choose the camera you want to configure
- Draw lines on the area of interest
- Choose the Arming Schedule under the "Arming Schedule" tab
- In the "Linkage Method" tab, enable the checkbox under the camera and check "Notify Surveillance Center"
- To trigger alarms from other cameras, use the "Trigger Alarm Output" options in the "Normal Linkage" section
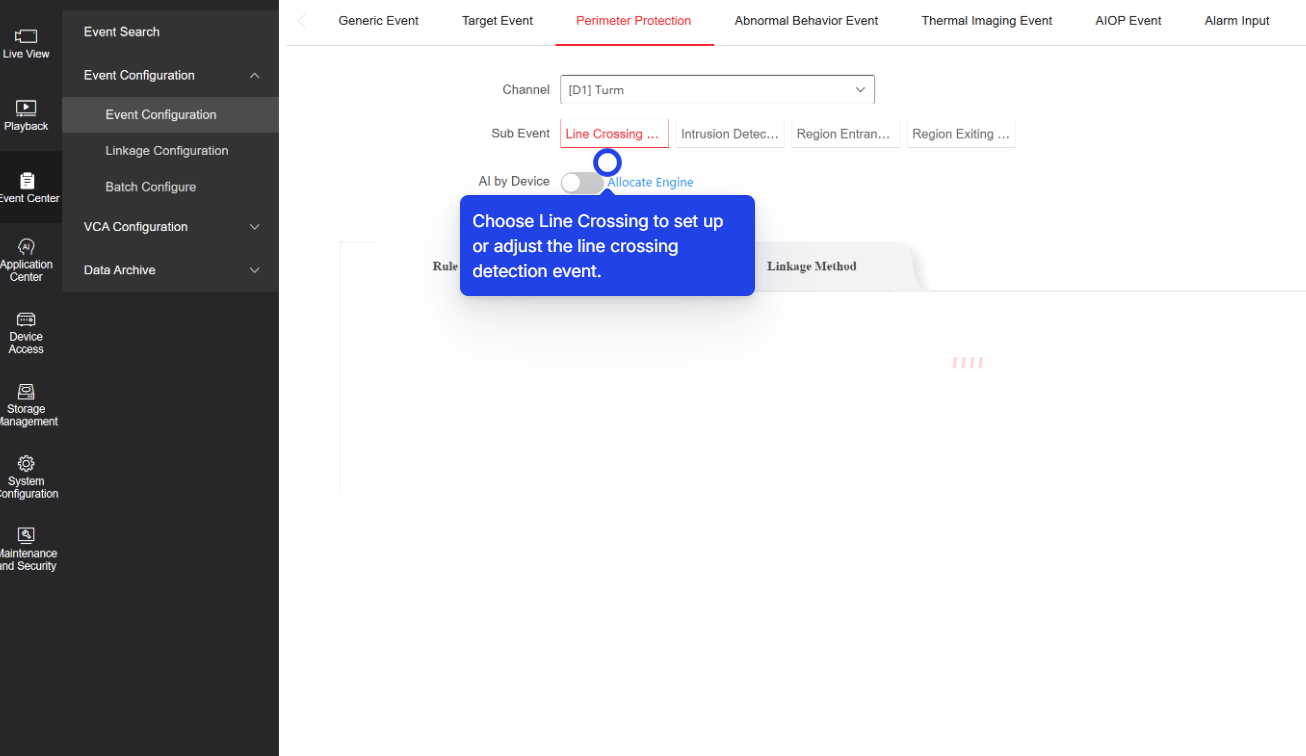
Expected result: Smart events configured to enhance security system's effectiveness and responsiveness
Step 7: Add Device in GCXONE
Step 7: Add Device in GCXONE
UI path: GCXONE → Customer → Site → Devices → Add Device
Configuration Steps
- Select Hikvision
- Fill: Host/Serial, Username, Password, Ports, Time Zone
- Click Discover. Review discovered sensors and I/O
- Click Save
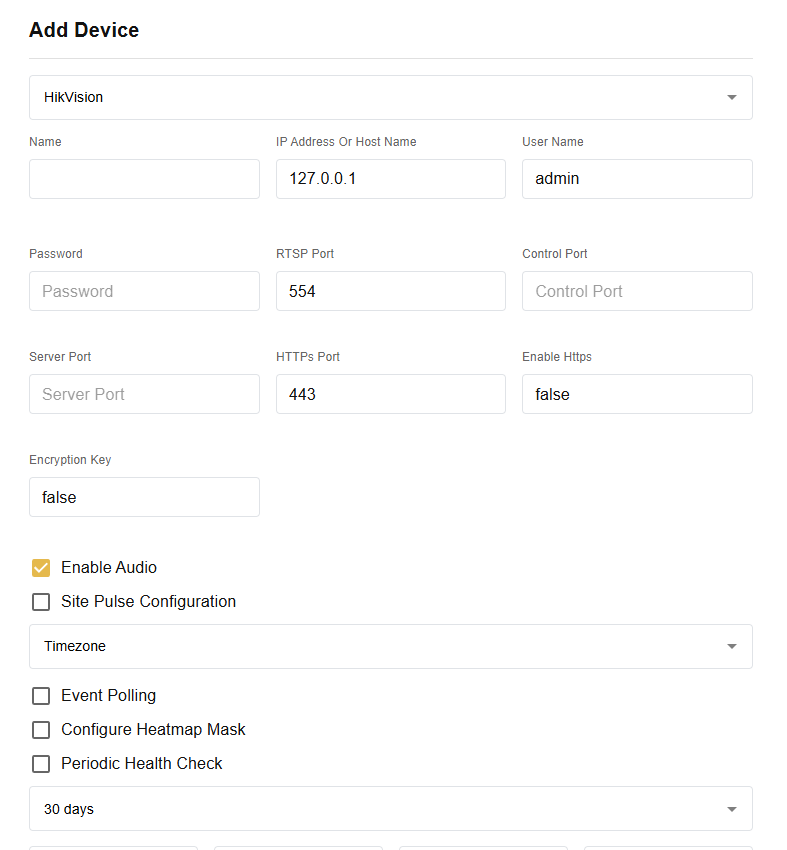
Expected result: GCXONE lists sensors under the Hikvision device
Step 8: Verify Integration
Step 8: Verify Integration
Verification Checks
- ✅ Verify time synchronization is working
- ✅ Test NXG user login and permissions
- ✅ Confirm ISAPI protocol is active
- ✅ Test basic and smart events are triggering properly
- ✅ Verify "Notify Surveillance Center" is working
- ✅ Check live view and playback functionality
Expected result: Complete Hikvision integration with GCXONE platform
Related Articles
Need Help?
If you're experiencing issues during configuration, check our or contact support.