Handling Alarms
What Handling Alarms Does
This page explains how to review, classify, and act on alarms in GCXONE. All alarm handling takes place primarily in Video Search and Talos.
Why It Matters
Every unclassified or missed alarm affects your team's performance metrics and response quality. Correct alarm handling ensures incidents are documented, false alarms are filtered, and real threats are escalated without delay.
How It Works
Before You Begin
- You are logged in and Cloud Mode Active is confirmed.
- You have access to Video Search from the left navigation.
- You understand the difference between real alarms (green) and false alarms (red).
Where Alarms Appear
- Video Search — Review alarm video clips, classify events, and take immediate action
- Talos — Manage alarm workflows, assignments, and escalations
Alarm Management System
The Alarm Management System connects GCXONE directly to your Central Monitoring Station (CMS), so alarms reach your team the moment they trigger — automatically, with no manual steps.
GCXONE supports two integration paths:
- DC-09 CMS Integration: Uses the SIA DC-09 industry-standard protocol over IP. Each alarm signal includes a secure event link so CMS operators can immediately access pre-event footage and full alarm context.
- Evalink Talos Integration: Uses a REST API for alarm delivery. Requires an API Key and Company ID from your Talos account.
Both are configured from:
Marketplace → Alarm Management System inside GCXONE.
Check the site mapping table regularly — red indicators mean those sites are not forwarding alarms yet.
→ For full Details, see Alarm Management System.
Managing Alarm Workflows in Talos
Workflows in Talos are predefined sequences of steps that standardize and automate alarm handling — ensuring every alarm is processed consistently and reducing human error. Only Administrator or Manager roles can create, edit, or delete workflows.
Workflow Types:
- Manual: guides an operator step-by-step, requiring human judgment at each stage
- Automated: runs without human intervention, used for routine tasks like status checks or hardware fault notifications
Priority Order: When an alarm arrives, Talos matches it to a workflow in this order:
- Site Level: most specific, highest priority
- Site Group: applied to a group of sites
- Global/Company Level: the default fallback
Every workflow is built from three blocks:
- Incoming Conditions: alarm code, schedule, and logic (AND/OR)
- Steps & Actions: send SMS/email, make decisions based on video, wait periods
- Outcome: close with a documented result (e.g., False Alarm, Police Dispatched)
Best Practices:
Use Managed Workflows over Global — easier to assign and update across multiple sites Keep conditions simple to ensure reliability Always test new workflows before deploying to live sites
→ For full details, see Talos Workflows.
Reviewing and Classifying an Alarm
- Navigate to Video Search from the left menu.
- Browse the alarm list — green = real alarm, red = false alarm.
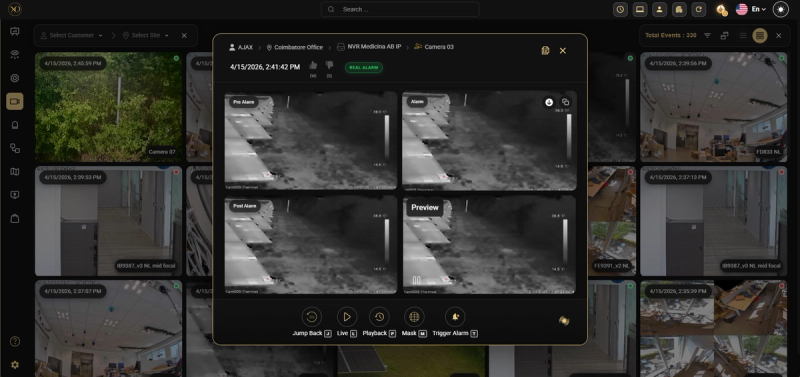
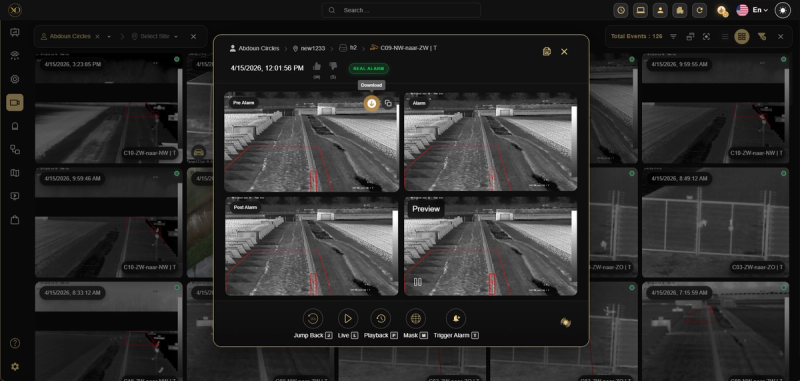
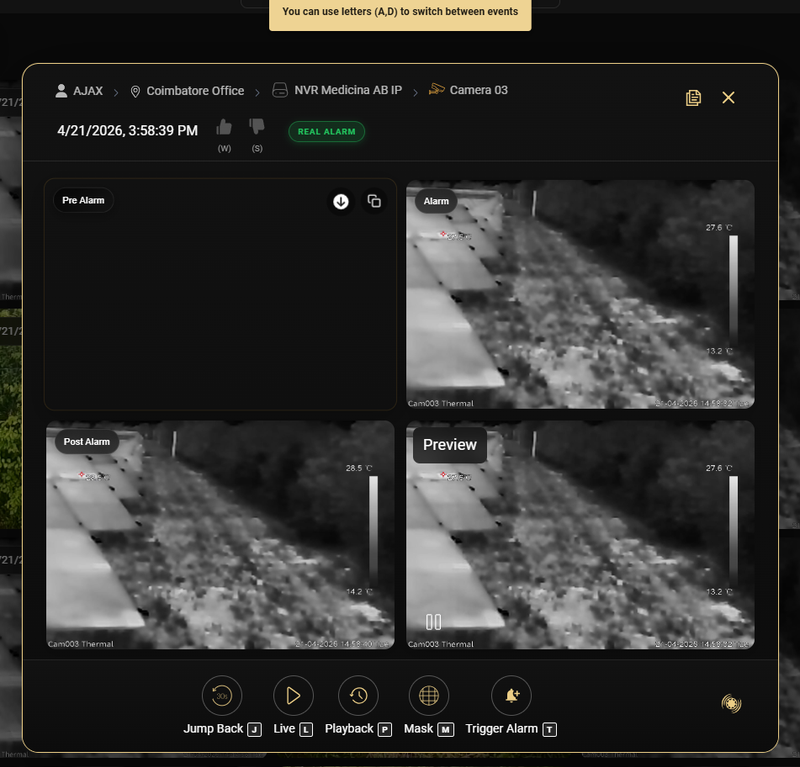
- Click any event to open its detail view showing the customer, site, device (NVR), sensor (camera), date, time, and alarm type.
- After reviewing the clip, click Thumbs Up for a real incident or Thumbs Down for a false alarm.
Alarm Actions Reference
When you open an alarm in Video Search, a set of action buttons appear at the bottom of the event detail panel. These are the available actions:
-
Jump Back [J] — Rewind the video to a point before the alarm trigger. A dropdown lets you choose how far back: 30 seconds, 1 minute, 2 minutes, 4 minutes, 5 minutes, 6 minutes, 7 minutes, 1 hour, 1 day, or a custom duration in minutes. You can also set a preferred interval as default using Save As Default.
-
Live [L] — Switch to the camera’s current live feed to see what is happening at the site right now.
-
Playback [P] — Open the full playback timeline for this camera to review recorded footage around the alarm time.
-
Mask [M] — Draw a mask over a region of the video frame to suppress false alarms from a specific area.
-
Trigger Alarm [T] — Manually trigger an alarm on this sensor, useful for testing alarm routing and workflows.
-
Camera Mask — Apply a persistent mask at the camera level that remains active across future alarms.

-
History — View all previous alarms for this sensor to check for recurring patterns or hardware issues.
-
Copy Salvo — Copy or share the alarm link with a colleague for collaboration or escalation.
-
Download — Save the alarm clip locally for evidence, reporting, or offline review.
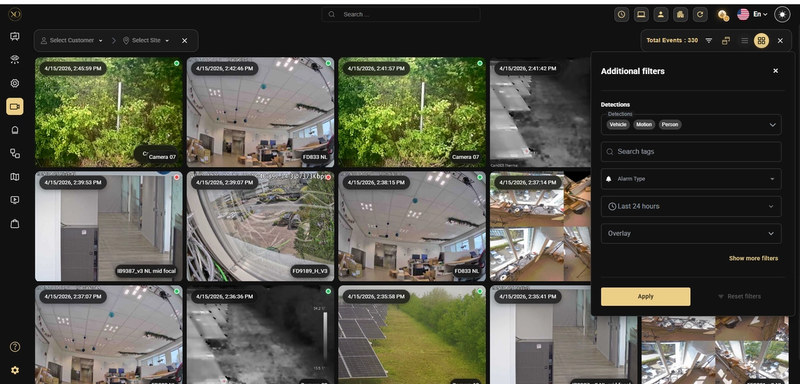
Using Filters to Find Specific Alarms
Use the filter panel in Video Search to narrow your results. Select Customer → Site → Device → Sensor in sequence, then choose Alarm Type, set a Time Period, or use the Detection Filter to search for specific event types.
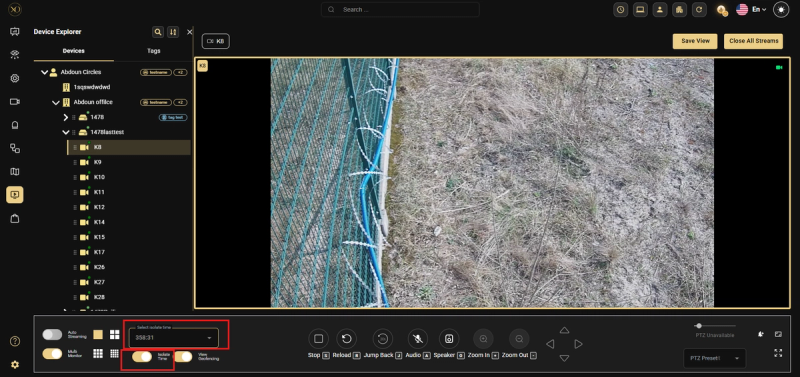
Isolating a Camera to Suppress Alarms
If a camera will generate excessive alarms (e.g., scheduled work in the area), open Video Viewer, open the camera options, set an Isolate Time duration, and toggle Isolate Time ON. Toggle OFF to cancel early.
Key Capabilities
Alarm Actions Reference
When you open an alarm in Video Search, a set of action buttons appear at the bottom of the event detail panel:
| Action | Shortcut | Description |
|---|---|---|
| Jump Back | J | Rewind the video to a point before the alarm trigger. Choose from 30 seconds up to 1 day, or set a custom duration. Use Save As Default to set your preferred interval. |
| Live | L | Switch to the camera's current live feed. |
| Playback | P | Open the full playback timeline for this camera. |
| Mask | M | Draw a mask over a region of the video frame to suppress false alarms from a specific area. |
| Trigger Alarm | T | Manually trigger an alarm on this sensor, useful for testing alarm routing and workflows. |
| Camera Mask | - | Apply a persistent mask at the camera level that remains active across future alarms. |
| History | - | View all previous alarms for this sensor to check for recurring patterns or hardware issues. |
| Copy Salvo | - | Copy or share the alarm link with a colleague for collaboration or escalation. |
| Download | - | Save the alarm clip locally for evidence, reporting, or offline review. |
| Previous Event | A | Navigate to the previous alarm in the list |
| Next event | D | Navigate to the next alarm in the list |
| Thumbs Up | W | Classify the alarm as a real incident |
| Thumbs Down | S | Classify the alarm as a false alarm |
Quad View Persistence During Workflows
The quad view remains fully visible throughout the alarm workflow lifecycle. Starting or closing an alarm workflow keeps the alarm grid intact and the quad view persists — giving operators uninterrupted visual context at every step.
Real-World Use Cases
- An operator reviews an alarm clip, uses Jump Back to see what happened 30 seconds before the trigger, and classifies it as a real incident.
- A camera near a construction zone generates excessive alarms — the operator sets an Isolate Time and notifies their supervisor before toggling it on.
- A Talos Automated workflow handles a hardware fault notification without any operator involvement, freeing the team to focus on real alarms.
Best Practices
- Always classify every alarm — unclassified alarms skew your team's performance metrics.
- Use Jump Back before classifying — context before the alarm trigger often reveals the cause. Use Save As Default to set your preferred jump-back duration.
- Check the History of a sensor if you see repeated alarms — it may indicate a hardware issue.
- Always document the reason before isolating a camera and notify your supervisor.
- Use ZenMode when you have a high volume of alarms to process them much faster.
- Use Managed Workflows over Global — easier to assign and update across multiple sites.
- Keep conditions simple to ensure reliability.
- Always test new workflows before deploying to live sites.