Tags
What Tags Does
Tags are a flexible labeling system in GCXONE that lets you group, organize, and filter any entity across your monitoring estate. You can tag customers, sites, devices, and sensors — then use those tags to filter health checks, save camera views, search for video activity, and navigate the Device Explorer. Tags bridge the gap between GCXONE's rigid hierarchy and the way your team actually works.
Why It Matters
Tags are especially useful when entities need to be grouped across different parts of the hierarchy. For example, you can tag specific cameras from different sites and customers as "Sensitive cameras" and then view or filter them all in one place — regardless of where they sit in the tree.
How It Works
Tags are created and managed from Settings > Tags Management. This is a global management panel showing all available tags across your tenant.
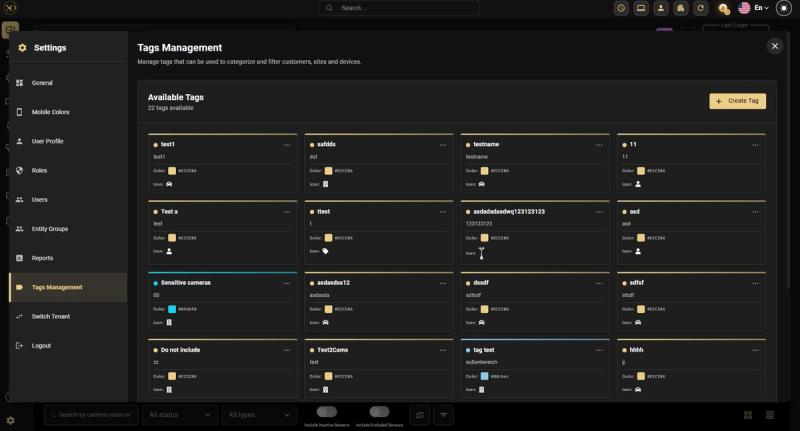
Each tag in the grid shows its name, description, color swatch, and assigned icon. You can edit or delete any tag using the three-dot menu on its card. The interface shows the total count of available tags at the top.
To create a new tag, click the + Create Tag button in the top-right corner of the Tags Management panel. The Create Tag dialog requires the following properties:
- Name — A short, descriptive identifier for the tag (e.g., "Sensitive cameras", "VIP Site", "Under Maintenance").
- Description — An optional longer description for context. Visible in the Tags Management interface.
- Color — A hex color code used to visually distinguish the tag in the UI (e.g.,
#ECCE86for gold,#0FD6F0for cyan). - Icon — A visual symbol: Car, Person, Building, Shield, Server, Tag, or Tower. Helps operators recognize tag types at a glance.
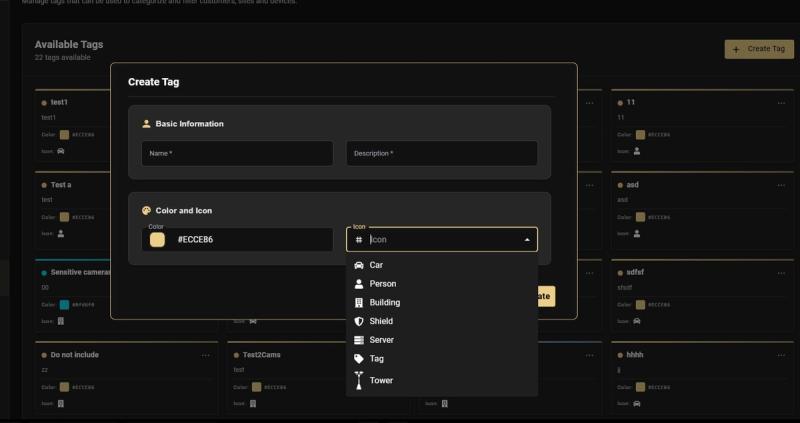
Icon Options — The available icons are: Car, Person, Building, Shield, Server, Tag, and Tower. Choose the icon that best represents what the tag describes — for example, use Building for site-related tags, Car for vehicle monitoring areas, or Shield for high-security zones.
Once tags are created, you can associate them with any entity in the hierarchy: Customers, Sites, Devices, and Sensors. This is done directly from the entity's detail page or overview panel.
How to associate a tag
- Open the entity you want to tag (customer, site, or device).
- Locate the Tags section in the entity's overview panel.
- Click Associate Tag — a modal will appear showing all available tags.
- Select the tag you want to apply and click Associate.
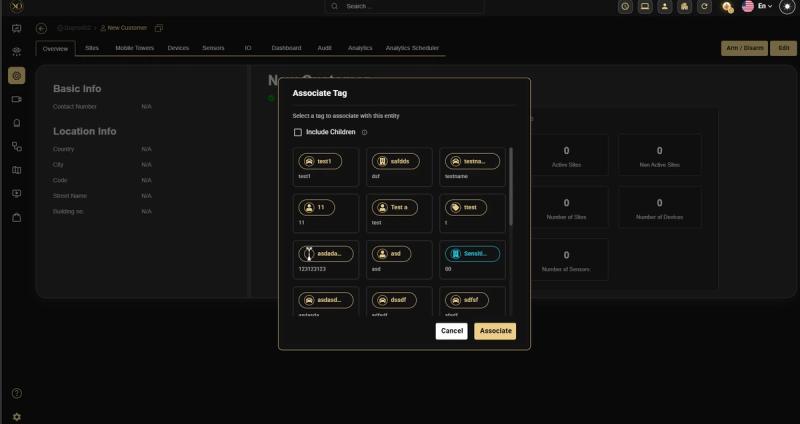
The modal also includes an Include Children checkbox. When enabled, the tag is automatically applied to all child entities under the selected parent — for example, tagging a customer will also tag all of their sites and devices.
Use Tags for Operational Grouping Tags are especially useful when entities need to be grouped across different parts of the hierarchy. For example, you can tag specific cameras from different sites and customers as "Sensitive cameras" and then view or filter them all in one place — regardless of where they sit in the tree.
Key Capabilities
Tags in the Device Explorer
The Device Explorer (accessible from the main left nav) has two views: Devices and Tags. Switching to the Tags view collapses the hierarchy and shows only tags as top-level folders. Each tag becomes a collapsible group containing all sensors associated with that tag.
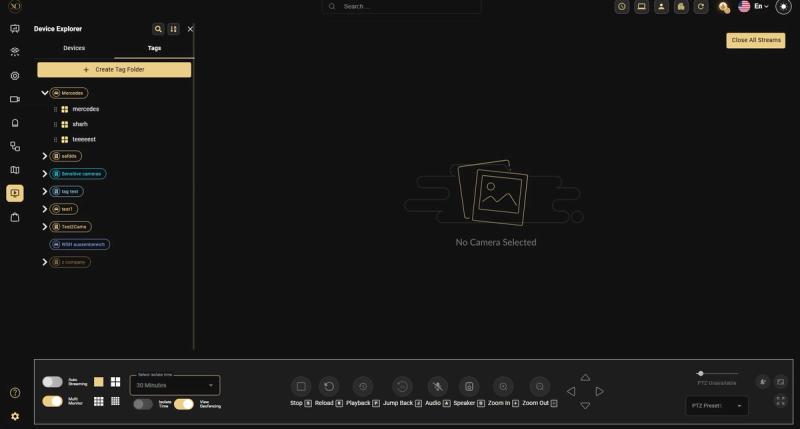
Imagine you have critical cameras spread across four different customers, three different sites, and two different devices. In the standard Devices view, finding all of them requires navigating multiple branches of the tree. In the Tags view, they all appear together under one tag — instantly accessible.
- Create a tag folder: Tags appear as expandable folders in the Tags view automatically once sensors are associated.
- Expand a folder: Click the arrow next to a tag name to see all sensors under it.
- Open a sensor: Click any sensor in the Tags view to open its live stream or access its settings.
Saving Salvo Views with Tags
A Salvo View is a saved multi-camera layout in GCXONE's live view. You can save any arrangement of open camera streams as a view and recall it with a single click. Tags can be attached to saved views to keep them organized.
The problem tags solve for live view
Suppose you need to monitor 4 high-priority cameras from different sites simultaneously — an entry point in Site A, a perimeter camera in Site B, and two indoor cameras from different customers. Without a saved view, loading this configuration every session requires manually navigating the device tree each time.
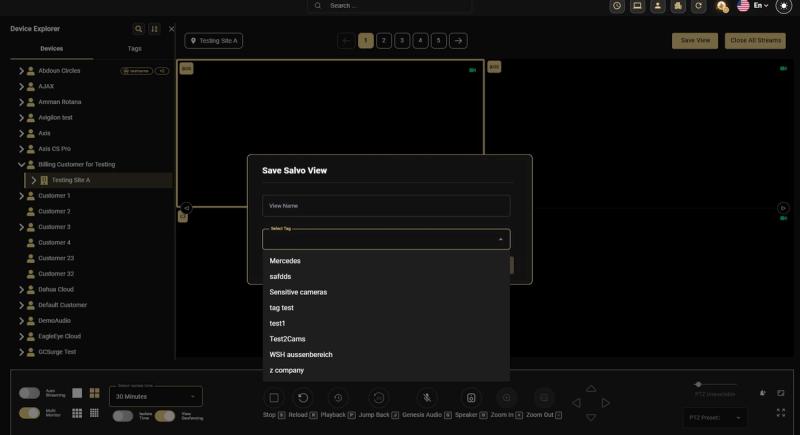
When saving a Salvo View, the dialog prompts for:
- View Name: A label for the saved layout (e.g., "Night Shift Setup", "Executive Entrance Monitor").
- Select Tag: An optional tag to associate the view with, making it findable and groupable in the Tags view.
Practical Example — A security operator monitoring a VIP building creates a Salvo View showing 4 entrance cameras. They save it as "VIP Entry — Night" and tag it as "VIP Site". Every evening, they open the Tags view, click the VIP Site folder, and their full 4-camera layout loads immediately — no navigation required.
Filtering by Tags in Health Check
The Health Check module supports tag-based filtering, allowing operators and CSMs to scope their camera health review to specific groups of cameras rather than seeing the entire estate at once.
Inline tag filter (quick select)
A tag filter dropdown is available directly in the Health Check toolbar. Clicking it opens a checklist of all available tags. Selecting one or more tags immediately filters the camera grid to show only cameras that carry those tags.
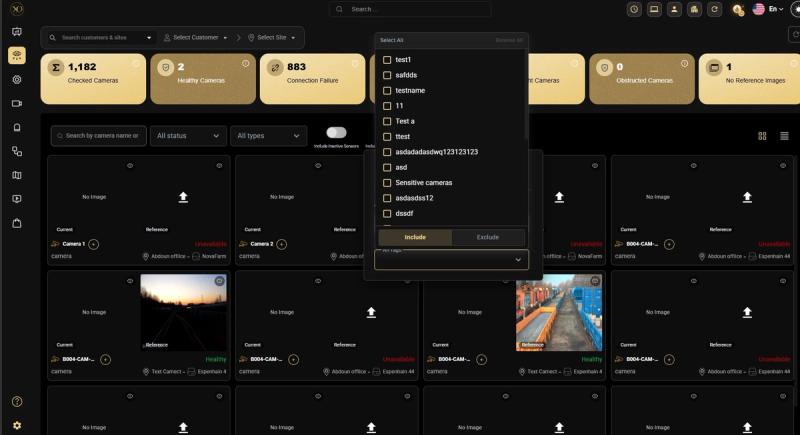
The filter also has an Include / Exclude toggle at the bottom:
- Include: Show only cameras that have the selected tags.
- Exclude: Hide cameras that have the selected tags — useful for removing cameras tagged as "Under Maintenance" from your health review.
More Filters panel
For combined filtering, the Health Check also has a More Filters panel (accessible via the filter icon). This panel allows filtering by both Manufacturer and Tags simultaneously:
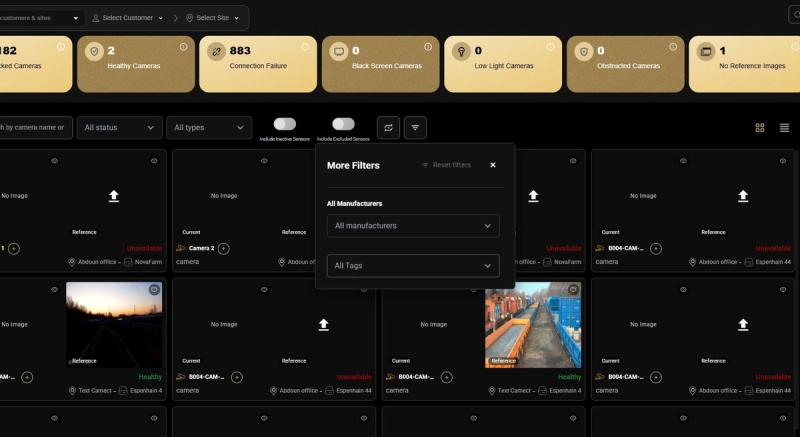
- All Manufacturers / specific manufacturer: Narrow results to cameras from a single brand.
- All Tags / specific tag: Further refine by tag to isolate a specific subset of that manufacturer's cameras.
Searching by Tags in Video Activity
Tags are also integrated into Video Activity (also known as Video Search) — the main page where all incoming alarm events are displayed and reviewed. Operators can use the Search Tags field in the Additional Filters panel to narrow the event feed to a specific tag group.
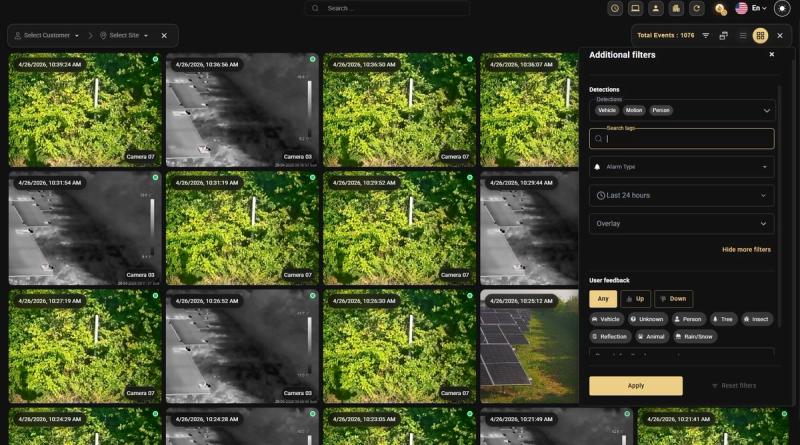
In the Additional Filters panel on the right side of Video Activity, operators can:
- Search tags: Type to search for and select one or more tags. Only alarm events from sensors carrying those tags will be displayed.
- Combine with other filters: Tag filters work in combination with Detections (Vehicle, Motion, Person), Alarm Type, time range (e.g., Last 24 hours), and User Feedback filters.
- Apply: Click the Apply button to activate the selected filters. Reset filters clears all applied filters.
Use Case
Reviewing Tagged Events During an Incident During a perimeter breach at a site, a CSM wants to review all alarm events from cameras tagged as "Sensitive cameras" in the last 24 hours. They open Video Activity, navigate to Additional Filters, search for the tag, and apply. The event feed immediately narrows to only those cameras — enabling a focused, fast incident review without scrolling through thousands of unrelated alarms.
Best Practices
- Use the Include Children checkbox when tagging a customer or site to automatically apply the tag across all child entities.
- Use Building for site-related tags, Car for vehicle monitoring areas, and Shield for high-security zones to make tag types instantly recognizable.
- Save Salvo Views with tags so operators can recall their full camera layout with a single click instead of navigating the device tree every session.
- Use the Exclude toggle in Health Check to hide cameras tagged "Under Maintenance" and focus only on active cameras.
- Use the Search Tags field in Video Activity during incidents to immediately narrow alarm events to only the cameras that matter.
Related Resources
- For managing the device hierarchy, refer to Organization & Hierarchy Setup
- For monitoring camera health, refer to HealthCheck
- For live view and saved layouts, refer to Live View Overview
- For contacting support, refer to Contact Support