SenStar
Introduction
This guide describes how to integrate and configure the Senstar Video Management System (VMS) within your security operations framework. It covers the key steps for configuring device connectivity, and integration with monitoring platforms. The goal is to enable seamless event telemetry from Senstar into GCX-ONE platform and ensure effective alerting, video correlation, and operational visibility.
Senstar’s video management offerings include the VMS software platform (e.g., Senstar Symphony Common Operating Platform) and supporting modules for cameras, video analytics, access control, and perimeter intrusion detection.
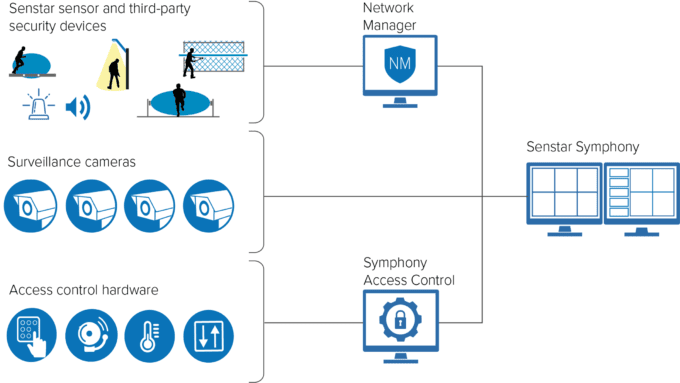
When used in your secure environment, the Senstar VMS acts as the central video & event engine:
- It aggregates video streams from cameras around the site.
- It collects alarms and status from sensors, analytics, and connected I/O.
- It provides a unified UI for operators and integrates with external platforms.
System Architecture
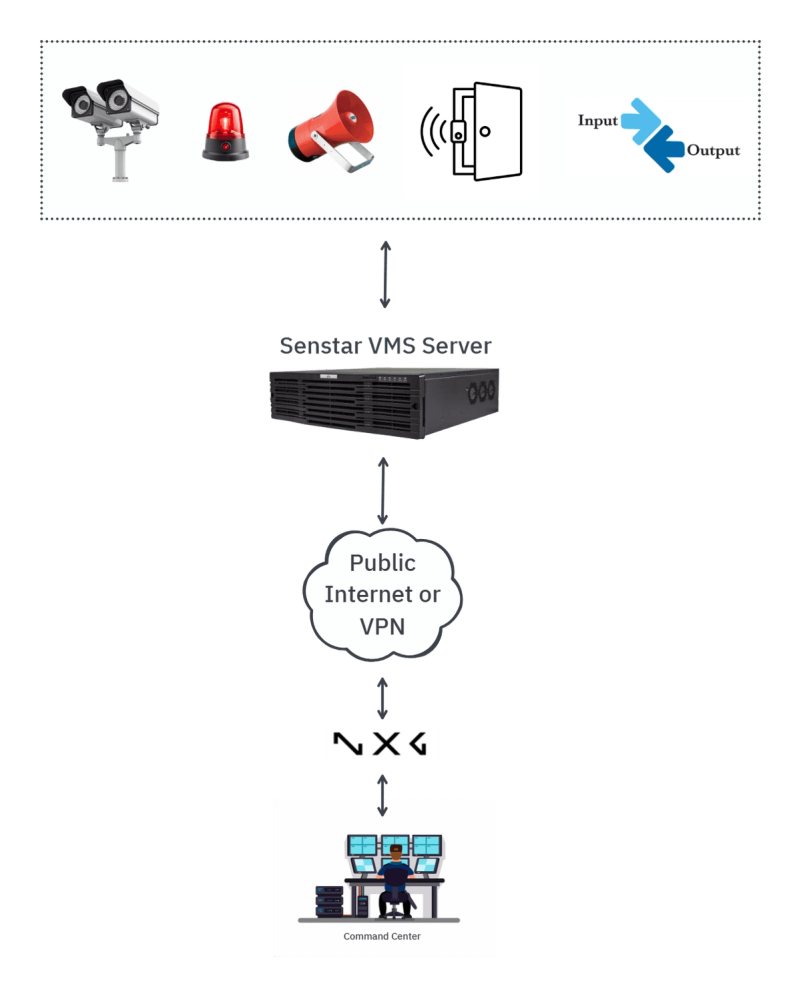
In a typical deployment:
- Cameras (IP/analog) stream into the Senstar VMS server (on-prem / appliance).
- Connected security sensors feed I/O and telemetry into the VMS or its sensor integration module.
- The VMS generates events (e.g., intrusion detection, sensor alarm, video analytic alert) that are forwarded to the central monitoring system via API, TCP, or SDK.
- GCX-ONE receives those events, perform false alarm filters, and triggers notifications to CMS accordingly.
SenStar Configuration
Pre-Integration Requirements
- Confirm the Senstar VMS version (8.10) and any required modules (e.g., video management, analytics).
- Ensure network connectivity (either public network access or through VPN) between the VMS server and the monitoring platform (GCX-ONE).
- Make sure the Mobile Bridge API Service is up and running. Detailed Senstar system configuration guide available here.
- Create or identify an integration user account in Senstar with sufficient administrator privileges to access event streams and alarms.
SenStar Config Guide with GCX-ONE
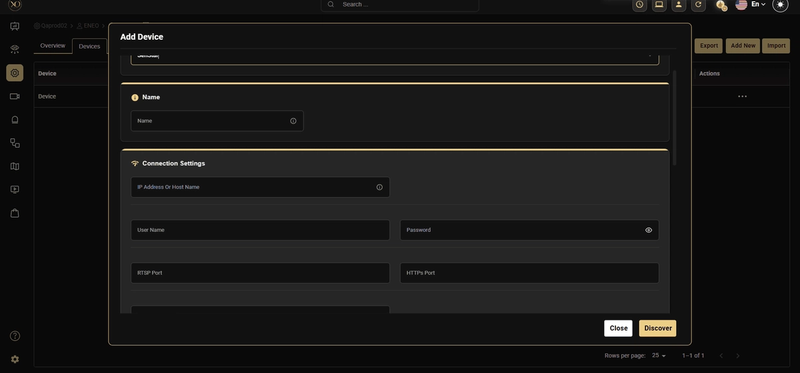
In the GCX-ONE platform, you can register the Senstar VMS instance as a device of type “SenStar”.This configuration establishes a secure communication channel between GCX-ONE and the Senstar Video Management System, enabling event synchronization, video stream access, and command & control.
Key Configuration Parameters
| Parameter Name | Description | Example Value |
|---|---|---|
| Device Type | Select SenStar as the device type to enable integration with the Senstar VMS platform. | SenStar |
| Device Name | A unique name to identify this VMS instance within GCX-ONE. This name will also appear in dashboards and event logs. | Tower01_VMS |
| Server IP / Hostname | The IP address or hostname of the Senstar VMS server or appliance where the Mobile Bridge is hosted. | 192.168.10.25 |
| HTTP/S Port | The Mobile Bridge API port used to access the Senstar API and event listener interface. Default value is 8433. | 8433 |
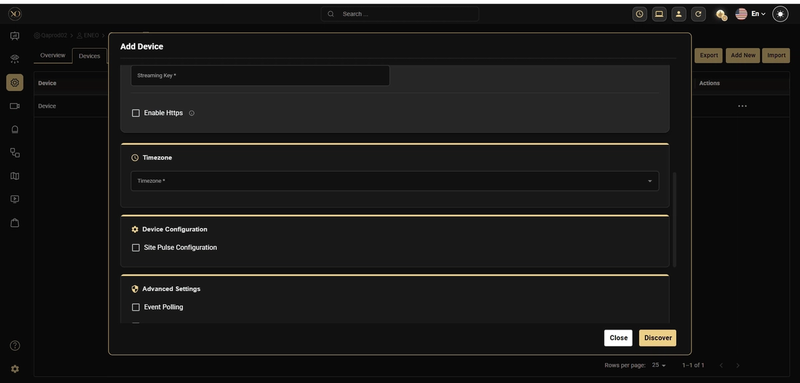
| Enable HTTPS | Toggle this option ON if the Senstar VMS server is configured to support secure HTTPS communication. | true |
| Username | The username of the integration account with API and event subscription privileges. | integration_admin |
| Password | The corresponding password for the integration account. | •••••••• |
| RTSP Port | The Mobile Bridge Video Proxy Port used for live and recorded video streams from connected cameras. | 8488 |
| Streaming Key | Encoded authentication token that replaces the plain password when accessing RTSP streams over unsecured protocols. | aHR0cHM6Ly8xOTIuMTY4LjEwLjI1OjU1NC9zdHJlYW0= |
| Device Timezone | The timezone of the Senstar VMS server. Ensure that it matches the system timezone configured in GCX-ONE to maintain event timestamp accuracy. | CET (+1:00) |
Streaming Key Generation
The Senstar VMS integration requires an encoded streaming password to securely access RTSP-based live and recorded video streams. This mechanism enhances security by avoiding direct exposure of the plain-text password during stream authentication.
Steps to Generate the Encoded Password
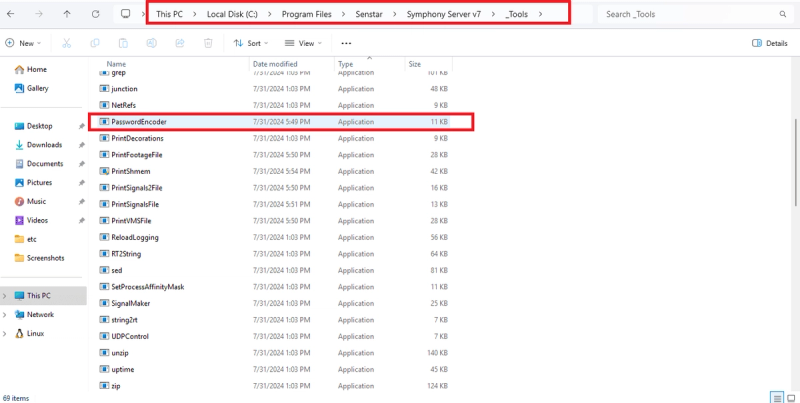
- Locate the Password Encoder Utility
The password encoding tool, PasswordEncoder.exe, is installed as part of the Senstar Symphony Server package.It cannot be downloaded separately. Ensure that the Senstar Symphony Server is installed on your system before proceeding.
-
Path:
-
C:\Program Files\Senstar\Symphony Server V7_Tools\PasswordEncoder.exe
-
Double-click PasswordEncoder.exe to launch the encoder utility.
-
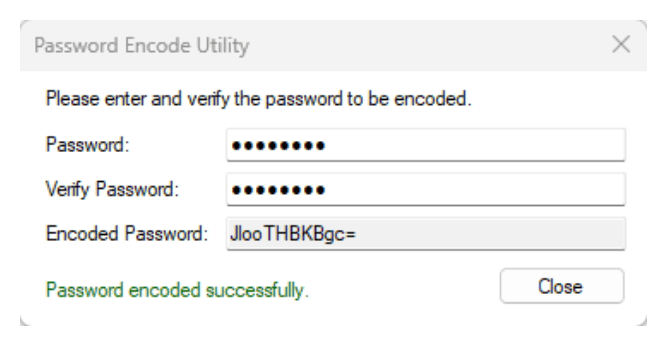
Enter the Device Password In the utility window, input the original (plain-text) device password that is configured in the Senstar VMS.
-
Copy the Encoded Password Once the password is encoded, copy the resulting Encoded Password string.
-
Paste the encoded password value into the Streaming Key field within the GCX-ONE Device Configuration page for your Senstar VMS instance.
Configuration Screenshot sample
Events and Rules Configuration
Configuring Senstar for Analytics and System Alarms
The Senstar VMS platform offers a comprehensive suite of video analytics that deliver real-time alerts that can be integrated with GCX-ONE for unified monitoring.
These analytics include features such as motion detection, camera tampering, license plate recognition, object tracking (people and vehicles), indoor/outdoor people counting, and advanced sensor fusion.
Before you can enable a video analytic for a camera, you must assign the appropriate analytic license to the device and configure any required parameters — such as drawing processing masks or calibrating the camera’s view.For detailed instructions on how to configure these analytics and system alarms, please refer to the official Senstar Configuration Guide provided by Senstar: Configuration Guide
Senstar Supported Analytics feature
| Analytics Feature | Description | Licensing / Notes |
|---|---|---|
| Camera Tampering | Detects when a camera’s field of view is obstructed or the camera is repositioned. | Requires analytic license per camera. |
| Signal Loss (Analog Video) | Monitors analog camera feeds for signal loss (e.g., solid color or no video). | Included in many core packs. |
| Indoor People Tracking | Tracks movement of people indoors, counts dwell time, reduces false alarms from shadows/reflections. | License varies by camera/environment. |
| Outdoor People and Vehicle Tracking | Optimized for outdoor environments, tracks people and vehicles under lighting/weather changes. | Often part of an “Outdoor Tracking” pack. |
| Left & Removed Item Detection | Detects when an item is left behind or removed within a defined scene. | Use case: object-left detection in public spaces. |
| Crowd Detection | Estimates number of people in an area; useful for capacity monitoring and alerts when thresholds exceeded. | Often requires advanced license. |
| License Plate Recognition (ALPR) | Reads and indexes vehicle license plates; integrates with access control or operational workflows. | Region-specific versions available. |
| Face Recognition | Detects and recognizes faces, triggers events based on known/unknown individuals. | Highest-tier license required. |
Action Set Configuration Guide
The Action Set configuration in Senstar Symphony VMS defines what actions the system performs when specific rules or events are triggered — for example, sending a notification, activating an external device, or forwarding an alarm to a third-party platform.
In the GCX-ONE platform integration, Action Sets play a key role in ensuring that all analytic or system events from Senstar are forwarded reliably to GCX-ONE over a TCP connection. Once Events and Rules are configured within Senstar, an Action Set must be created and linked to those rules to complete the integration.
Pre-requisites
Before configuring Action Sets for GCX-ONE:
In GCX-ONE: navigate to Device → Edit → Unique Reference Number.
- The Senstar VMS device must already be added to GCX-ONE and have a valid Unique Reference Number (deviceId).
- Events and Rules should be configured in Senstar for the cameras or analytics you want to monitor.
- Network access must be allowed from the Senstar VMS to the GCX-ONE cloud server on the specified TCP port.
Creating an Action Set in Senstar
Follow the standard Senstar procedure to create a new Action Set:
- Open Senstar Symphony Server Configuration Client.
- Go to Rules and Actions → Action Sets.
- Click New Action Set.
- Enter a descriptive name for the Action Set (e.g., GCX-ONE_Alarm_Forwarder).
- Under Actions, click Add Action → select TCP.
GCX-ONE-Specific TCP Configuration
In the TCP Message configuration, apply the following settings:
| Parameter | Value | Description |
|---|---|---|
| Address | 18.158.38.178 | GCX-ONE TCP alarm receiver endpoint |
| Port | 19232 | GCX-ONE TCP listening port |
| Message (JSON) | (see below) | JSON body containing event metadata |
Message JSON Format
{
"deviceId": "<<GCX-ONE Device ID>>",
"Camera": "%c",
"cameraName": "%e",
"file": "%f",
"RuleName": "%b",
"Policy": "%o",
"metadata": "%md",
"AlarmTime": {
"year": "%YYYY",
"month": "%MM",
"date": "%DD",
"hour": "%hh",
"minute": "%mm",
"second": "%ss",
"ms": "%fff"
}
}
Parameter Description
| Field | Description |
|---|---|
| deviceId | Unique Reference Number of the device registered in GCX-ONE (replace manually). |
| Camera | Internal camera ID from Senstar. |
| cameraName | Display name of the camera associated with the rule. |
| file | File path or name of the captured image or video clip associated with the event. |
| RuleName | The name of the triggering rule in Senstar. |
| Policy | The policy name under which the rule is configured. |
| metadata | Analytical or contextual metadata generated by Senstar (if available). |
| AlarmTime | Structured timestamp of when the alarm was triggered, including milliseconds. |
Placeholder Reference (Senstar Syntax)
The placeholders such as %c, %e, %f, etc. are dynamic variables replaced automatically by Senstar when an event occurs:
| Placeholder | Value |
|---|---|
| %c | Camera ID |
| %e | Camera Name |
| %f | File Name |
| %b | Rule Name |
| %o | Policy Name |
| %md | Metadata |
| %YYYY | Year |
| %MM | Month |
| %DD | Day |
| %hh | Hour |
| %mm | Minute |
| %ss | Second |
| %fff | Milliseconds |
Testing and Verification
- Trigger a known rule in Senstar (e.g., motion or analytics alert).
- In GCX-ONE, verify that the corresponding event appears in Video activity search or device level alarm dashboard.
- If no events appear, confirm network reachability to 18.158.38.178:19232 and verify that the Action Set is active.
Best Practices
- Always test connectivity with telnet 18.158.38.178 19232 before saving.
- Ensure firewall or outbound network policies allow TCP traffic to the GCX-ONE endpoint.
- Avoid modifying placeholder syntax — any incorrect character will break JSON parsing.
- Use UTC timestamps where possible to maintain time sync between Senstar and GCX-ONE.
Integrations Features Overview
The GCX-ONE platform integrates seamlessly with the Senstar Symphony VMS through a combination of Mobile Bridge APIs, RTSP streaming, and TCP-based alarm forwarding. This integration enables unified management, monitoring, and analytics for all connected cameras and sensors within the Senstar ecosystem.
| Feature | Description | API/Protocol Used | GCX-ONE Integration Status |
|---|---|---|---|
| Device Discovery | Automatically retrieves the list of configured cameras, encoders, and input/output channels from the Senstar VMS. | Mobile Bridge API | Integrated |
| Live Stream | Provides real-time video streaming from cameras connected to the Senstar VMS for live monitoring. | RTSP | Integrated |
| Playback Stream | Enables access to recorded or historical footage from Senstar’s video archive. | RTSP | Integrated |
| Timeline Control | Displays the recorded video timeline for each camera, allowing smooth scrubbing and playback control. | Mobile Bridge API | Integrated |
| PTZ and Preset Control | Allow pan, tilt, and zoom control of supported cameras, and the ability to trigger predefined PTZ presets. | Mobile Bridge API | Integrated |
| Alarms | Forwards real-time event notifications (analytics, system, or rule-based alarms) to GCX-ONE using Action Sets. | TCP | Integrated |
Summary
By following this guide, you will be able to configure your Senstar VMS instance to feed live video and alarm event data into your GCX-ONE monitoring ecosystem. This integration helps unify video surveillance, sensor alarms, and makes your monitoring operations more responsive and holistic.