Roles and Permissions
What RBAC Does
Role-Based Access Control (RBAC) in GCXONE gives administrators granular control over what users can do and which entities they can see.
Entity access and privileges are separate concepts in GCXONE. Privileges (configured in the role) determine WHAT actions a user can perform. Entity access determines WHICH customers, sites, devices, and sensors they can see. User-level customization is done through entity access only — there are no user-level privilege overrides.
Why It Matters
- "I have to jump between multiple pages to see what access a role actually grants"
- "Creating a new role takes forever with too many configuration steps"
- "I can't quickly tell what permissions my users have"
- "Two users in the same role need access to different customers, but I have to create separate roles for each"
How It Works
A role is the core unit of access control in GCXONE. Each role combines three elements:
Role Information & Users: Basic role details (name, description, default role toggle) and the users assigned to this role.
Module Privileges: Which platform modules users can access, and which specific capabilities are enabled within each. Privileges determine WHAT a user can do.
Entity Assignments: Which customers, sites, devices, and sensors users can access. Entity access determines WHERE a user can operate. Entity assignments can be configured at two levels:
- Role-Level Entities: Entities assigned within the role itself, shared by all users in the role
- User-Level Entities: Entities assigned to individual users through Edit Entity Access, allowing different users in the same role to access different customers or sites
Previously, if two users needed the same privileges (e.g., Admin access) but managed different customers, you had to create two separate roles. Now, create one role and customize entity access per user through Edit Entity Access.
Entity Hierarchy
GCXONE organizes entities in a hierarchical structure. The Service Provider is the top-level account (your tenant), and all entities are nested beneath it: Service Provider → Customer → Site → Device → Sensor.
Cascading selection: Selecting a customer automatically includes all sites, devices, and sensors beneath it. This ensures new entities are automatically included when using the Include Children toggle and simplifies configuration.
Permission Resolution: When a user has multiple roles (direct assignments + group memberships), all privileges combine additively. Changes take effect within 5 seconds across web and mobile platforms.
Key Capabilities
Default Roles
GCXONE includes pre-configured roles to help you get started quickly. Each role comes with a defined set of module privileges. Entity access can be further customized per user.
- Super Admin — Full platform access with complete control over all modules, users, roles, and settings. Complete administrative access to all system features. Can manage all users, roles, and permissions. Full access to all entities. Configure system-wide settings and audit logs. One Super Admin per tenant. Cannot be deleted.
- Admin — Administrative access — can manage users, roles, configuration, and reports, but not billing. Manage users and role assignments. Configure system settings. Create and manage Entity Groups. View audit logs and reports. Cannot access billing. Cannot delete critical system components.
- Operator — Operational access — can view and manage configuration and reports but cannot delete or administer users/roles. Day-to-day monitoring and alarm processing. View dashboards and configuration. Generate and view reports. Handle operational tasks. Cannot delete system components. Limited administrative capabilities.
- Installer — Field technician access — can manage devices, sensors, and network configuration. Manage physical devices and sensors. Configure network settings. Install and set up hardware. Troubleshoot device issues. Cannot manage users or roles.
- End User — Read-only access to dashboards, configuration, and reports. View dashboards and basic configuration. Access basic reports. View assigned cameras and devices. Arm/disarm for assigned devices/sites. No ability to change settings or administer the system.
You can use these default roles as-is, customize them, or create new roles from scratch.
Module Privileges
Privileges are organized by platform module. Each module has an Access Page toggle and granular capability settings. Privileges determine WHAT actions a user can perform across the platform.
- Dashboard — Access Page toggle, Accounts filter, Capability filter
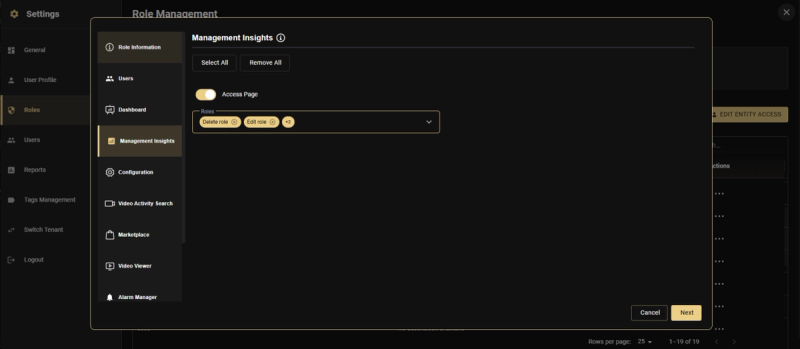
- Management Insights — Enable Role, Edit Role, and additional analytics capabilities
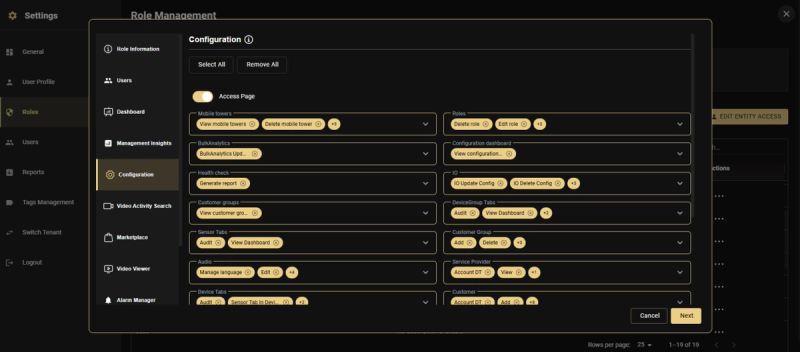
- Configuration — Mobile Users, Roles, SubAnalytics, Health Check, Customer Groups, Sensor Table, Audits, Dealer Table, Service Provider Table, IoT, Group/Stage Table, Customer Group, Service Provider, Customer, Site, Configuration Dashboard
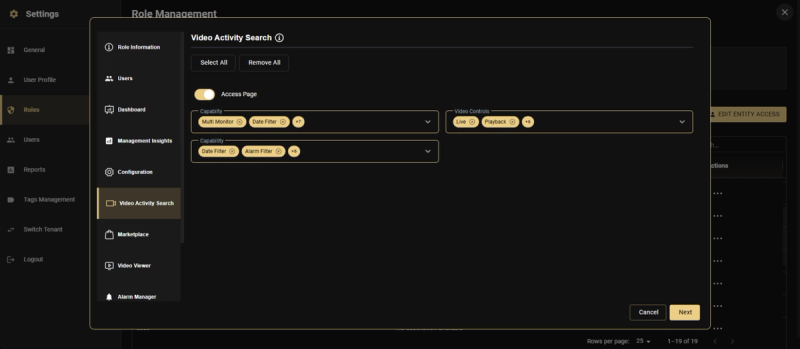
- Video Activity Search — Edit Saved, Use Filter, Live, Playback, Edit Filter, Alarm Filter
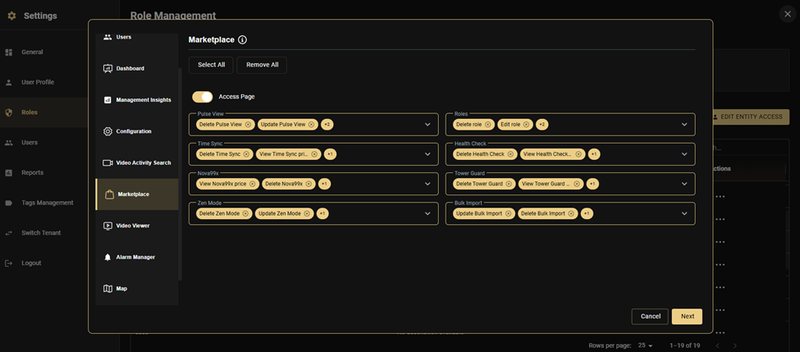
- Marketplace — Pulse View, Roles, Time Sync, Health Check, Timer Count, Zen Mode, Bulk Import
- Video Viewer — Video Controls, Capability toggles
- Alarm Manager — Video Controls, Capability toggles
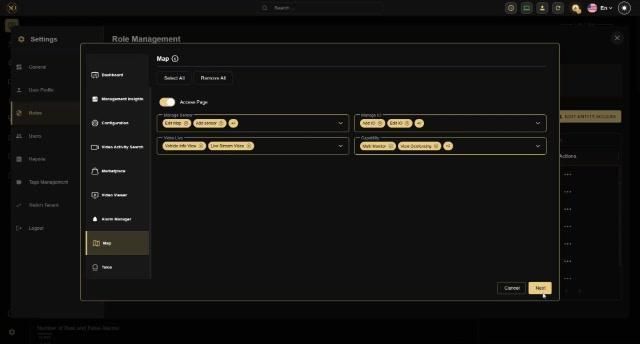
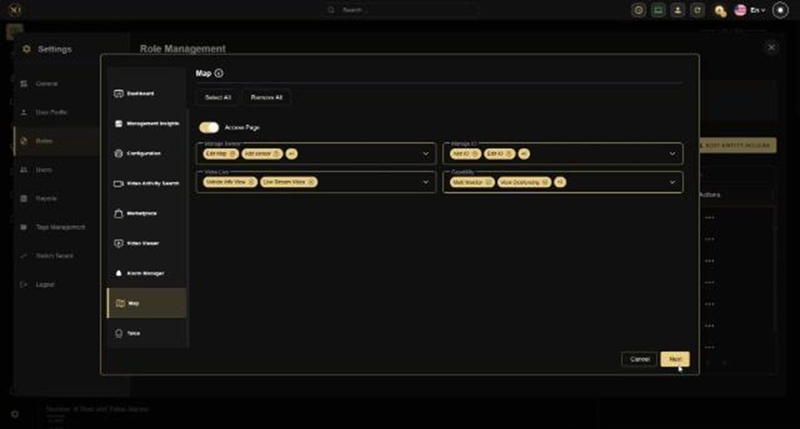
- Map — Edit Map, Add Sensor, Add IO, Edit IO, Manage Review, Manage IO, Video Live, Live Stream View, Wall Monitor, View Dashboard
Each module has a Select All / Remove All option for quick bulk configuration, plus an Access Page toggle that enables or disables the entire module.
Entity Access: Three Modes
When configuring entity access during role creation (or editing), three modes are available. Entity access determines WHERE a user can operate — it controls which customers, sites, devices, and sensors are visible and accessible to the user.
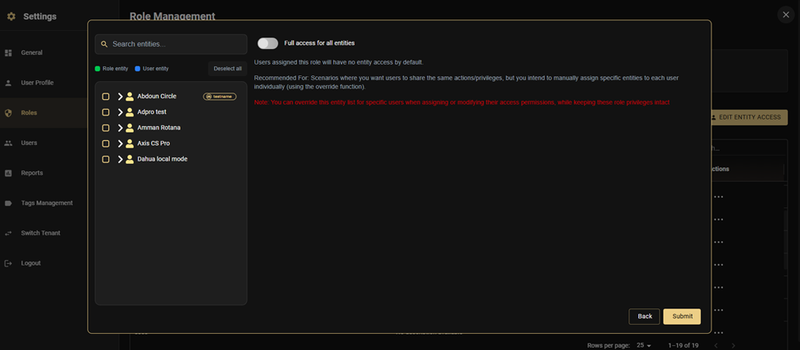
- No Entity Access — Users have no entity access by default. Must be assigned per user via Edit Entity Access. Best for: Shared role with individual entity assignments.
- Selected Entities — Users are restricted to the specifically selected entities (with or without children). Best for: Specific sub-lists or tenants with identical access.
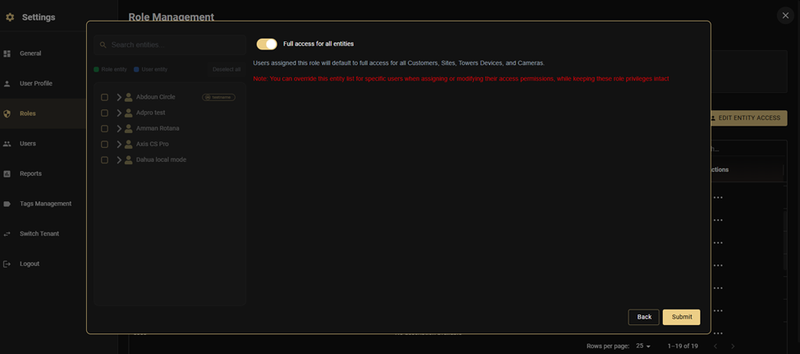
- Full Access — Users default to full access for all Customers, Sites, Devices, and Sensors. Best for: Admin or super-user roles needing unrestricted access.
Regardless of Mode: You can always customize the entity list for specific users through Edit Entity Access, overriding or extending the role-level assignments while keeping their role privileges intact.
The Include Children Toggle: When selecting entities in the tree view, each entity has an Include Children toggle (shown as a blue slider next to the entity name). This toggle has a critical impact on how access works:
Without Include Children: Only the manually selected entities are included. If you select Site A and its 5 devices and 30 sensors individually, the user gets access to exactly those items. Future devices or sensors added under that site will NOT be included automatically — you would need to manually go back to Edit Entity Access and select the new device.
With Include Children: You only need to select the parent entity (e.g., Site A). All devices and sensors underneath are automatically included. Any future devices or sensors added under that site are automatically included — no manual updates needed.

Use Include Children whenever possible. It saves time and ensures new devices are automatically accessible to the right users. Only use manual selection when you specifically need to restrict access to a fixed set of entities.
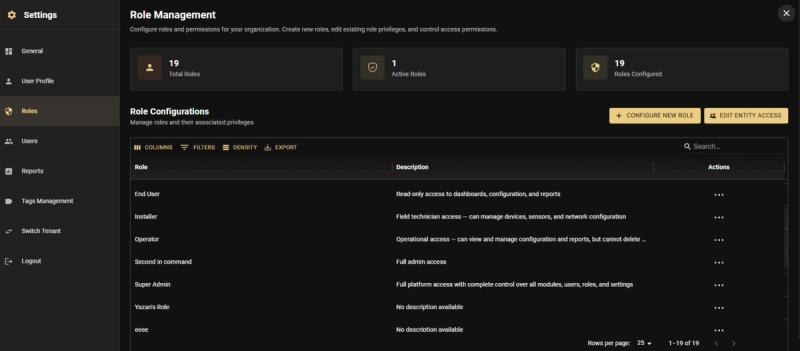
Managing Roles
Navigation: Settings → Roles
The Role Management page displays all configured roles with their descriptions and provides two main action buttons:
- Configure New Role — Opens the guided role creation wizard
- Edit Entity Access — Opens the per-user entity access management interface

Creating a Role
Navigation: Settings → Roles → Configure New Role
The role creation wizard guides you through a multi-step process. Each step is accessible via its tab in the left sidebar.
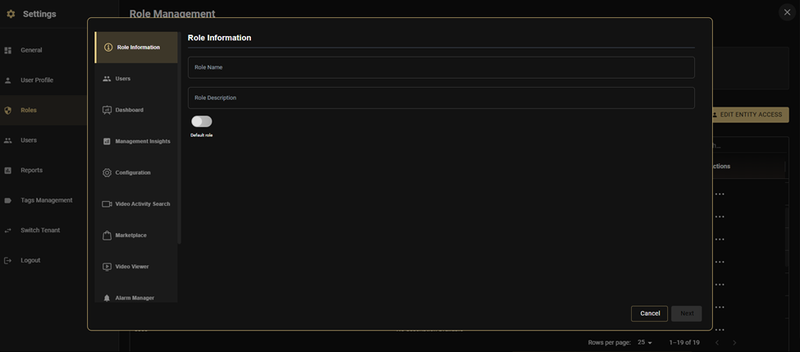
Step 1: Role Information
- Role Name — A unique name identifying the role (e.g., "Regional Admin", "View-Only Operator")
- Role Description — A brief description of the role's purpose
- Default Role toggle — When enabled, this role will be automatically assigned to new users when they are invited to the platform. This is useful for base-level roles like "End User" that every new team member should start with.
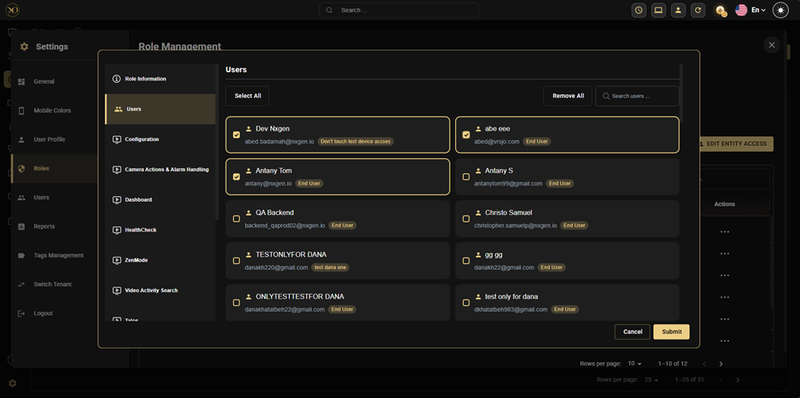
Step 2: Users
Select which users should be assigned to this role. The Users step displays all available users in a searchable grid with their current role badges. Click on a user card to select them (highlighted with a gold border). Use Select All, Remove All, or Search Users for bulk management.
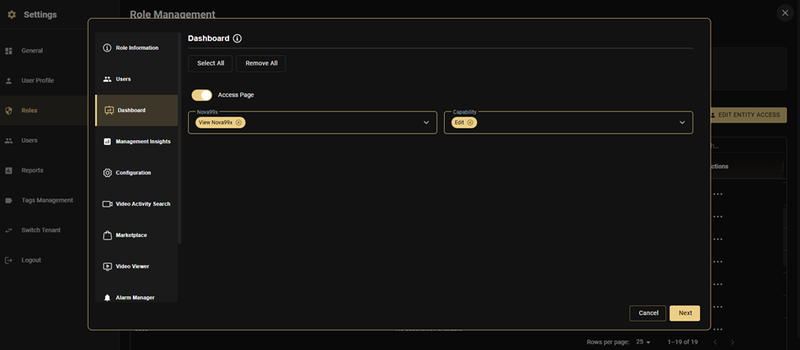
Step 3: Module Privileges
Configure access for each platform module. The wizard presents each module as a separate tab in the sidebar. For each module:
- Toggle Access Page on/off to enable or disable the entire module
- Use Select All / Remove All for quick bulk selection of capabilities
- Select individual capabilities from the dropdown menus to fine-tune access
Dashboard:
Management Insights:
Configuration:
Video Activity Search:
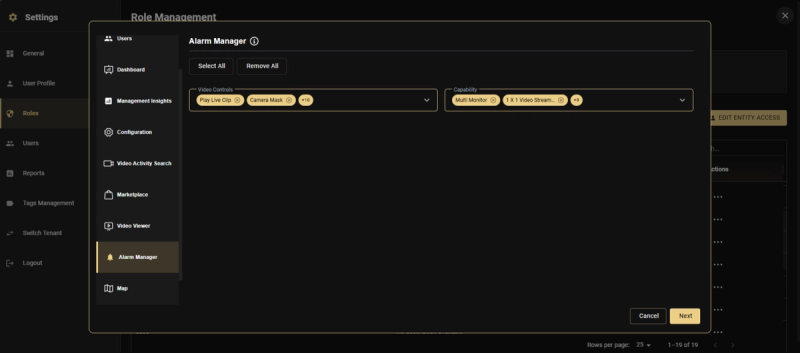
Alarm Manager:
Marketplace:
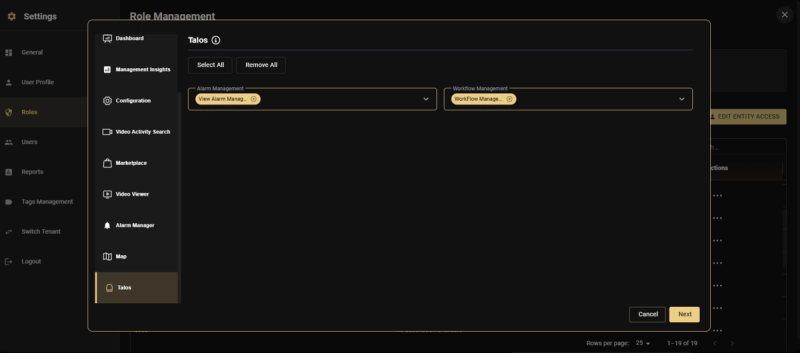
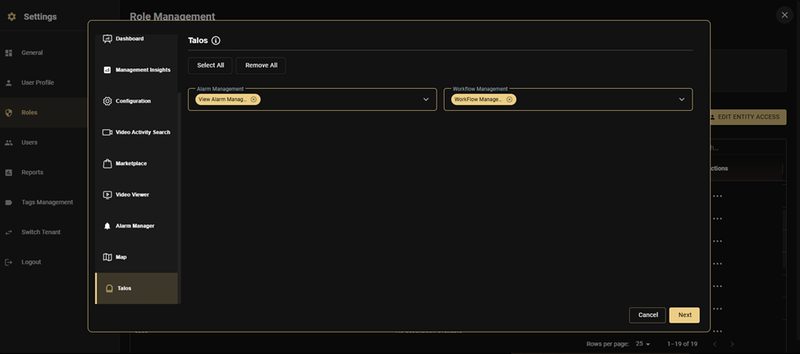
Talos:
Map:
Step 4: Entity Assignment
The final step configures which entities users of this role can access. The entity tree is displayed on the left side with checkboxes for selection and Include Children toggles for each entity.
Full Access for All Entities (toggle ON): Users assigned this role will default to full access for all Customers, Sites, Towers/Devices, and Cameras.
No Entity Access (toggle OFF, no entities selected): Users assigned this role will have no entity access by default. Recommended for scenarios where you want users to share the same privileges, but you intend to manually assign specific entities to each user individually using the Edit Entity Access feature.
Selected Entities (toggle OFF, entities checked): Users assigned this role will be restricted to the selected entities. With the Include Children toggle enabled on specific items, all sub-entities (current and future) are automatically included.
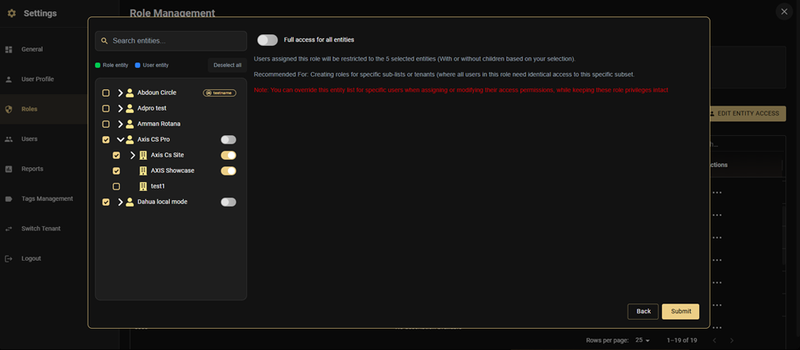
Warning: When selecting entities without Include Children, only the currently existing and manually selected items are included. New devices added later will NOT be automatically accessible. Always consider using Include Children to future-proof your entity assignments. Example: You assign User X to Site A, which currently has 1 device. If a new device is later added under Site A and Include Children was disabled, User X will still only see the original device. You would need to manually go to Edit Entity Access and add the new device for that user.
Click Submit to create the role.
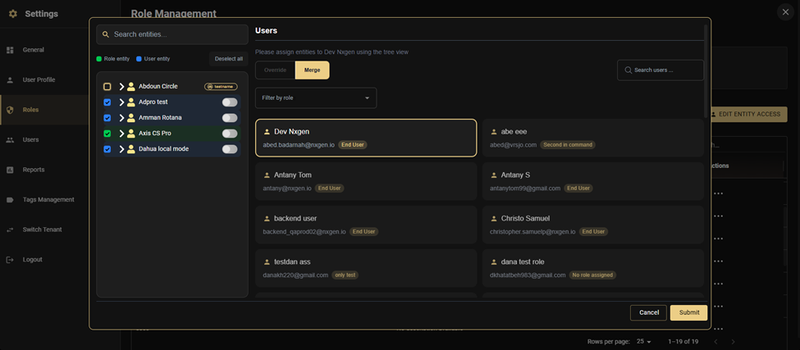
Edit Entity Access (Per-User Entity Management)
Navigation: Settings → Roles → Edit Entity Access
This is the key feature that allows you to customize entity access for individual users without creating separate roles. Remember: entity access determines WHERE a user can operate, not what they can do. Privileges always come from the role.
The interface is split into two panels:
- Left panel: Entity tree with Role Entity, User Entity, and Connected To tabs
- Right panel: Users list with search, role filtering, and Override/Merge mode tabs
How to Customize a User's Entity Access
- Click Edit Entity Access from the Role Management page
- Select a user from the right panel by clicking their card
- Choose the mode: Override or Merge
- Use the entity tree on the left to select or deselect entities for that specific user
- Enable Include Children on entities where you want to include all current and future sub-entities. This is crucial for ensuring that any newly added cameras, devices, or sensors under a parent entity are automatically included in the user's entity access list without requiring manual updates. Example: You assign User X to Site A, which currently has 1 device. The next day, a new device is added under Site A (now 2 devices total). If Include Children was disabled for Site A, User X will still only see the original device and will NOT have access to the newly added one. If Include Children was enabled, User X automatically sees both devices — no manual update needed.
- Click Submit to save changes
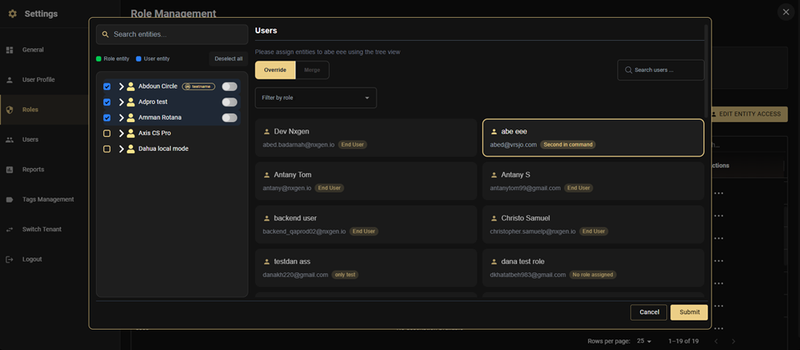
Override vs. Merge
Override Mode: The user's custom entity selection REPLACES the role-level defaults. Whatever you select for this user overrides what the role provides. Use this when you want complete control over a specific user's entity access.
Merge Mode: The selected entities are ADDED on top of the role's existing entity assignments. The user gets both the role-level entities AND the additional user-level entities. Use this to extend a user's access beyond what the role provides.
You can also filter the user list by role using the dropdown at the top of the right panel, making it easy to manage entity access for all users of a particular role.
Tip: Use the "Filter by role" dropdown to quickly find all users assigned to a specific role and customize their entity access in bulk.
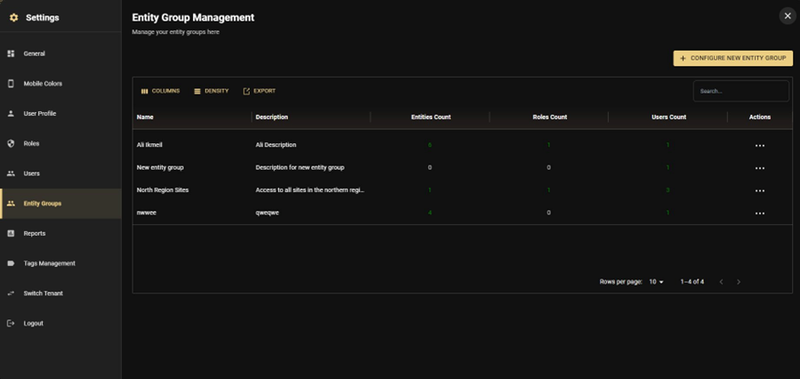
Managing Entity Groups
Navigation: Settings → Entity Groups
Entity Groups are saved, reusable collections of entities (customers, sites, devices, and sensors) that act as templates. Instead of manually selecting the same entities every time you configure a role or assign user access, you define the group once and apply it wherever needed. Think of an Entity Group as a named shortcut for a specific set of entities.
Entity Groups: Define the group once, then select it by name when assigning entity access to any role or user. Any role or user assigned that group automatically gets the correct entities.
The Entity Groups page lists all existing groups in a table showing Name, Description, Entities Count, Roles Count, and Users Count. From here you can search, export, and configure new groups using the Configure New Entity Group button.
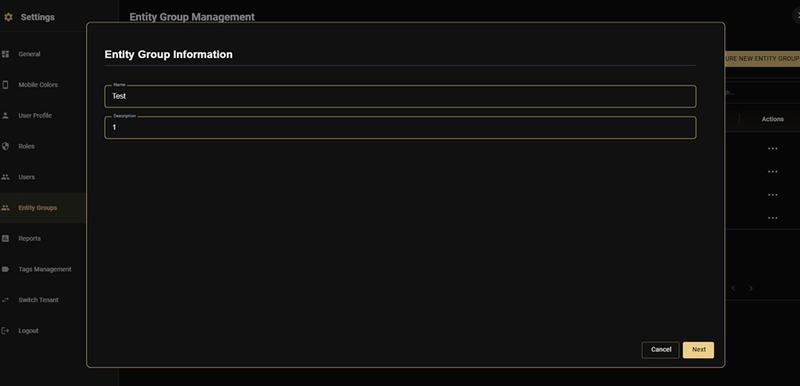
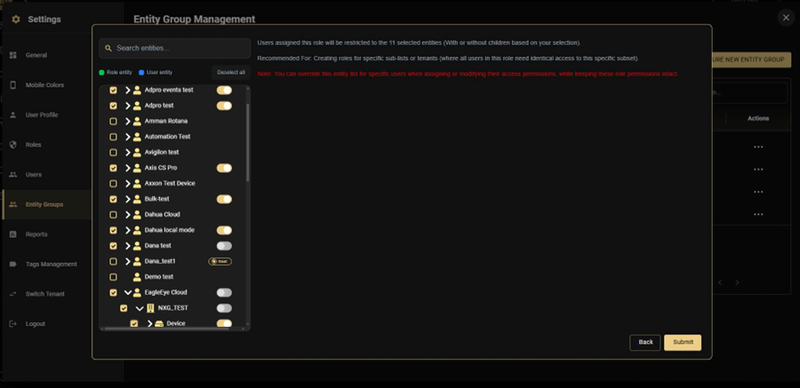
Creating an Entity Group
Click Configure New Entity Group to open the two-step creation wizard.
Step 1 — Group Information: Enter a Name and an optional Description for the group, then click Next.
Step 2 — Select Entities: Use the entity tree to check the customers, sites, devices, or sensors to include in this group. Use the Include Children toggle next to any entity to automatically include all current and future sub-entities beneath it. A summary on the right shows how many entities are selected and which roles and users are currently affected. Click Submit to save the group.
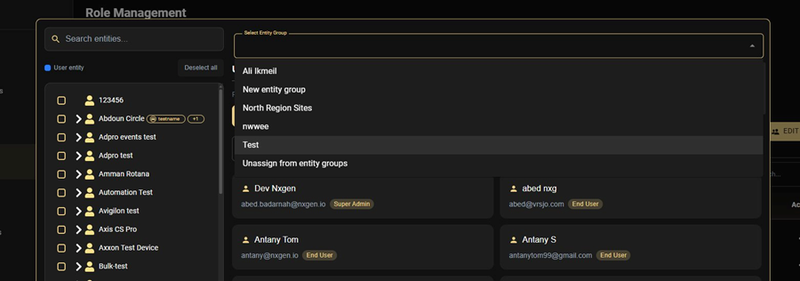
Assigning an Entity Group to a Role or User
Entity Groups can be applied in two places:
-
During role entity assignment (Step 4 of role creation/editing): In the entity selection screen, use the Select Entity Group dropdown to apply a saved group. All entities in that group are immediately loaded into the selection. All users of the role will inherit those entities.

-
In Edit Entity Access (per-user): After selecting a user in the Edit Entity Access panel, use the Select Entity Group dropdown at the top to quickly load a group's entities for that user. The Override or Merge mode setting still applies — the group simply pre-populates the entity selection.
Tip: Entity Groups are especially useful when multiple roles or users need access to the same set of sites or customers. Create the group once, then apply it across as many roles and users as needed. If the entity list ever changes, update the group in one place and all assigned roles and users automatically reflect the change.
Editing a Role
Navigation: Settings → Roles → [Role Name] → Edit (via Actions menu)
The edit flow uses the same wizard interface as role creation. Modify any step — Role Information, Users, Module Privileges, or Entity Assignments — then save. Changes affect all users with this role immediately.
Warning: Removing module access or entities may disrupt user workflows. Verify who has this role before making significant changes.
Deleting a Role
Navigation: Settings → Roles → [Role Name] → Delete (via Actions menu)
The system warns if users are currently assigned to the role and lists affected users. System roles (Admin, Super Admin) cannot be deleted.
Best Practices
Example 1: Two Regional Admins, One Role
Scenario: You have two regional admins who need identical privileges (full monitoring, alarm control, video export) but Admin A manages Northeast customers while Admin B manages Southeast customers. Previously, this required two separate roles. Now you need just one.
Step 1 — Create the role with no default entity access:
- Go to Settings → Roles → Configure New Role
- Role Information: Name = "Regional Admin", Description = "Full monitoring and alarm control for assigned region"
- Users: Select both Admin A and Admin B from the user grid
- Module Privileges: Enable Dashboard, Video Viewer, Alarm Manager, Map with desired capabilities
- Entity Assignment: Leave "Full access for all entities" OFF and do NOT select any entities. Click Submit.
Step 2 — Assign entity access per user:
- Go to Settings → Roles → Edit Entity Access
- Select Admin A → Choose Merge → Check all Northeast customers (with Include Children enabled) → Submit
- Select Admin B → Choose Merge → Check all Southeast customers (with Include Children enabled) → Submit
Result: Both admins share the exact same role and privileges, but Admin A only sees Northeast customers while Admin B only sees Southeast customers. One role instead of two. When new sites or devices are added under their assigned customers, they're automatically included thanks to Include Children.
Example 2: View-Only Operator
Scenario: Operators who should only view cameras during their shift — no video export, no alarm control, just live viewing and playback for specific sites.
Configuration:
- Settings → Roles → Configure New Role
- Role Information: Name = "View-Only Operator"
- Users: Select the operators who need this role
- Module Privileges: Enable only Dashboard (view only) and Video Viewer (with Live View and Playback). Leave all other modules disabled.
- Entity Assignment: Select specific sites these operators cover in the entity tree with Include Children enabled
Operators can watch cameras but cannot export footage, access configuration, or control alarms. Perfect for entry-level staff or third-party monitoring services.
Example 3: Installer with Site-Specific Access
Scenario: A field installer needs access to a specific customer site to manage devices and configure sensors. They should only see the entities relevant to their current assignment.
Configuration:
- Create role "Installer" (or use the default Installer role)
- Module Privileges: Enable Configuration (devices, sensors, network settings), Video Viewer (Live View for testing)
- Entity Assignment: No default entity access
- Edit Entity Access: Select the installer user → Merge → Select only the specific site they're working on with Include Children enabled
The installer can only see and manage the specific site and all its devices/sensors. When a new device is installed at that site, it's automatically accessible. When the job is done, remove their entity access or reassign to the next site.
Example 4: Mobile App Access for Field Technicians
Scenario: Field technicians need mobile app access to sites they service, with camera viewing and alarm control.
Configuration:
- Create role "Field Technician" via the role wizard
- Module Privileges: Enable Video Viewer (Live View), Alarm Manager (Arm/Disarm), Map (Live Stream View)
- Entity Assignment: No default entity access. Use Edit Entity Access to assign each technician their service area with Include Children enabled.
Mobile App Behavior: The technician logs into the GCXONE mobile app and sees only their individually assigned sites. They can view live cameras and arm/disarm from their phone. Permission changes apply to mobile within 5 seconds. No need to manage mobile permissions separately or create individual roles.
Related Resources
- For understanding the entity hierarchy, refer to Organization & Hierarchy Setup
- For managing users, refer to User Management
- For understanding audit logs, refer to Audit
- For contacting support, refer to Contact Support