First-Time Login & Access
Overview
This section outlines the complete process for accessing GCXONE for the first time. It covers account registration, verification, password setup, and the initial login procedure. Each step must be completed in sequence to activate successfully and access the platform.
Note: There are two ways to access GCXONE for the first time:
- Self-registration (new users create their own account)
- Administrator-created accounts (users receive a temporary password)
Follow the steps below based on your account setup. Some steps may not apply depending on whether your account was self-registered or created by an administrator.
Account Registration & Activation
Alternative Access Method : If your account was created by your administrator, you will receive a temporary password via email instead of registering manually. In this case, proceed directly to the login steps below.
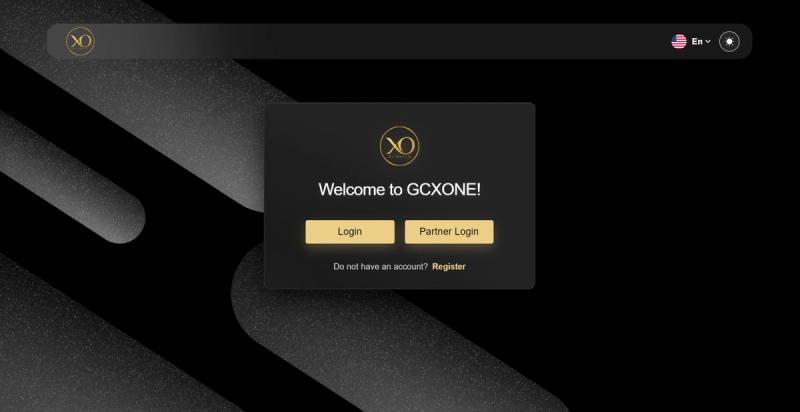
Access the Registration Portal
Navigate to the GCXONE Portal (https://gcx.nxgen.cloud/) using a supported web browser (Chrome, Edge, or Firefox).
Upon accessing the portal, the following elements are displayed:
- A professional login interface
- A prominent Register button for new users
Select Register to begin the onboarding process.
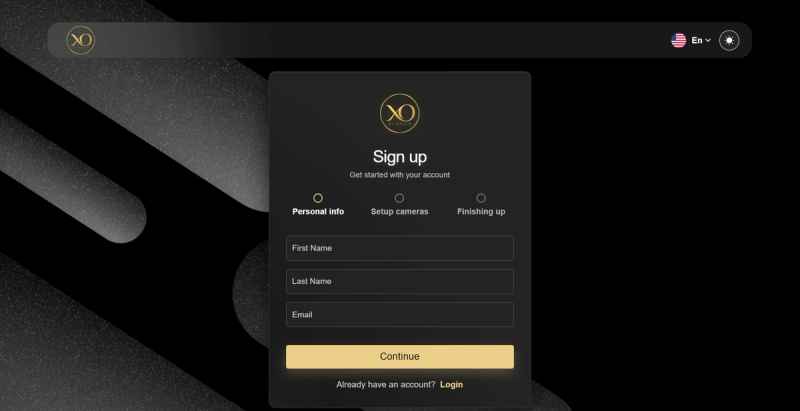
Complete the Sign-Up Process
The onboarding follows a guided three-stage wizard: Personal Info → Setup Cameras → Finishing Up
Each stage must be completed before proceeding.
Stage 1: Personal Information
Enter the following details:
- First Name — Account holder's first name
- Last Name — Account holder's last name
- Email — A valid business email address
Select Continue to proceed.
Stage 2: Setup Cameras
Configure your tenant environment and select a deployment type.
Tenant Configuration:
- Tenant Name — Enter the official name for the tenant environment
- Logo (Optional) — Upload a company logo for branding
Camera Selection — choose the option that aligns with your environment:
| Option | Description |
|---|---|
| Demo Camera | Instant platform access, full feature availability, no hardware required |
| Existing Camera | Compatible with most IP cameras, guided setup wizard, technical support available |
Select Continue to proceed.

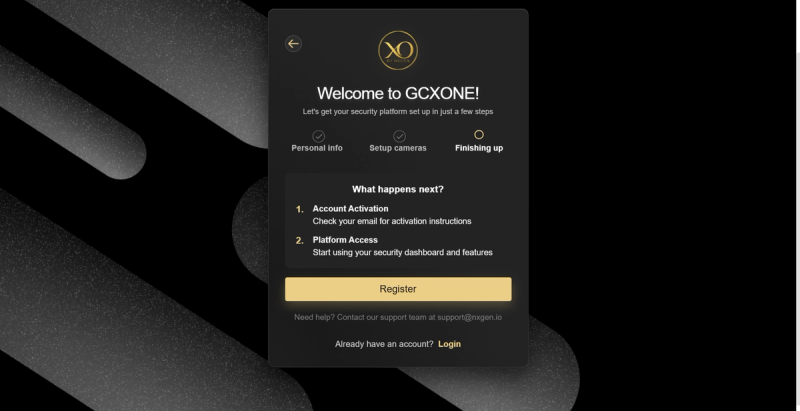
Stage 3: Finishing Up
The final stage summarizes the activation process.
- Account Activation — Check your email for activation instructions
- Platform Access — Access the dashboard after activation is completed
Select Register to finalize the registration.
Account Verification & Password Setup
Email Verification
After completing registration, a verification email is sent from: support@nxgen.io
Open the email and select Confirm my account to activate your account.
️ Ensure emails from nxgen.io are not blocked by spam filters.
If the verification email is not received:
- Check spam or junk folders
- Add nxgen.io to your email whitelist
- Verify that corporate firewall policies are not blocking automated emails
- Contact your IT department if filtering is suspected
Password Creation
After confirming your account, you will be redirected to the secure password setup page hosted by Auth0.
Password Requirements:
- Minimum 8 characters
- At least 3 of the following: lowercase letters, uppercase letters, numbers, special characters (e.g. !@#$%^&*)
Re-enter the password to confirm and select Reset password.
Login Process
The following steps apply to all users after account setup is completed (either through self-registration or administrator invitation).
Initial Login
Return to the GCXONE portal and sign in using your newly created credentials.
If you received a temporary password from your administrator, use it to sign in. You will be prompted to create a new password on first login.
Each user logs in with assigned credentials. Access is controlled based on role configuration — users only see features and entities relevant to their permissions.
Dashboard Overview
After successful authentication, you are redirected to the GCXONE Dashboard — the central operational interface of the platform.
The dashboard displays:
- Total Alarms — overall alarm count across all sites
- Alarms Passed — alarms processed and forwarded
- Alarms Filtered Out — false alarms suppressed by NOVA99x
- Unhealthy Cameras — devices flagged by HealthCheck
- Checked Cameras / Healthy Cameras — camera health summary
- Connection Failure — devices with connectivity issues
- Real vs False Alarms — pie chart showing alarm accuracy ratio
Additional interface elements:
- Left-side navigation menu for core modules
- Global search bar for quick navigation
- Top-right controls: language selection, notifications, dark/light mode, and account options
- Customer and site filters for scoped views
- Time range selector for historical data
The dashboard adapts based on your role — operators see alarm widgets, managers see KPIs, and technicians see device health.
After logging in, review your user profile and ensure that your contact information and notification preferences are correctly configured.
Login Troubleshooting
If you did not receive a temporary password:
- Check your spam or junk folder
- Contact your administrator to resend the invitation
If your temporary password has expired:
- Request a new password from your administrator
If your account is locked after multiple failed login attempts:
- Wait 15 minutes before trying again
- Contact support if the issue persists