Customer Groups
Customer Groups are the primary tool for segregating data within a single Tenant. They allow you to define which specific customers a user can see without needing to create hundreds of individual roles.
What Are Customer Groups?
Customer Groups provide a flexible way to control which customers a user can access without creating separate roles for each customer. This is particularly useful when you have multiple customers and want to use standardized roles.
Purpose and Benefits
Customer Groups provide a mechanism to restrict the visibility and access of specific users to a subset of data within a tenant. This is particularly useful for:
Segregating Customer Data
- If a monitoring station (Service Provider) handles multiple installers, you can group customers by installer
- Users assigned to "Customer Group A" will not see sites or data from "Customer Group B"
Production vs. Test Sites
- Separate production sites from test/trial sites
- Prevent operators from viewing or acting on test alarms by restricting them to the "Production" Customer Group
Without Customer Groups
- Users at Service Provider level would see all customers by default
- You would need to create separate roles for each customer or segment
- Managing permissions becomes complex as you scale
With Customer Groups
- Create one unified role (e.g., "End User" or "Operator")
- Assign different Customer Groups to different users
- Each user sees only their designated customer(s)
- Role permissions remain consistent across all customers
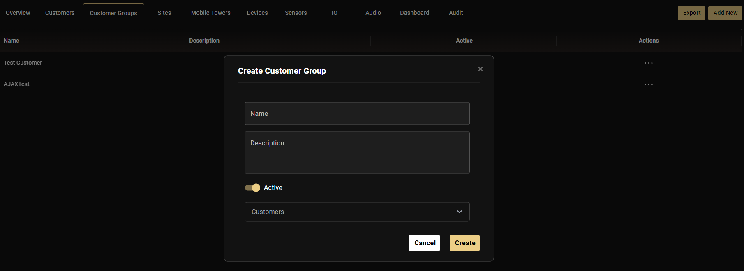
Creating a Customer Group
- Open Configuration
- Click on the Customer Groups tab in the horizontal menu
- Click Add New
- Enter a descriptive Name (typically the customer's name or a descriptive label like "All Production Sites")
- Add a Description (e.g., "End user Customer group for the customer")
- Toggle the group to Active
- Select customers: Choose which customer(s) should be included in this group
- Click Create
Important Access Rule
GCXONE does not support an "exclusion" policy (e.g., "See everything except Site X"). Access must be positively defined via Customer Groups. If a user is set up at the Service Provider level, they have access to all customers by default unless explicitly restricted by assigning them to a specific Customer Group.
Customer Groups vs. Access Levels
- Access Level (set in Role): Defines the type of access (Service Provider/Customer/Site)
- Customer Group (assigned to User): Restricts which specific customers the user can see
Think of it this way: The role's access level sets the boundary, and the Customer Group applies the filter within that boundary.
Editing Customer Groups
Customer Groups can be modified after creation:
- Navigate to Customer Groups
- Click the Actions menu (three dots) next to the group
- Select Edit
- Add or remove customers as needed
- Save changes
Use Case Example: Test vs. Production Setup
To protect your operators from false alerts during system maintenance:
- Create a group called "Production Only" and add all live billing clients.
- Create a group called "Staging/Test" and add your internal test sites.
- Assign your daily monitoring staff to the Production Only group.
- Assign your technicians to the Staging/Test group.
Related Articles
Related Articles
Next: