User Management Guide
This guide covers the complete user management system in NXGEN GCXONE, including creating roles, configuring privileges, setting up customer groups, and inviting users to the platform.
Topics Covered
- Understanding Roles and Access Levels
- Creating and Configuring Roles
- Customer Groups
- Inviting Users
- Managing Existing Users
Understanding Roles and Access Levels
What Are Roles?
Roles define what users can see and do within the platform. Each role contains a set of privileges (permissions) that determine access to specific features and sections of the application.
Common Role Types
GCXONE provides default roles with predefined permissions, and you can create custom roles to fit specific operational needs:
- Company Admin: Full access to all features and settings, including configuring settings for all types of users
- Manager: Supervises operators with permissions to view most objects but limited access to settings
- Operator: Focuses on day-to-day operational access for monitoring and alarm processing
- Operator Minimal: Limited view permissions, strictly for processing alarms
- End User: Custom role with limited access for customers to view and control their own sites
Access Levels Explained
Every role operates at one of three access levels that determine the scope of what users can see and manage within the GCXONE hierarchy (Tenant to Customer to Site to Device to Sensor):
| Access Level | Description | Use Case |
|---|---|---|
| Service Provider | Access across the entire tenant, including all customers and sites | Platform administrators who manage the entire organization |
| Customer | Access limited to specific customer account(s) and their associated sites | Account managers or operators who work with specific customers |
| Site | Access limited to specific physical locations only | Installers or technicians who work at particular sites |
Key Point: A Customer can have multiple sites under it. The access level determines the boundary of what a user can see and manage within the hierarchy.
Creating and Configuring Roles
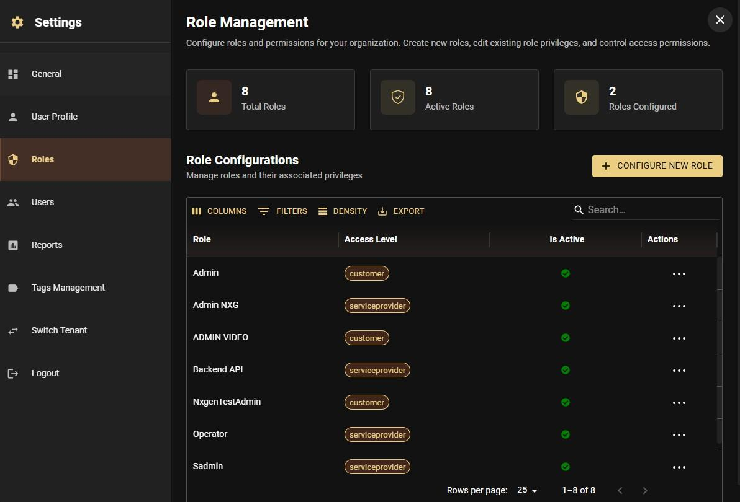
Step 1: Navigate to Roles
- Open Settings
- Click on the Roles tab
- Click Configure new role to create a new role
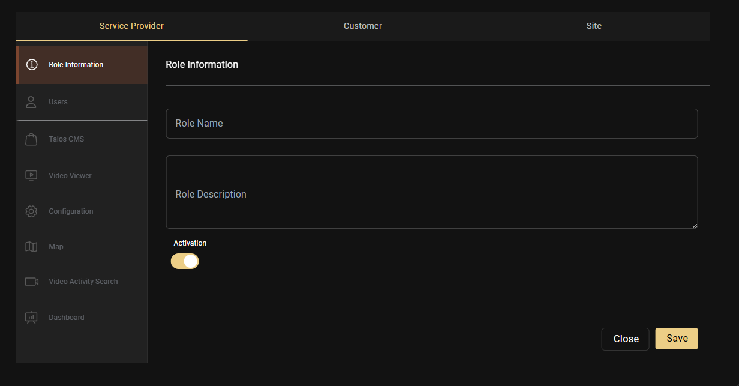
Step 2: Define the Role
- Enter a Role Name (e.g., "End User", "Installer", "Operator")
- Add a brief Description explaining the role's purpose
Step 3: Configure Privileges
Select the specific privileges you want to assign to this role. Permissions in GCXONE are categorized by:
- App: Which applications the user can access
- Category: Specific sections within applications
- Action: What operations the user can perform (view, create, edit, delete)
Example configurations:
- Company Admin Role: Enable all privileges across all categories
- Operator Role: Enable monitoring, alarm processing, and device management; disable system configuration
- End User Role: Enable only Configuration and Dashboard for site control
- Installer Role: Enable device setup, mobile towers, and sensors; disable reporting and user management
Step 4: Set Access Level
Choose the appropriate access level for this role:
- Service Provider: For tenant-wide access
- Customer: For customer-specific access (can be further refined with Customer Groups)
- Site: For site-specific access
Step 5: Configure Session Timeout
Set the session timeout duration (in minutes, default is 30 minutes):
- Range: 30-1440 minutes (0.5-24 hours)
- If GCXONE is unattended for the set time, the user is automatically logged out
- Important: Session timeouts are configured at the role level, not per individual user. All users assigned to this role will have the same session timeout setting.
Step 6: Save the Role
Click Save to finalize the role setup. It will immediately be available for user assignment.
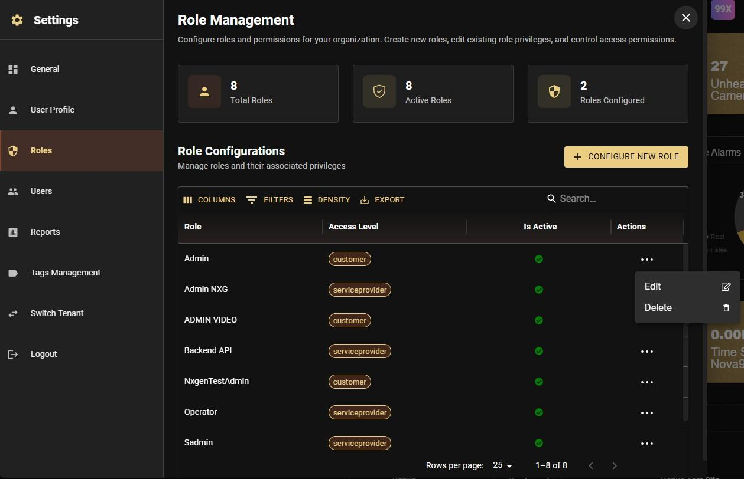
Editing Existing Roles
Roles can be modified at any time:
- Open Settings
- Click on the Roles tab
- Select the role you want to modify
- Click Edit
- Update privileges, access level, or session timeout as needed
- Click Save
Important: Changes to roles take effect immediately and will apply to all users assigned to that role.
Deleting Roles
Roles that are no longer needed can be deleted. Ensure no active users are assigned to a role before deleting it, or reassign those users to a different role first.
Customer Groups
What Are Customer Groups?
Customer Groups provide a flexible way to control which customers a user can access without creating separate roles for each customer. This is particularly useful when you have multiple customers and want to use standardized roles.
Purpose and Benefits
Customer Groups provide a mechanism to restrict the visibility and access of specific users to a subset of data within a tenant. This is particularly useful for:
Segregating Customer Data:
- If a monitoring station (Service Provider) handles multiple installers, you can group customers by installer
- Users assigned to "Customer Group A" will not see sites or data from "Customer Group B"
Production vs. Test Sites:
- Separate production sites from test/trial sites
- Prevent operators from viewing or acting on test alarms by restricting them to the "Production" Customer Group
Without Customer Groups:
- Users at Service Provider level would see all customers by default
- You would need to create separate roles for each customer or segment
- Managing permissions becomes complex as you scale
With Customer Groups:
- Create one unified role (e.g., "End User" or "Operator")
- Assign different Customer Groups to different users
- Each user sees only their designated customer(s)
- Role permissions remain consistent across all customers
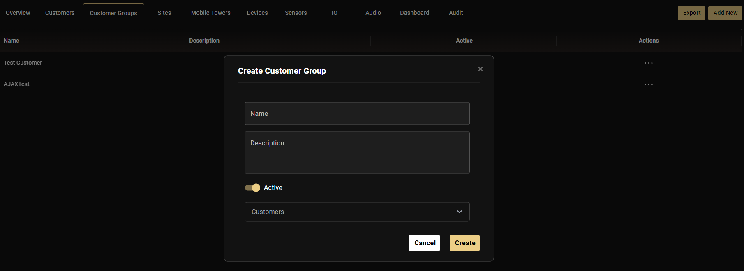
Creating a Customer Group
- Open Configuration
- Click on the Customer Groups tab in the horizontal menu
- Click Add New
- Enter a descriptive Name (typically the customer's name or a descriptive label like "All Production Sites")
- Add a Description (e.g., "End user Customer group for the customer")
- Toggle the group to Active
- Select customers: Choose which customer(s) should be included in this group
- Click Create
Important Access Rule
GCXONE does not support an "exclusion" policy (e.g., "See everything except Site X"). Access must be positively defined via Customer Groups. If a user is set up at the Service Provider level, they have access to all customers by default unless explicitly restricted by assigning them to a specific Customer Group.
Customer Groups vs. Access Levels
- Access Level (set in Role): Defines the type of access (Service Provider/Customer/Site)
- Customer Group (assigned to User): Restricts which specific customers the user can see
Think of it this way: The role's access level sets the boundary, and the Customer Group applies the filter within that boundary.
Editing Customer Groups
Customer Groups can be modified after creation:
- Navigate to Customer Groups
- Click the Actions menu (three dots) next to the group
- Select Edit
- Add or remove customers as needed
- Save changes
Inviting Users
Step 1: Navigate to Users
- Open the Settings
- Click on the Users
- Click Invite new user to start adding a new user
Step 2: Enter User Information
Fill in the required fields:
Personal Information:
- First Name
- Last Name
- Email Address (required - serves as login ID and must be unique)
- Phone Number (optional - for SMS alerts)
Address Information (optional):
- Street Name
- Building Number
- Zip Code
- City
- Country
Step 3: Configure Account Settings
Role Assignment:
- Select the role that defines what this user can access (e.g., "End User", "Admin", "Operator", etc.). Each role determines which features and actions the user can access.
Customer Group (optional):
- If you want to restrict this user to specific customer(s), select a Customer Group.
- If no Customer Group is selected, the user will have the default access defined in their role.
Session Timeout:
- Set the session timeout period (default: 30 minutes).
- Range: 30-1440 minutes (0.5-24 hours).
Step 4: Send Invitation
Click Submit. The user will receive two automated emails:
- Email Confirmation: Verifies the email is active.
- Password Setup Link: Allows the user to create their secure password.
What Happens Next?
Once you click Submit, the user will receive two emails. The account setup process works as follows:
- The user receives an email titled "Changing your password for the nxgen NXGEN application".
- They click the password reset link in the email.
- They create a new password for their account.
- Upon first login, they are directed to the appropriate section based on their role:
- If Dashboard is enabled in their role, they land on Dashboard.
- If Dashboard is not enabled, they land on the first accessible section (e.g., Configuration).
Multi-Organization Access
Users invited to multiple tenants use the same email address. Upon login, they are prompted to select which organization to access. They can switch between tenants anytime via Settings and Switch Tenant.
Managing Existing Users
Viewing Users
Open Settings and click on the Users tab to see all users in your organization, including:
- Name and email
- Assigned role
- Status (Active/Inactive)
Editing User Access
To modify a user's role or Customer Group:
- Open Settings.
- Click on the Users tab.
- Click on the 3 dots of the user you want to edit.
- Update their role or Customer Group assignment.
- Click Save.
Changes take effect immediately.
Removing Users
To remove a user's access:
- Open Settings.
- Click on the Users tab.
- Click on the 3 dots of the user you want to remove.
- Click Delete User.
- Confirm the deletion.
Warning
This permanently removes the account and cannot be restored. This also deletes associated contacts and logs for that user's specific actions if they were the primary contact. Use only for accounts created by mistake or during development.
Note: Consider deactivating users instead of deleting them, as this preserves the user's history in audit logs and allows for easy reactivation if needed.
Best Practices
- Use Default Roles First: Start with default roles (Company Admin, Manager, Operator). Only create custom roles if your business requires a highly niche set of permissions.
- Quarterly Audits: Review your user list every 3 months. Deactivate anyone who hasn't logged in recently.
- Offboarding: Deactivate accounts the moment a team member leaves the organization.
- Avoid Shared Accounts: Never share a single login between multiple people. This destroys your audit trail.
- Document Custom Roles: Keep a list of why a custom role was created to avoid "Role Bloat."
- Least Privilege: Start with zero permissions and add only what the user needs to do their job.
- Test Before Deployment: Create a "dummy" user with the new role to verify the sidebar only shows the intended apps.
Troubleshooting
Invitation Links Expire
For security, the password setup link expires after 24 hours. If a user misses this window, you must Resend Invitation from the Users table.
Email Not Received
Ask the user to check their Spam/Junk folder for mail from @nxgen.cloud.
Login Issues
Ensure the user clicked the Verification Link in the first email before attempting to use the password setup link.
Related Articles
Related Articles
Next: