ADPRO Installer Configuration
This guide provides step-by-step instructions for configuring ADPRO security control panels to integrate with GCXONE. Follow these steps in order to ensure proper alarm transmission and device connectivity.
Configuration
Step-by-Step
Prerequisites
Before You Begin
- ✅ ADPRO XO client software installed
- ✅ Network connectivity to NXGEN's ADPRO virtual receiver
- ✅ Dedicated virtual receiver IP address (provided by NXGEN CMS team)
- ✅ Network configuration (Public Network, VPN, or Whitelisting setup)
- ✅ Administrative access to ADPRO XO client
- ✅ GCXONE account with appropriate permissions
Step 1: Network Configuration
Step 1: Network Configuration
Network Options
Public Network
Use public IP address of receiver and associated ports
VPN
Connect through network tunnel using private IP addressing
Whitelisting
Request NXG tech support for dedicated receiver IP address
- For ADPRO devices there is a dedicated virtual receiver for each customer
- Your NXGEN CMS team will provide you with the IP address for your ADPRO virtual receiver when your GCXONE tenant is setup
- GCXONE supports both primary receiver and backup receiver
- If you want to avoid opening your existing RTSP to the external world, you'll need to provide an external RTSP address as well as the control port
Expected result: Network connectivity established to NXGEN ADPRO virtual receiver
Step 2: CMS Alarm Transmission
Step 2: CMS Alarm Transmission
UI path: ADPRO XO Client → CMS Alarm Transmission
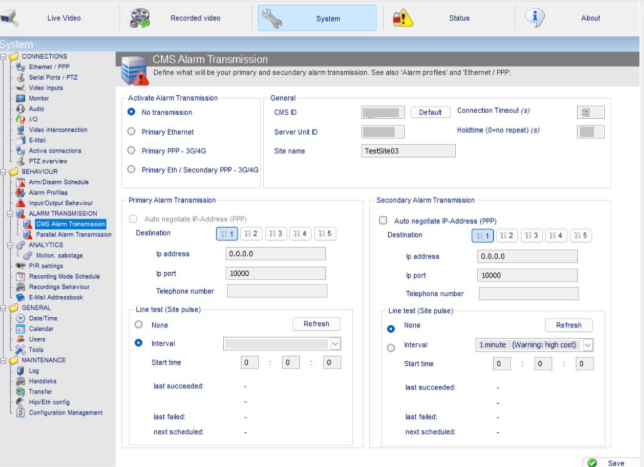
- General Settings
- Primary Alarm Transmission
- Secondary Alarm Transmission
- Site Pulse (Lifecheck)
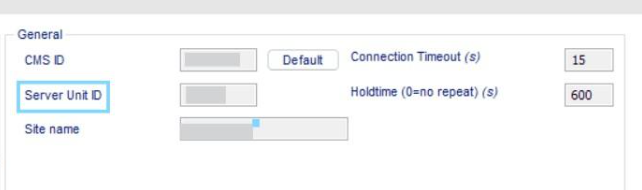
Configure General Settings
- On "General" provide your Server unit ID
- Keep in mind that each device should have a unique server ID, which means you can't use the same value twice
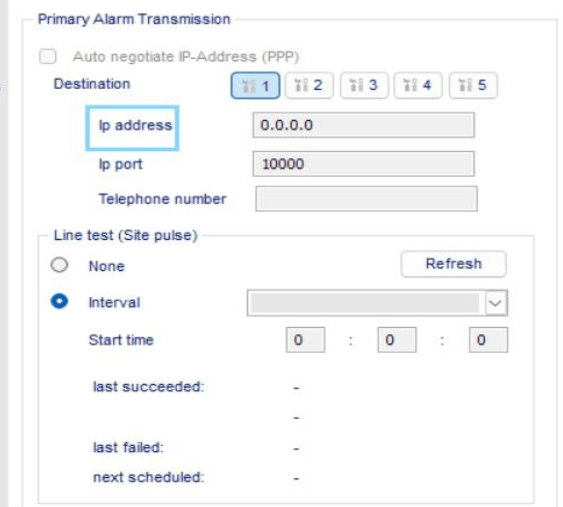
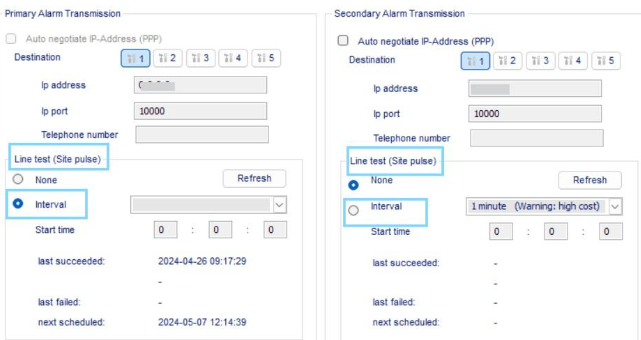
Configure Primary Alarm Transmission
- In the 'Primary Alarm Transmission' section, enter the IP address provided by the NXG support team
- This IP address corresponds to the customer device on the GCXONE
Configure Secondary Alarm Transmission (Optional)
- To add an additional backup IP address, include it under the "Secondary Alarm Transmission" section
- Use the secondary IP address provided by the NXG support team
- Ensure you have verified the new IP address with NXG support to avoid any configuration issues
- This secondary IP address will serve as a backup communication pathway, enhancing reliability and redundancy
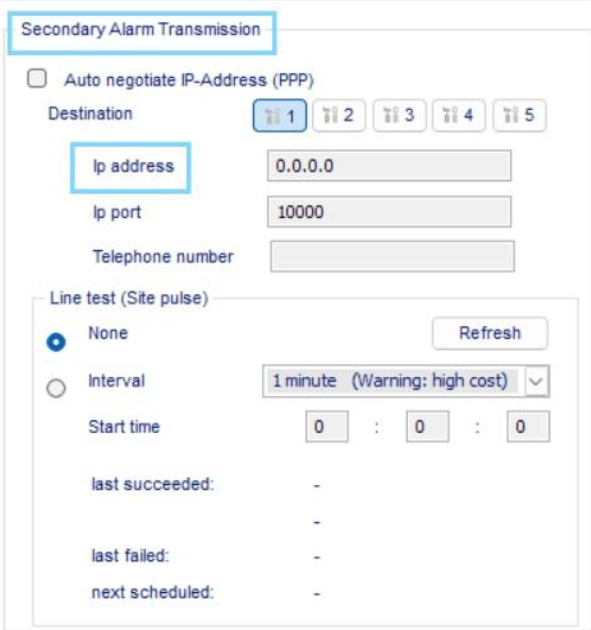
Configure Lifecheck - Site Pulse (Recommended)
- Under both Primary Alarm Transmission and Secondary, you will find a section dedicated to site pulse activity monitoring
- Regularly check the site activity
- Select the interval at which pulses are sent to the GCXONE
- This allows for precise control over the frequency of status updates, ensuring device is active
Expected result: Primary and secondary alarm transmission configured with site pulse monitoring
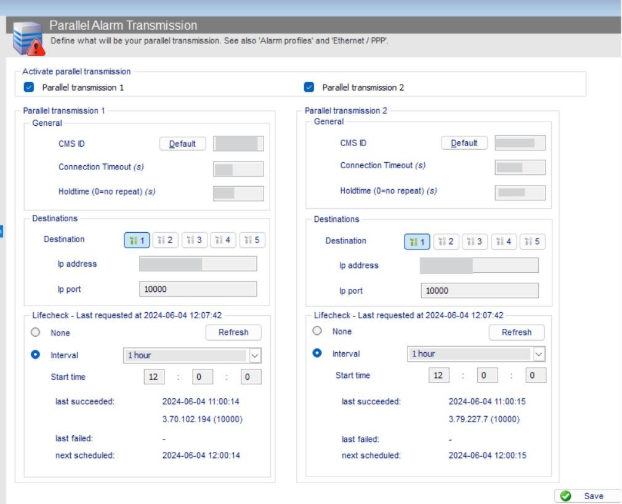
Step 3: Parallel Alarm Transmission (Optional)
Step 3: Parallel Alarm Transmission (Optional)
UI path: ADPRO XO Client → Parallel Alarm Transmission
Configuration Steps
- In the 'Parallel Alarm' section, you have the option to add an additional IP address for alarm transmission
- This can be useful for other purposes, such as integrating with a different alarm management system or generating reports
- Keep in mind that this feature is optional and intended for customer use
- The same steps mentioned in Step 2 can be done in this chapter as well
Expected result: Additional parallel alarm transmission configured if needed
Step 4: Analytics Configuration
Step 4: Analytics Configuration
UI path: ADPRO XO Client → Analytics
Available Analytics Features
Intrusion Trace
Define specific areas within camera's field of view for unauthorized entry monitoring
Loiter Trace
Configure detection for prolonged presence in restricted areas
Motion Sabotage
Set up detection for camera tampering or obstruction
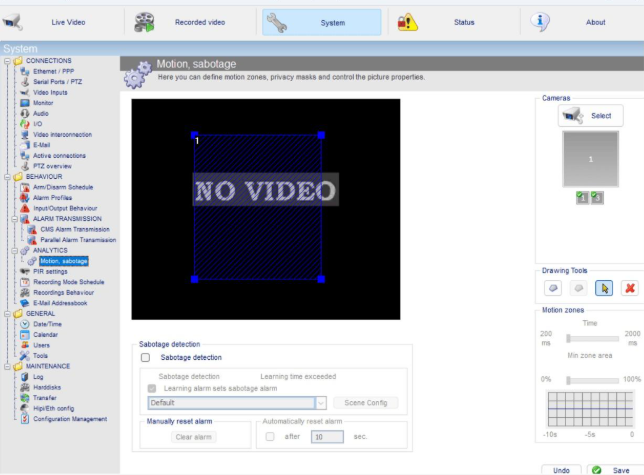
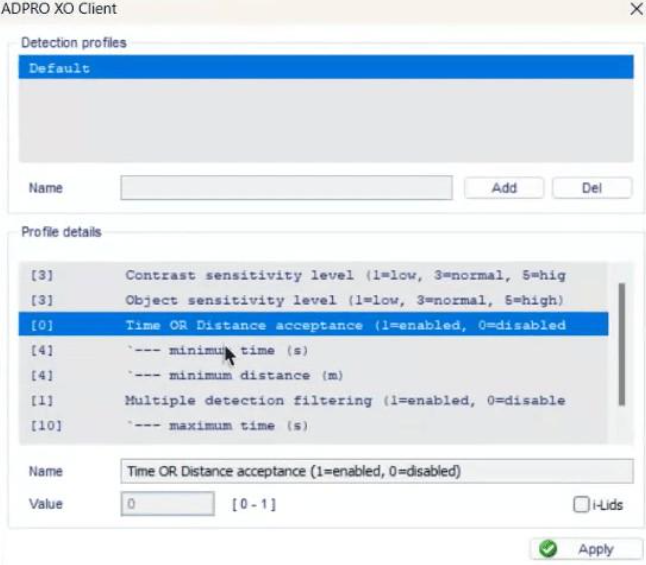
Configure Detection Parameters
- Set up and adjust parameters for motion alarms
- Define specific zones, sensitivity levels, and rules for detecting various activities or threats
- Configure detection zones for entry points or perimeters
- Adjust sensitivity levels to distinguish between minor movements and actual intrusions
- Specify conditions such as size and speed of moving objects that will trigger alerts
Expected result: Analytics configured to reduce false alarms and enhance security accuracy
Step 5: Arm and Disarm Schedule
Step 5: Arm and Disarm Schedule
UI path: ADPRO XO Client → Arm/Disarm Schedule
Configuration Steps
- Set the system to either armed or disarmed mode by selecting your desired times
- Use the right side of the screen to configure scheduling
- Define when the system should be automatically armed or disarmed
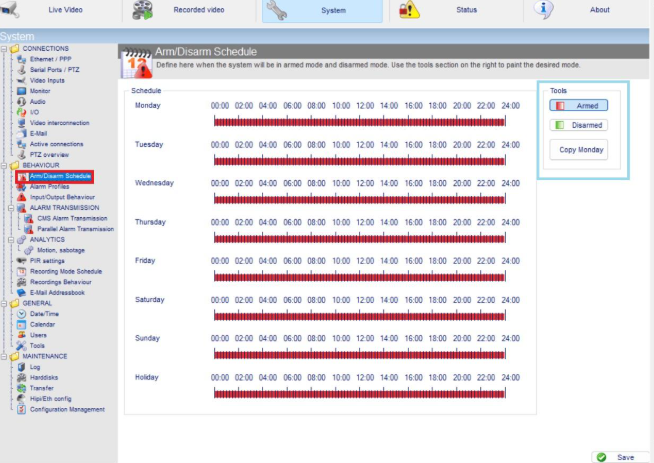
Expected result: Automated arm/disarm schedule configured
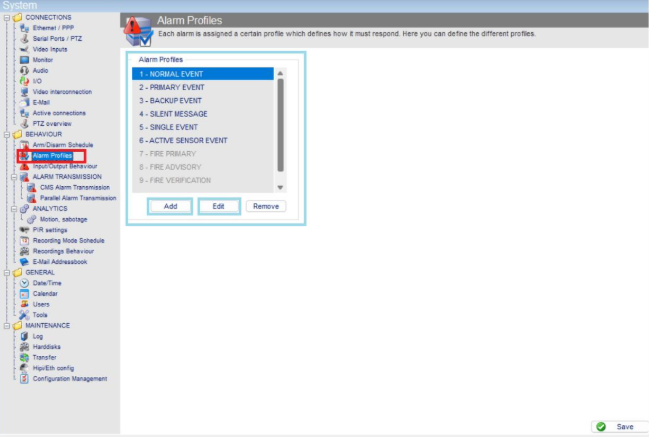
Step 6: Alarms Profile
Step 6: Alarms Profile
UI path: ADPRO XO Client → Alarms Profile
Configure Alarm Profiles
- Alarm Profiles are customizable settings that determine how the system responds to various alarm events
- Specify different parameters such as the type of alarm, conditions for triggering, and subsequent actions
Edit Profile Settings
When you press "Edit", configure the following:
- Profile Type: Select the type of profile (alarm or other event type)
- Operational State: Specify whether profile should be active when disarmed, armed, or both
- Alarm Behaviour - Armed: Define system behavior when armed
- Alarm Behaviour - Disarmed: Define system behavior when disarmed (suppress alarms, transmissions, email notifications)
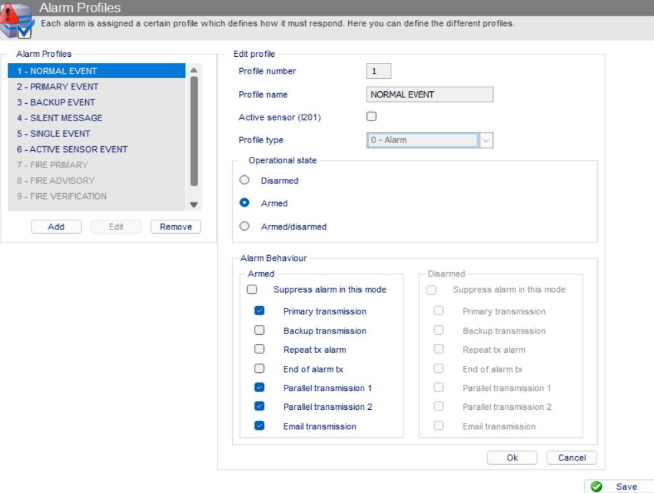
Note: You can also add a profile of your choice as an administrator
Expected result: Custom alarm profiles configured for different operational states
Step 7: Input/Output Behaviour
Step 7: Input/Output Behaviour
UI path: ADPRO XO Client → Input/Output Behaviour
Configure Event Responses
- The configuration screen lets users manage system event responses
- Left panel has navigation tree
- Middle panel lists events like "SYSTEM STARTUP" and "SYSTEM ARMED"
- Right panel allows detailed settings for each event
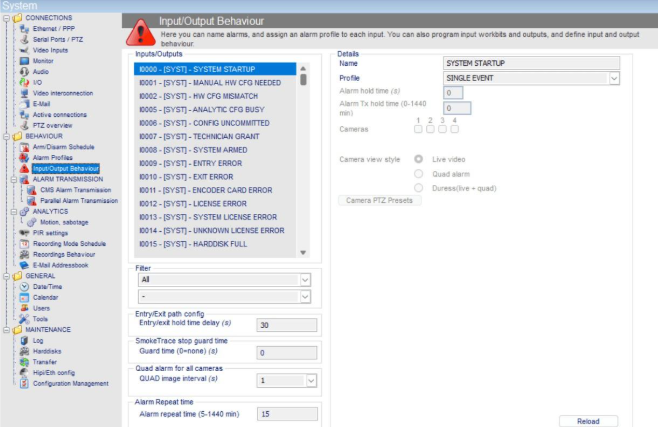
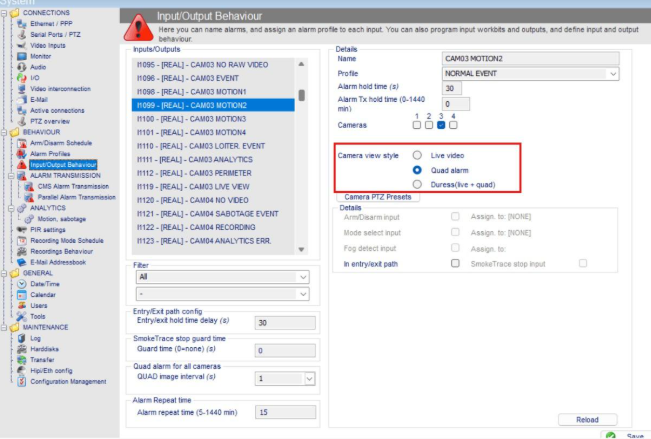
Configure Camera Assignment
Configure the event to its corresponding Camera for email or alarm reports
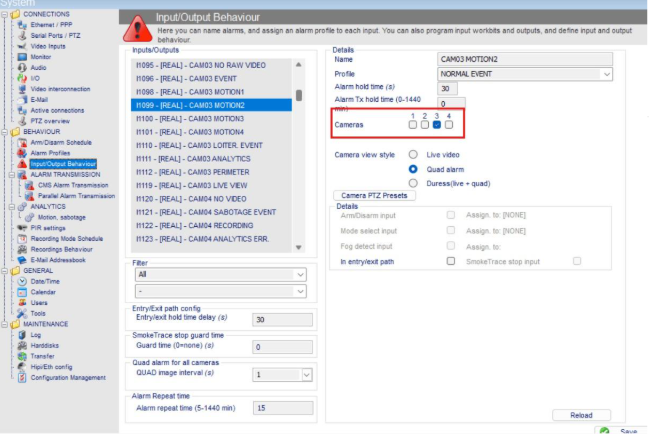
Configure Camera View Style
- After configuring the camera, select a camera view style
- Live View: See live feed on both ADPRO XO client and GCXONE
- Quad View or Duress: Receive still images on both platforms
Expected result: Automated security actions configured with proper camera assignments and view styles
Step 8: Time Zone Configuration
Step 8: Time Zone Configuration
UI path: ADPRO XO Client → General → Date/Time
Configuration Steps
- Configure the time zone as the customer's device time zone
- We recommend you sync the NTP server, in this case you don't need to configure it manually
- The device will read the server day-time
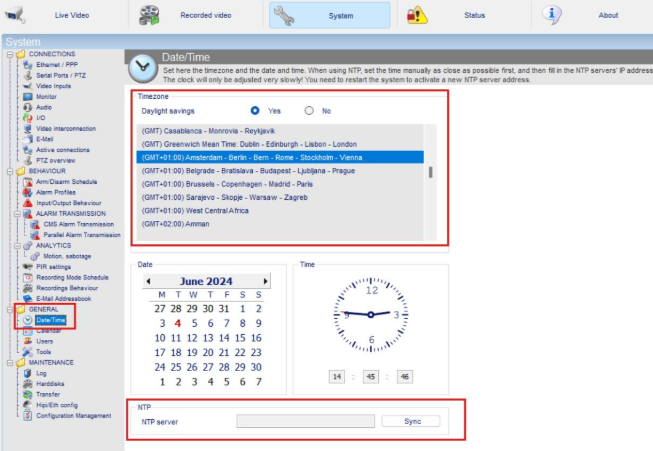
Expected result: Time zone configured with NTP synchronization
Step 9: Configure NXG Users
Step 9: Configure NXG Users
UI path: ADPRO XO Client → Users
Configuration Steps
- In the "Users" section, identify NXG users of the system and define their access rights
- We recommend granting Administrative rights; however, if that's not possible, User rights will also suffice

Expected result: NXG user configured with appropriate access rights
Step 10: Configure iFT Gateway (If Applicable)
Step 10: Configure iFT Gateway (If Applicable)
UI path: GCXONE → Device → Edit → Additional Settings → Custom Property
Note: This step only applies to ADPRO device sub-type [iFT] Gateway
Configuration Steps
- Login into GCXONE using your credentials
- Navigate to your device then click on "edit"
Go to "Additional Settings" then "Custom property" and add the following parameters:
- Parameter type: String
- Parameter name: eventClipRecord
- Parameter value: True
- Parameter type: String
- Parameter name: eventClipRecordAlarmCode
- Parameter Value: motion.perimeter

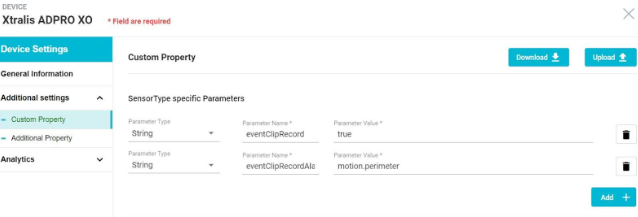
Expected result: iFT Gateway configured with custom properties for event clip recording
Step 11: Add Device in GCXONE
Step 11: Add Device in GCXONE
UI path: GCXONE → Customer → Site → Devices → Add Device
Configuration Steps
- Select ADPRO
- Fill: Host/Serial, Username, Password, Ports, Time Zone
- Click Discover. Review discovered sensors and I/O
- Click Save
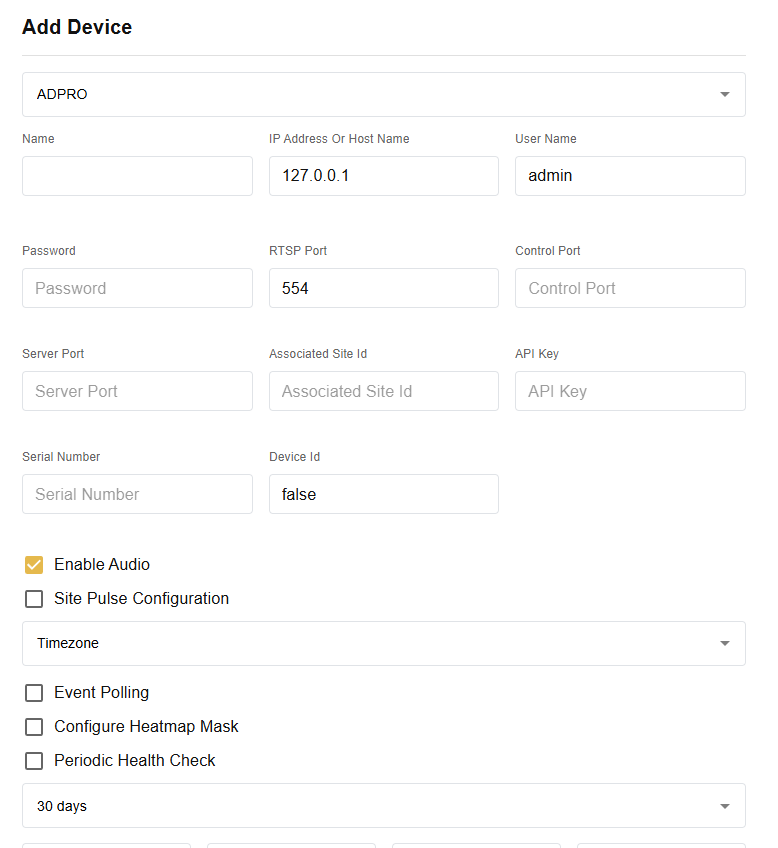
Expected result: GCXONE lists sensors under the ADPRO device
Step 12: Verify Integration
Step 12: Verify Integration
Verification Checks
- ✅ Verify alarm transmission is working (primary and secondary)
- ✅ Test site pulse/lifecheck functionality
- ✅ Confirm analytics are generating appropriate events
- ✅ Test arm/disarm schedule functionality
- ✅ Verify user access and permissions
- ✅ Check time synchronization
Expected result: Complete ADPRO integration with GCXONE platform
Troubleshooting
Common Issues and Solutions
- Alarm Transmission Issues
- Analytics False Alarms
- Scheduling Issues
- User Access Problems
- Verify unique server ID is configured
- Check IP addresses provided by NXG support team
- Confirm network connectivity to virtual receiver
- Test both primary and secondary transmission paths
- Adjust sensitivity levels for detection zones
- Refine size and speed criteria for moving objects
- Review and modify detection zone boundaries
- Verify time zone configuration matches customer location
- Confirm NTP synchronization is working
- Check arm/disarm schedule settings
- Verify NXG user has appropriate rights (Administrative preferred)
- Check user credentials and permissions
Related Articles
Need Help?
If you're experiencing issues during configuration, check our Troubleshooting Guide or contact support.