AxisCameraStation VMS Configuration
Overview
This guide covers the complete configuration of Axis Camera Station VMS integration with GCXONE, including both device-side and platform-side setup.
What you'll accomplish:
- Configure Axis Camera Station VMS for communication with GCXONE
- Enable SDK access and configure required services
- Set up network connectivity and user credentials
- Add and register Camera Station in GCXONE platform
- Configure camera mappings and event rules
- Verify successful integration and test key features
Estimated time: 45-60 minutes
Prerequisites
Ensure you have completed the prerequisites listed in the Overview:
- Axis Camera Station Pro 5.x or higher installed
- Network connectivity established between Camera Station server and GCXONE
- Administrative credentials for Camera Station available
- GCXONE account with device configuration permissions
- Camera Station license valid and active
Configuration Workflow
The configuration process consists of 4 main parts:
- Initial Setup - Access Camera Station and verify system status
- Camera Station Configuration - Configure network, users, SDK access, and recording settings
- GCXONE Platform Setup - Add Camera Station in GCXONE and configure integration
- Verification - Test live streaming, playback, events, and advanced features
Part 1: Initial Setup
Step 1: Access Camera Station Interface
UI Path: Camera Station Management Client
Objective: Access the Axis Camera Station management interface to begin configuration.
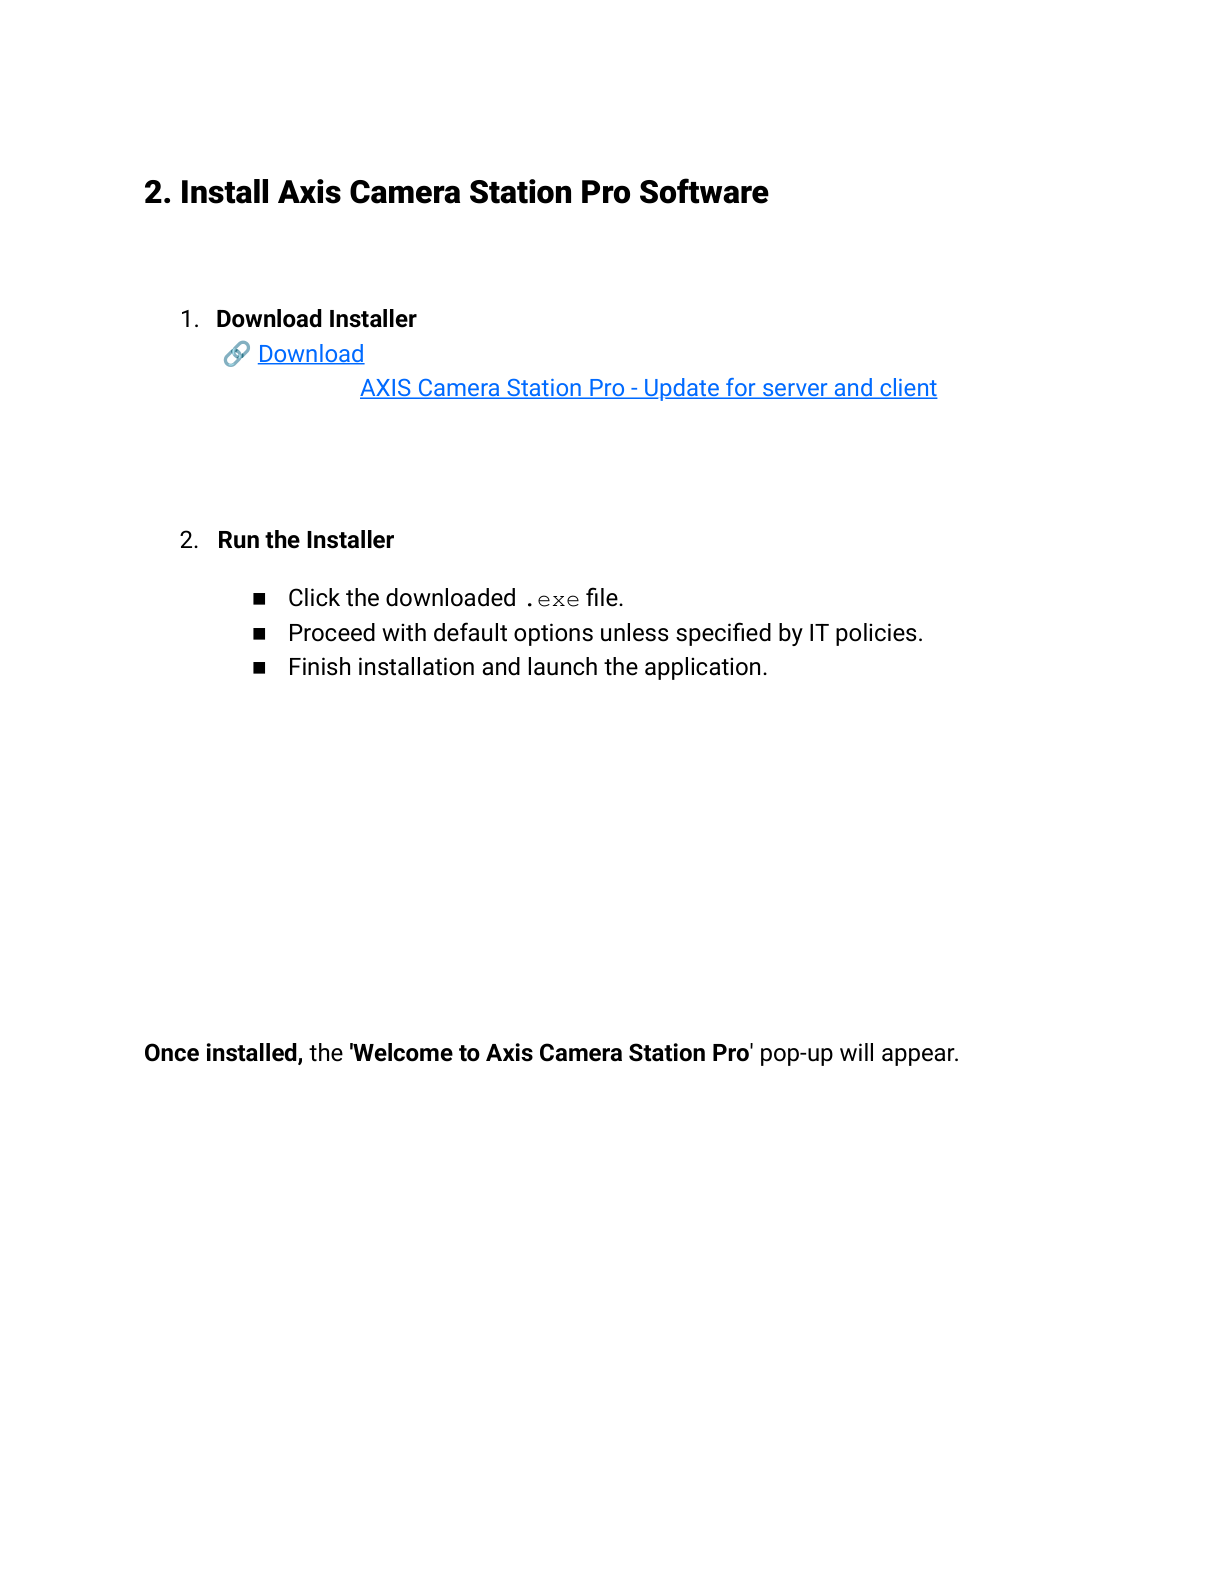
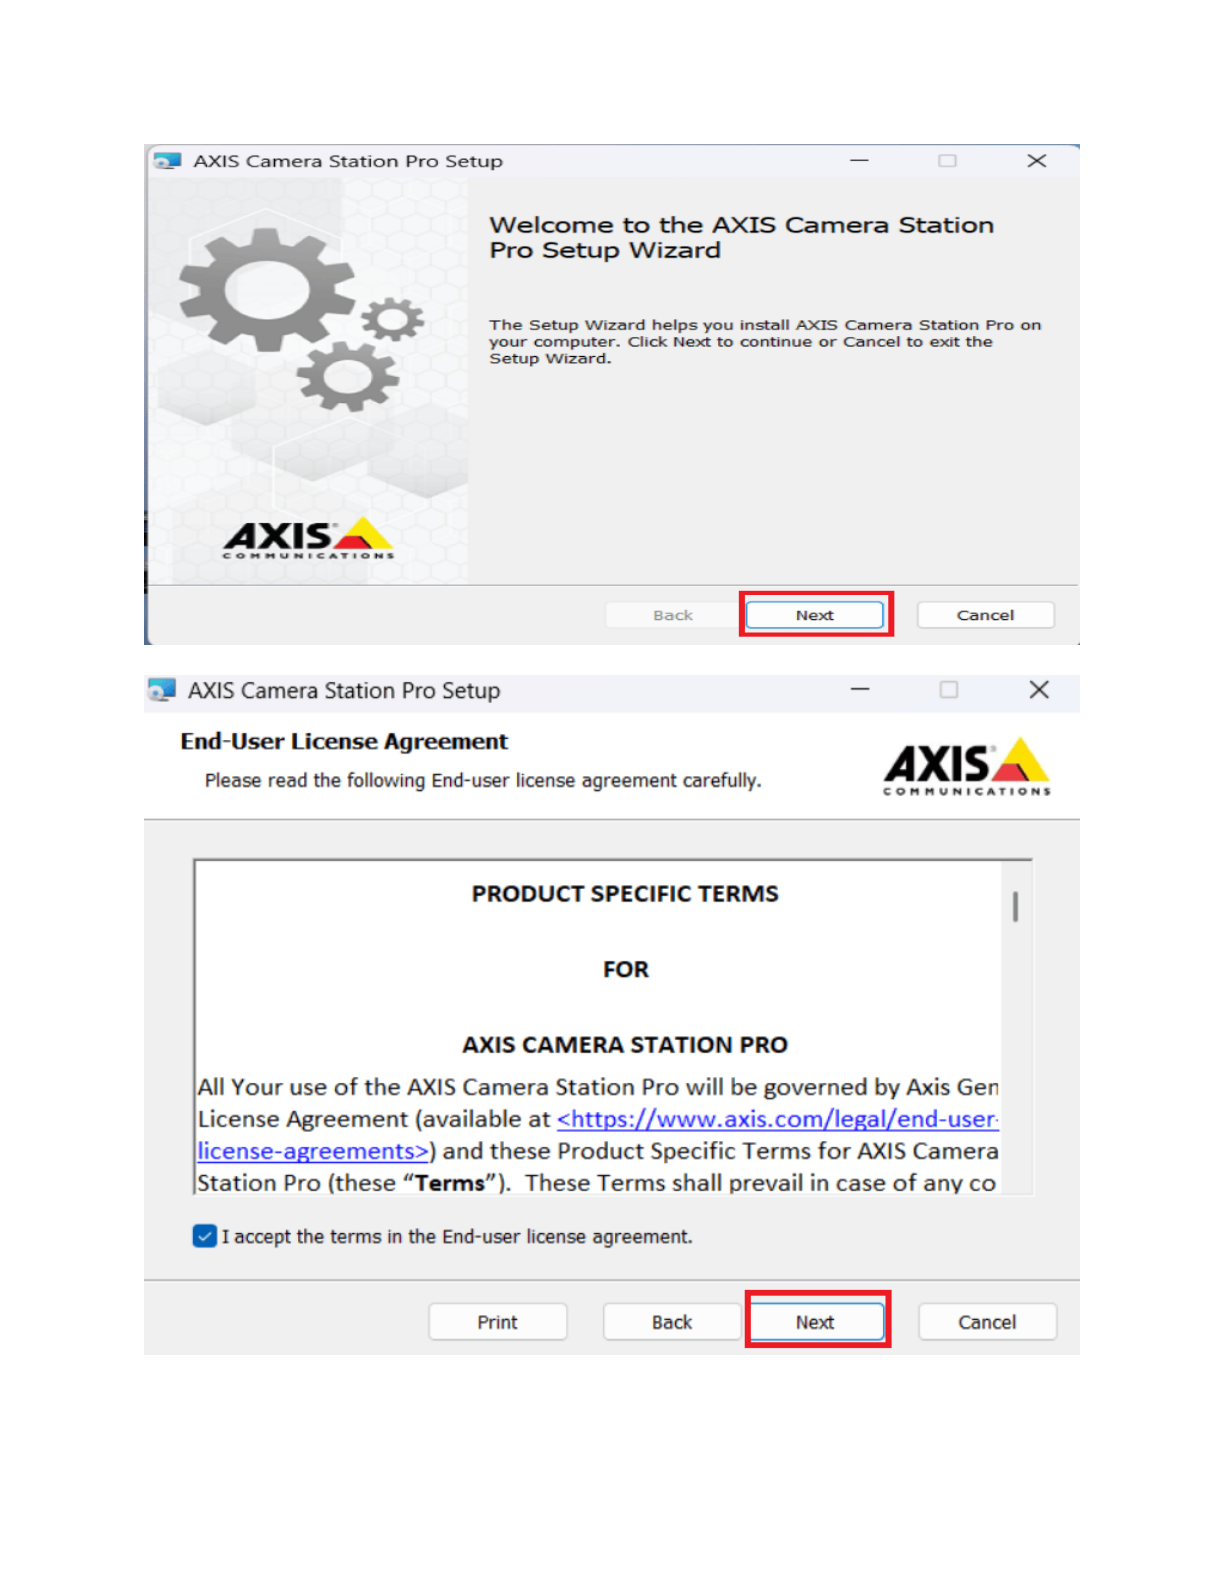
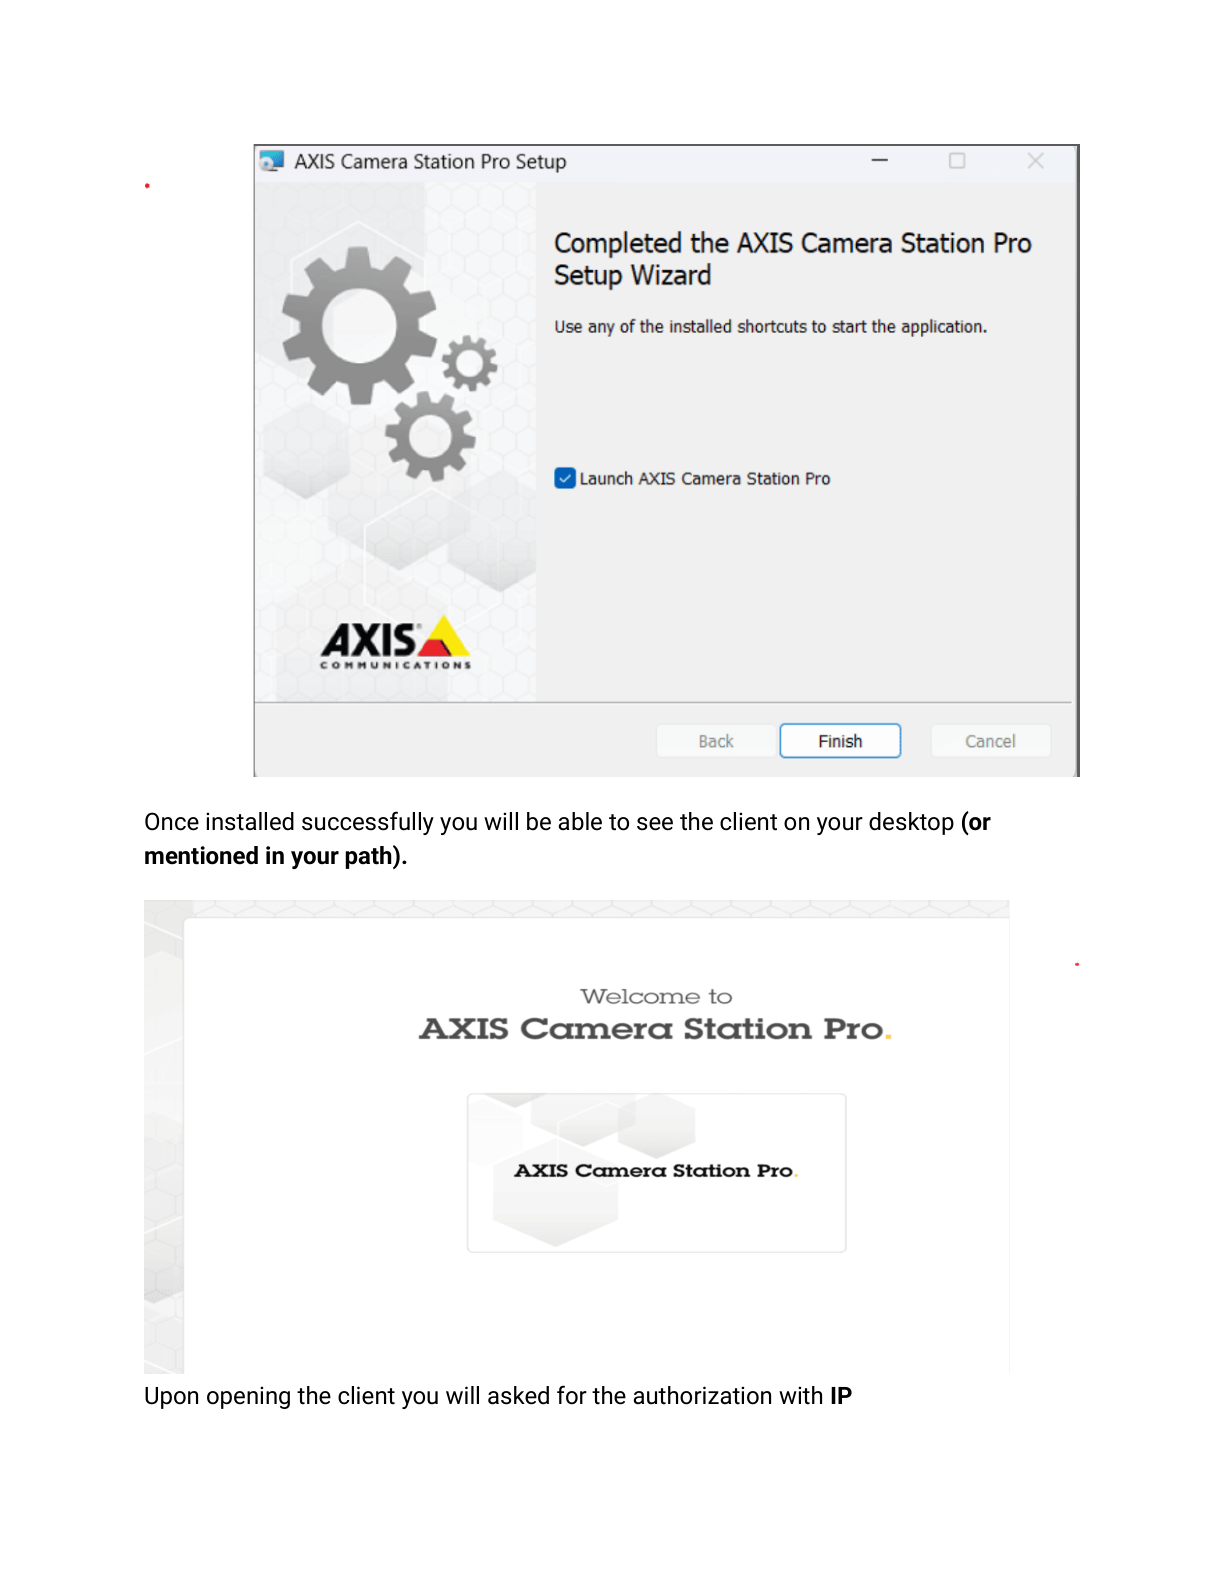
Configuration Steps:
- Launch the Axis Camera Station management client on the Windows server
- Log in with administrative credentials
- Verify that Camera Station is running and all licensed cameras are detected
- Check system status and confirm no critical errors
Expected Result: Successfully logged into Camera Station with admin privileges, system status shows green/healthy.
Step 2: Verify Network Configuration
UI Path: Camera Station → Configuration → Network Settings
Objective: Ensure the Camera Station server has proper network connectivity.
Configuration Steps:
- Navigate to Configuration → Network Settings
- Verify the following network parameters:
- Server IP Address: Note the static IP (required for GCXONE integration)
- Subnet and Gateway: Confirm proper network configuration
- DNS Servers: Ensure DNS resolution is working
- Internet Connectivity: Verify server can reach external services
- Test connectivity to GCXONE cloud endpoints (port 443)
Expected Result: Server has valid IP configuration and can reach GCXONE cloud platform.
Part 2: Camera Station Configuration
Step 3: Configure User Accounts and Permissions
UI Path: Camera Station → Configuration → Users & Permissions
Objective: Create a dedicated user account for GCXONE integration with appropriate permissions.
Configuration Steps:
- Navigate to Configuration → Users & Permissions
- Click Add New User
- Configure the integration user:
- Username:
gcxone_integration(or preferred name) - Password: Create a strong password (save for GCXONE configuration)
- User Role: Administrator (or custom role with full SDK access)
- Permissions: Enable all required permissions:
- View live video
- View recordings
- PTZ control
- Event management
- SDK/API access
- Username:
- Click Save to create the user
Expected Result: Integration user created with full access permissions for GCXONE.
Step 4: Enable SDK Access
UI Path: Camera Station → Configuration → Services → SDK Settings
Objective: Enable SDK access to allow GCXONE to communicate with Camera Station.
Configuration Steps:
- Navigate to Configuration → Services → SDK Settings
- Enable SDK Service
- Configure SDK settings:
- Enable SDK API: ✓ Checked
- SDK Port: 80 (HTTP) or 443 (HTTPS recommended)
- Enable Authentication: ✓ Checked
- Allowed IP Addresses: Configure firewall rules or allow GCXONE IP ranges
- Click Apply to save changes
- Restart SDK service if prompted
Expected Result: SDK service is running and accessible for GCXONE integration.
Step 5: Configure Camera Settings
UI Path: Camera Station → Cameras → Configuration
Objective: Verify all cameras are configured correctly and enable required features.
Configuration Steps:
- Navigate to Cameras → Configuration
- For each camera to be integrated:
- Verify camera is online and streaming
- Enable Motion Detection if required
- Configure Recording Settings (continuous or event-based)
- Set Stream Profiles (main stream, sub-stream)
- Enable Audio if camera supports it
- Configure Event Actions for cameras:
- Motion detection triggers
- Analytics events
- I/O triggers (if applicable)
- Click Save for each camera
Expected Result: All cameras are configured and streaming properly with events enabled.
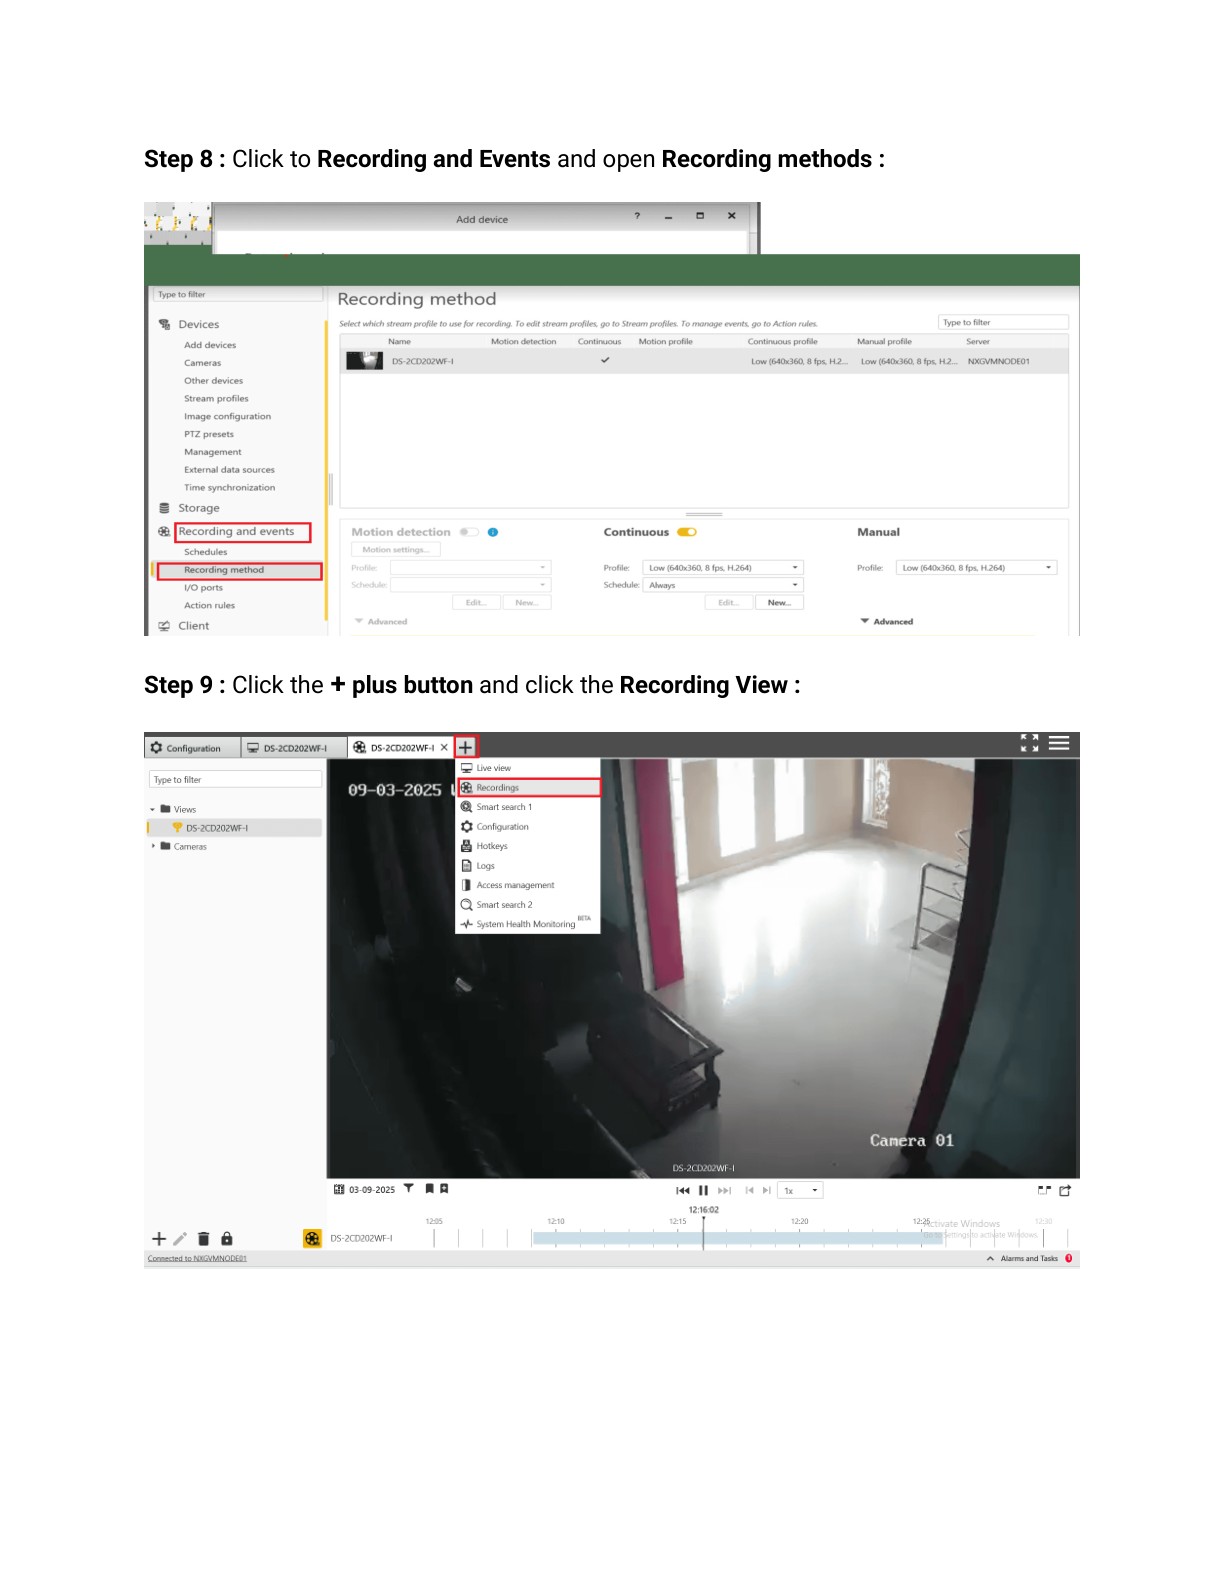
Step 6: Configure Recording and Storage
UI Path: Camera Station → Configuration → Recording & Storage
Objective: Ensure recording settings are configured for event-based and continuous recording.
Configuration Steps:
- Navigate to Configuration → Recording & Storage
- Configure Recording Rules:
- Continuous Recording: Enable for 24/7 recording (optional)
- Event-Based Recording: Enable for motion/analytics events
- Pre-Recording: 5-10 seconds recommended
- Post-Recording: 15-30 seconds recommended
- Configure Storage Settings:
- Verify storage location and available space
- Set retention period (7-30 days typical)
- Enable Automatic Deletion when storage is full
- Click Apply to save settings
Expected Result: Recording settings configured to capture events with appropriate retention.
Part 3: GCXONE Platform Setup
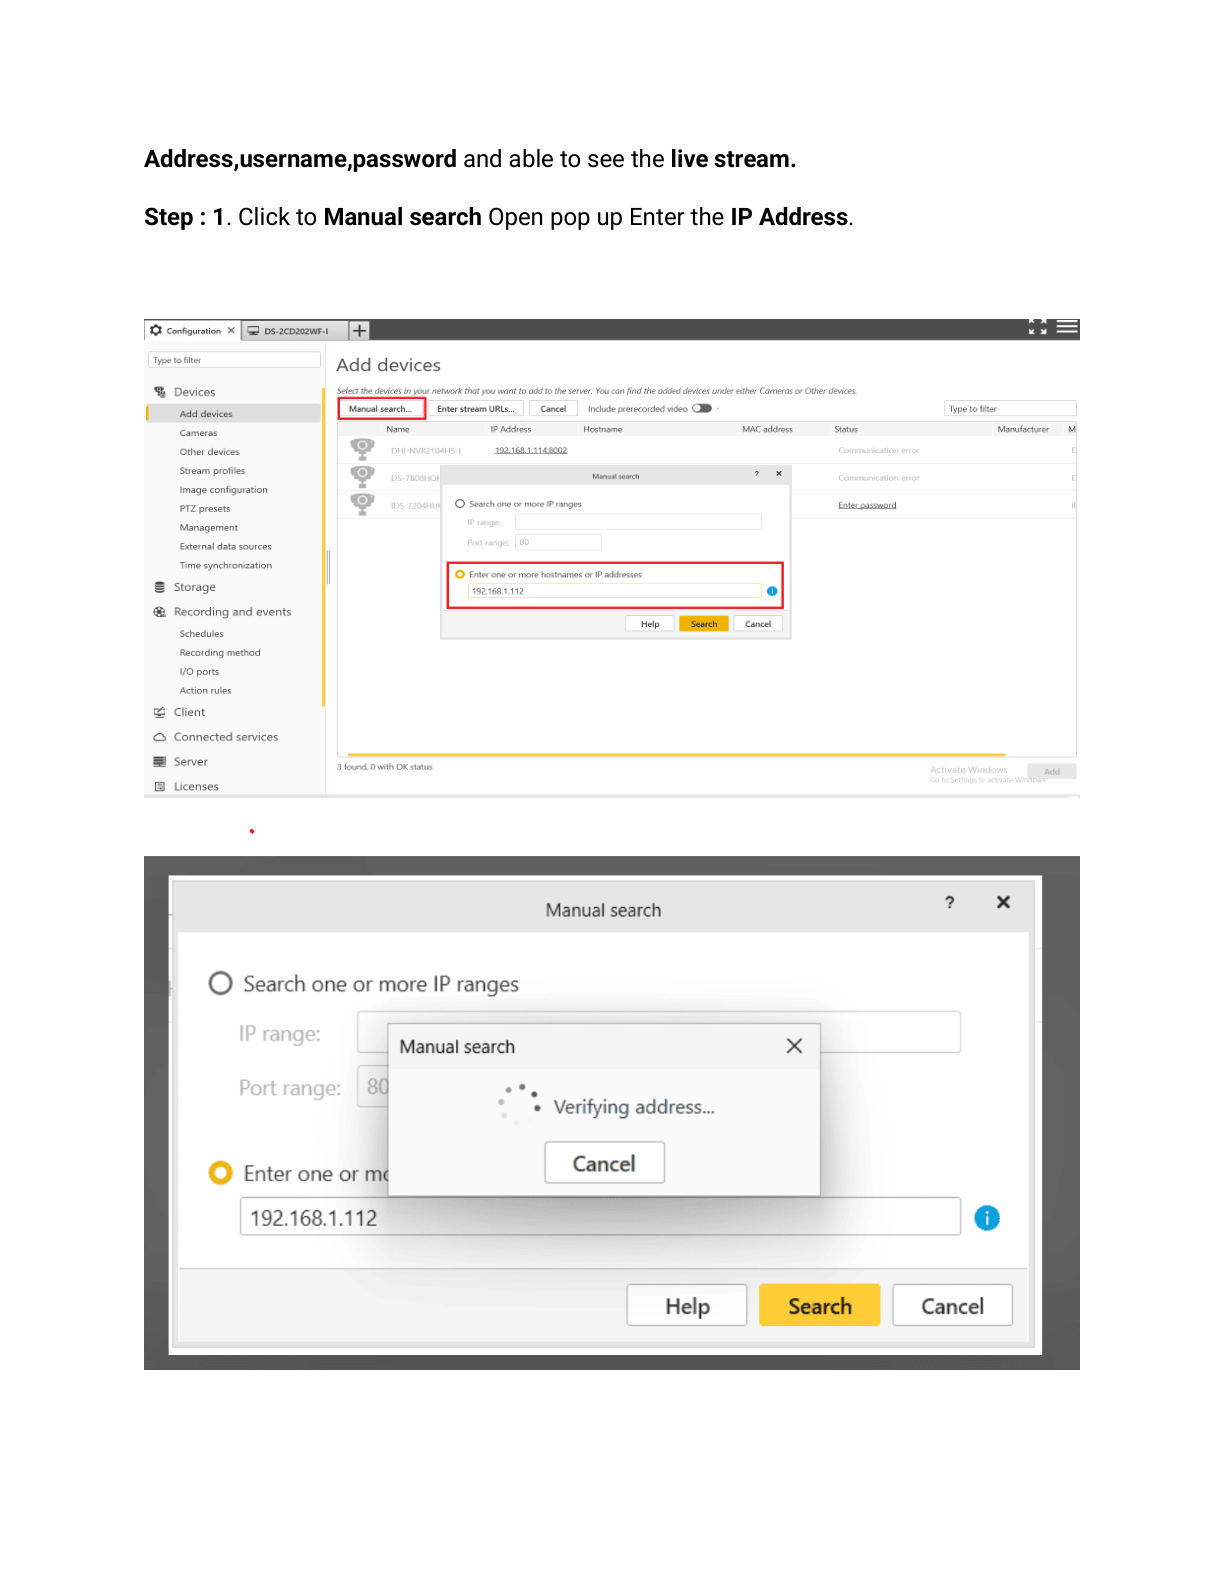
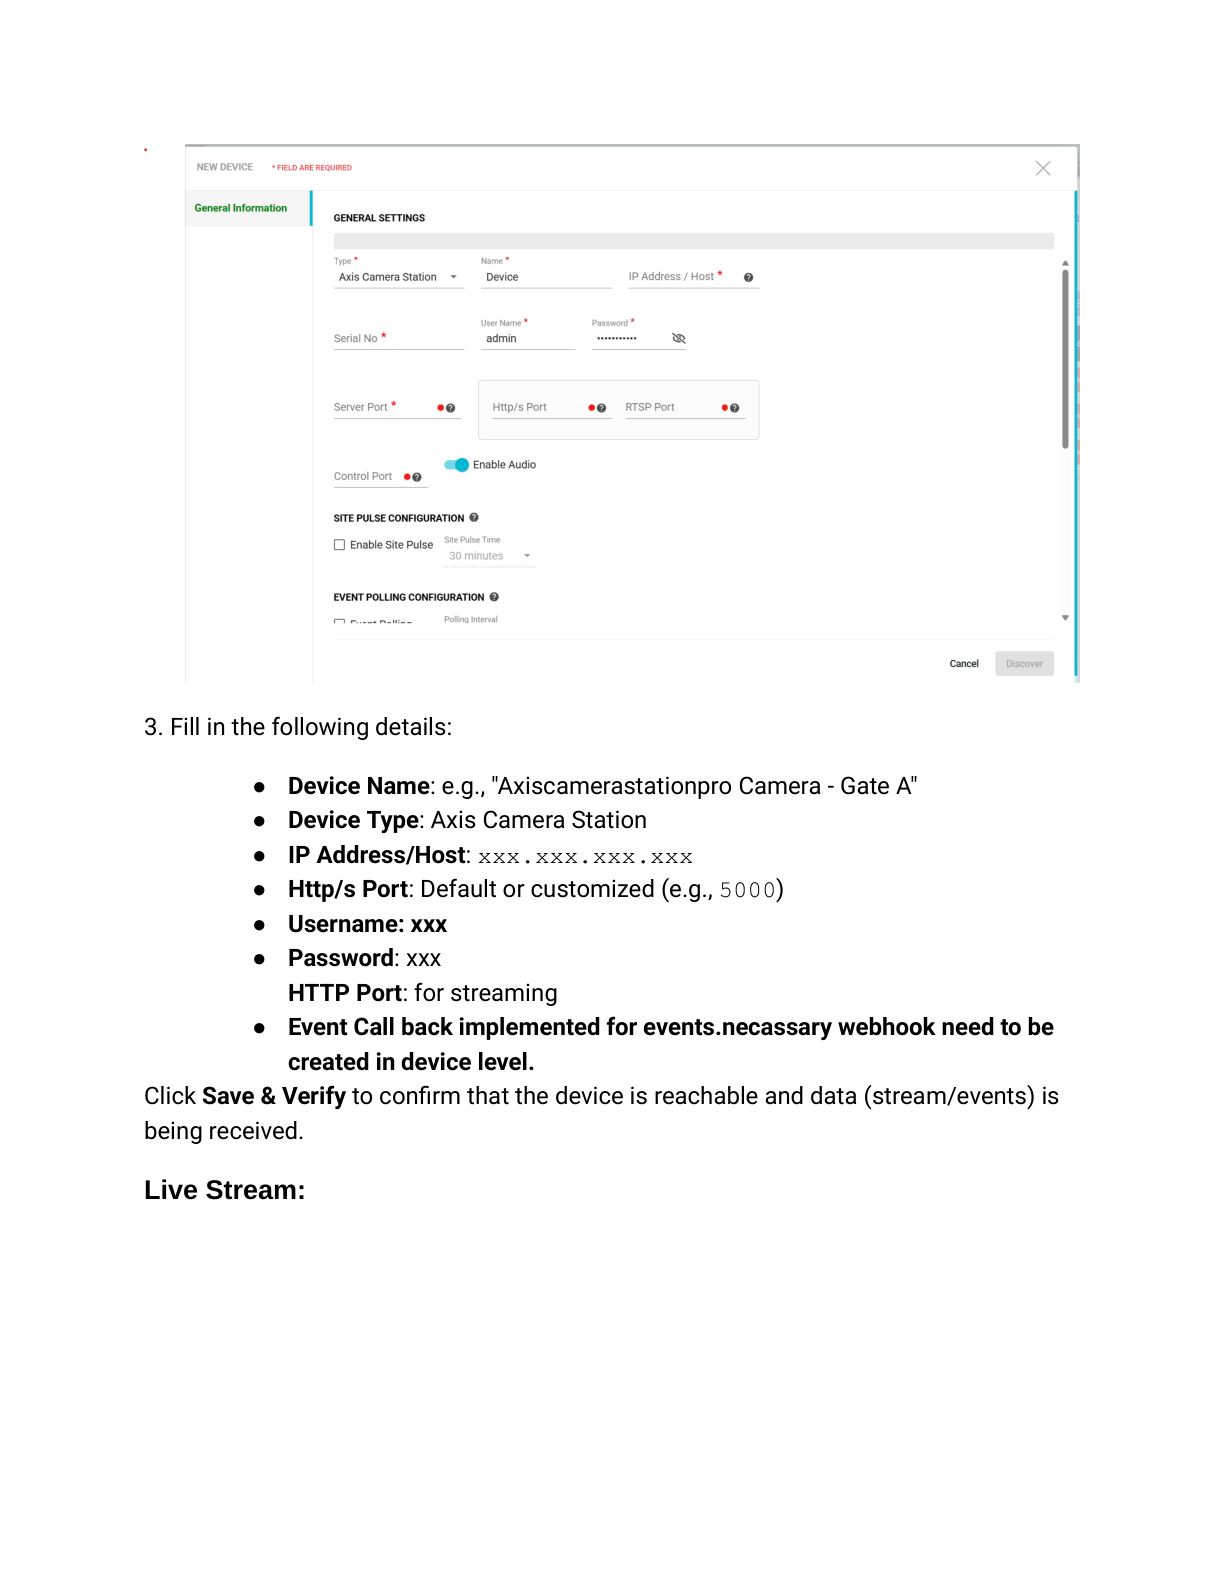
Step 7: Add Camera Station in GCXONE
UI Path: GCXONE Web Portal → Devices → Add Device
Objective: Register the Axis Camera Station server in the GCXONE platform.
Configuration Steps:
- Log into the GCXONE web portal with admin credentials
- Navigate to Devices → Add Device
- Select Axis Camera Station VMS from device types
- Enter Camera Station details:
- Device Name: Descriptive name (e.g., "Site A - Camera Station")
- IP Address/Hostname: Camera Station server IP (from Step 2)
- Port: 80 or 443 (match SDK configuration)
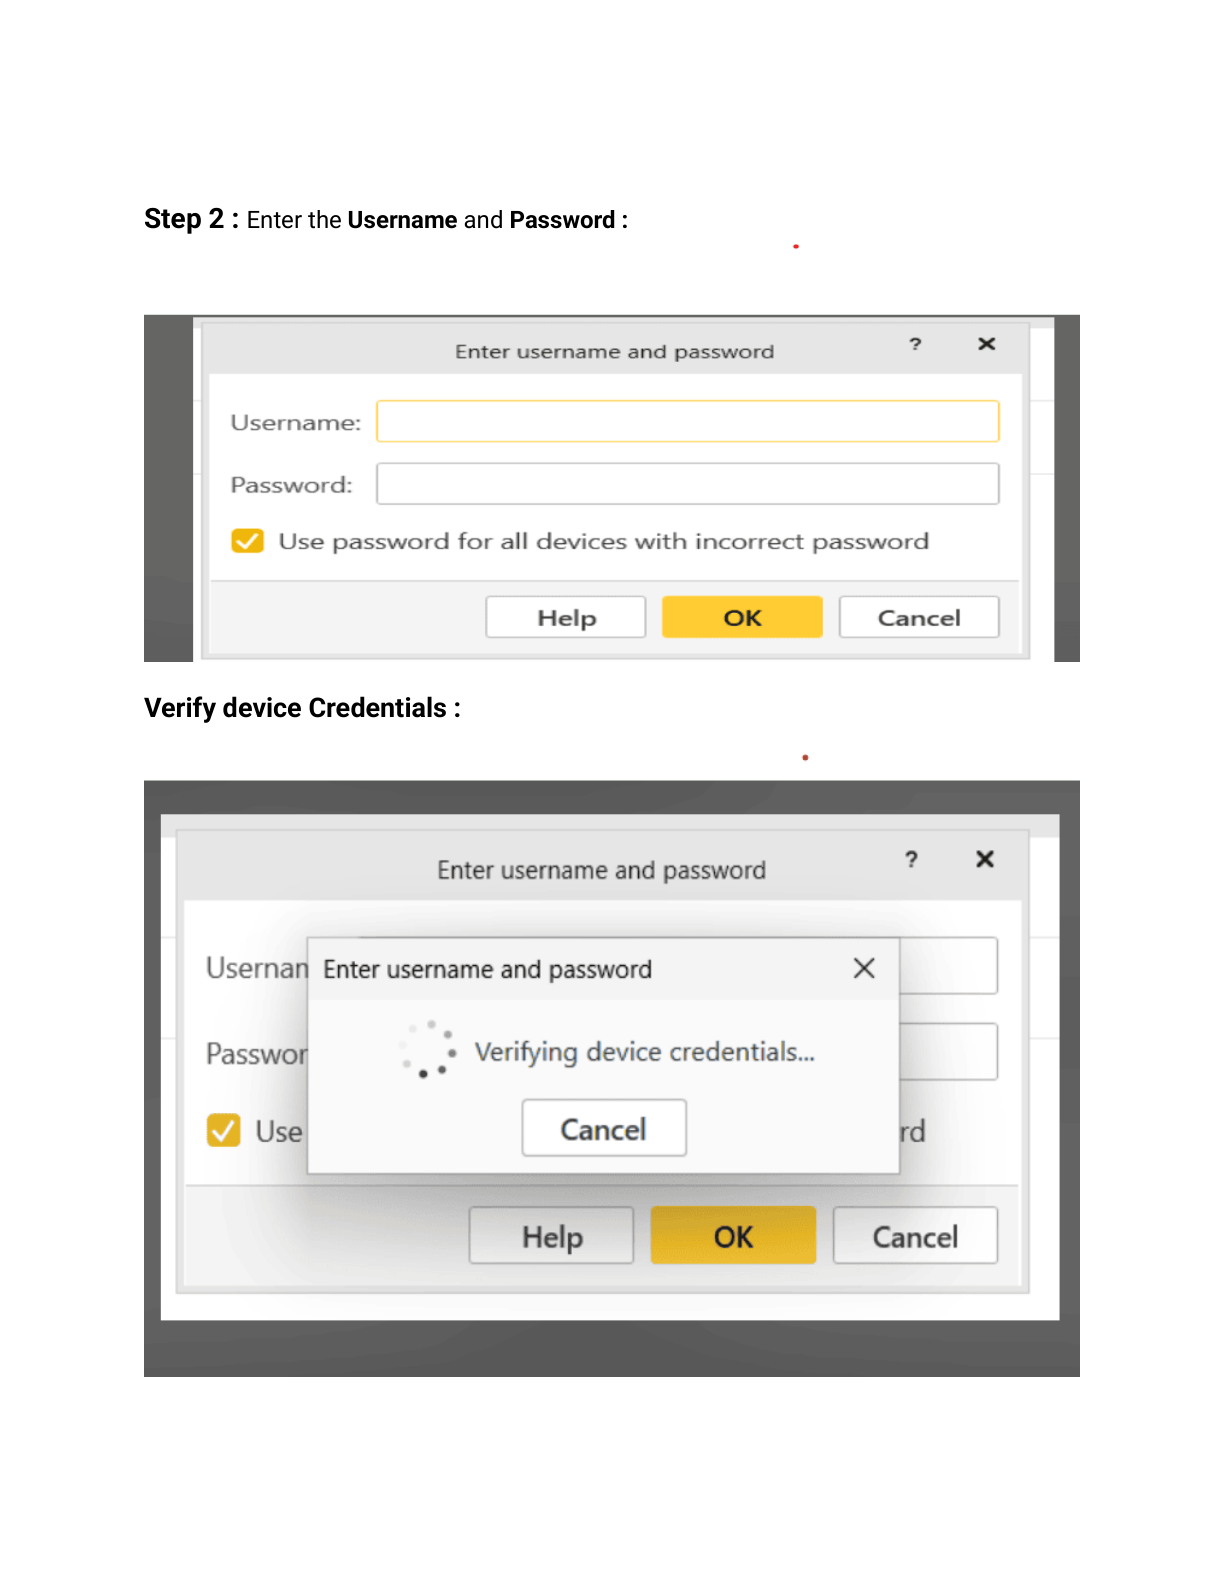
- Username: Integration user created in Step 3
- Password: Password for integration user
- Protocol: HTTP or HTTPS (HTTPS recommended)
- Click Test Connection to verify connectivity
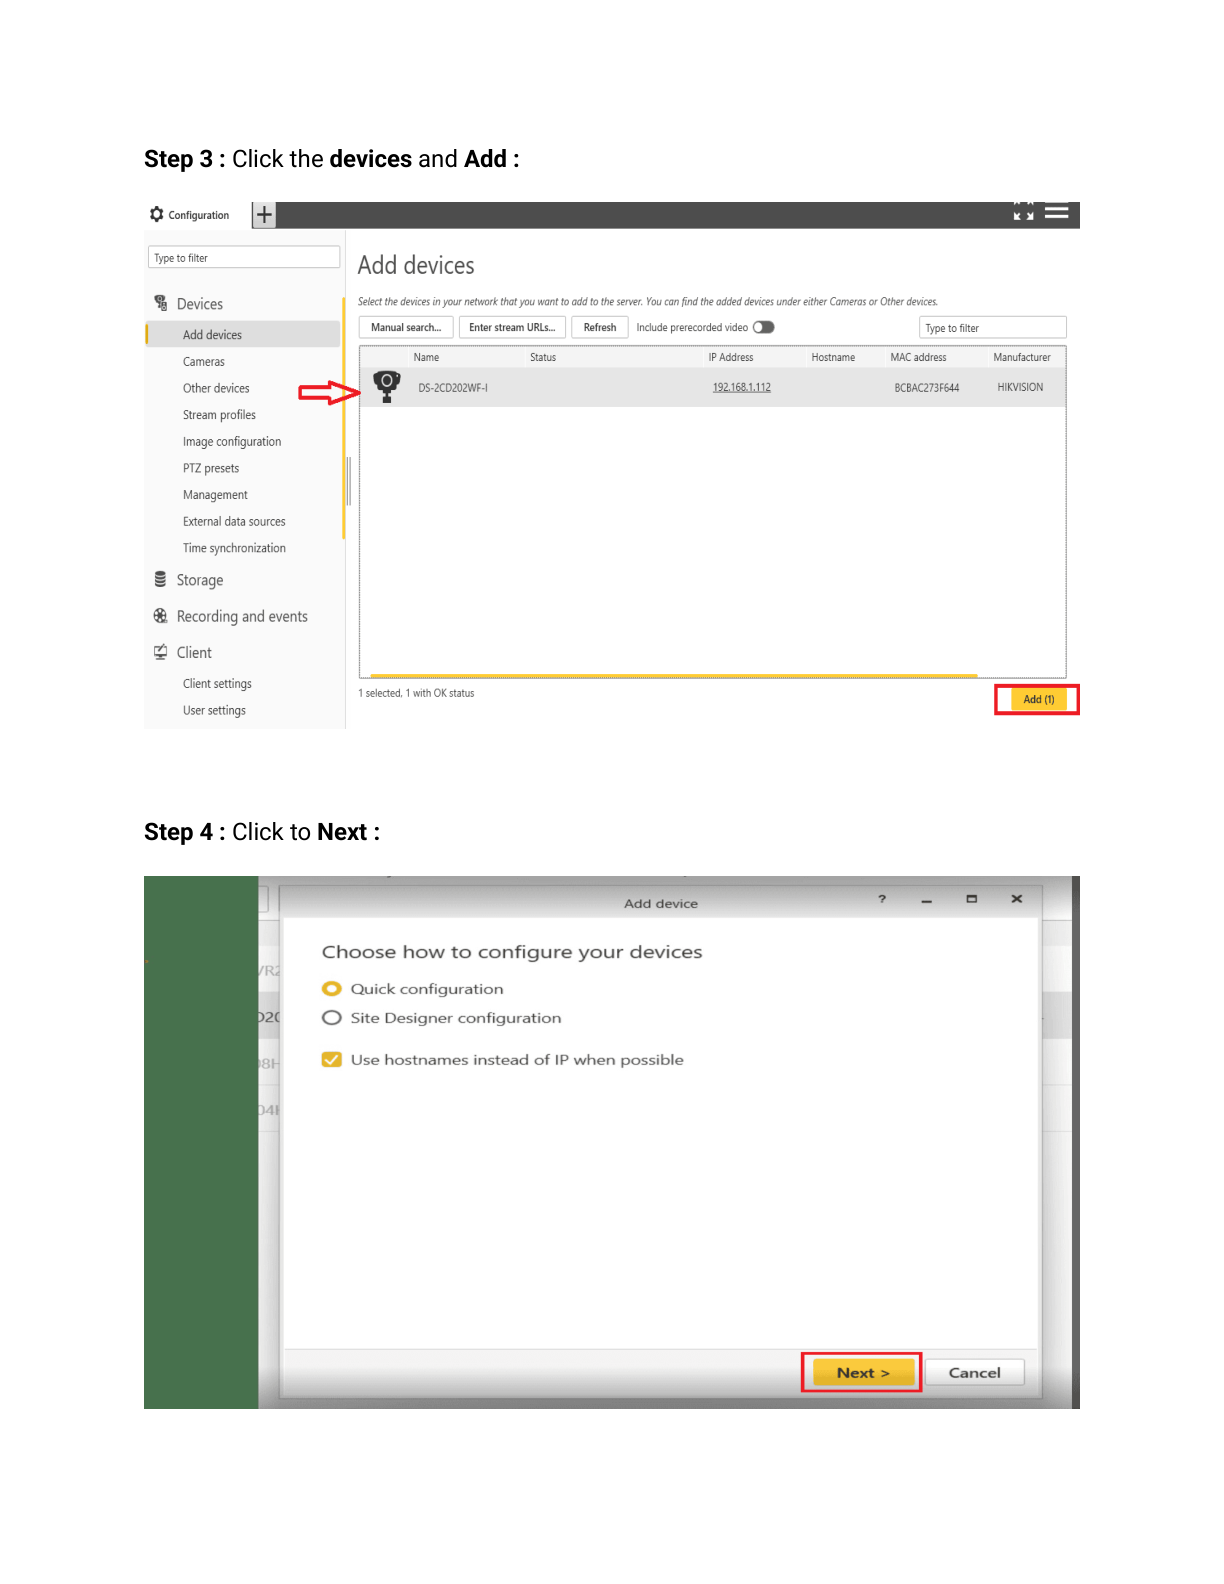
- Click Add Device to register in GCXONE
![]()
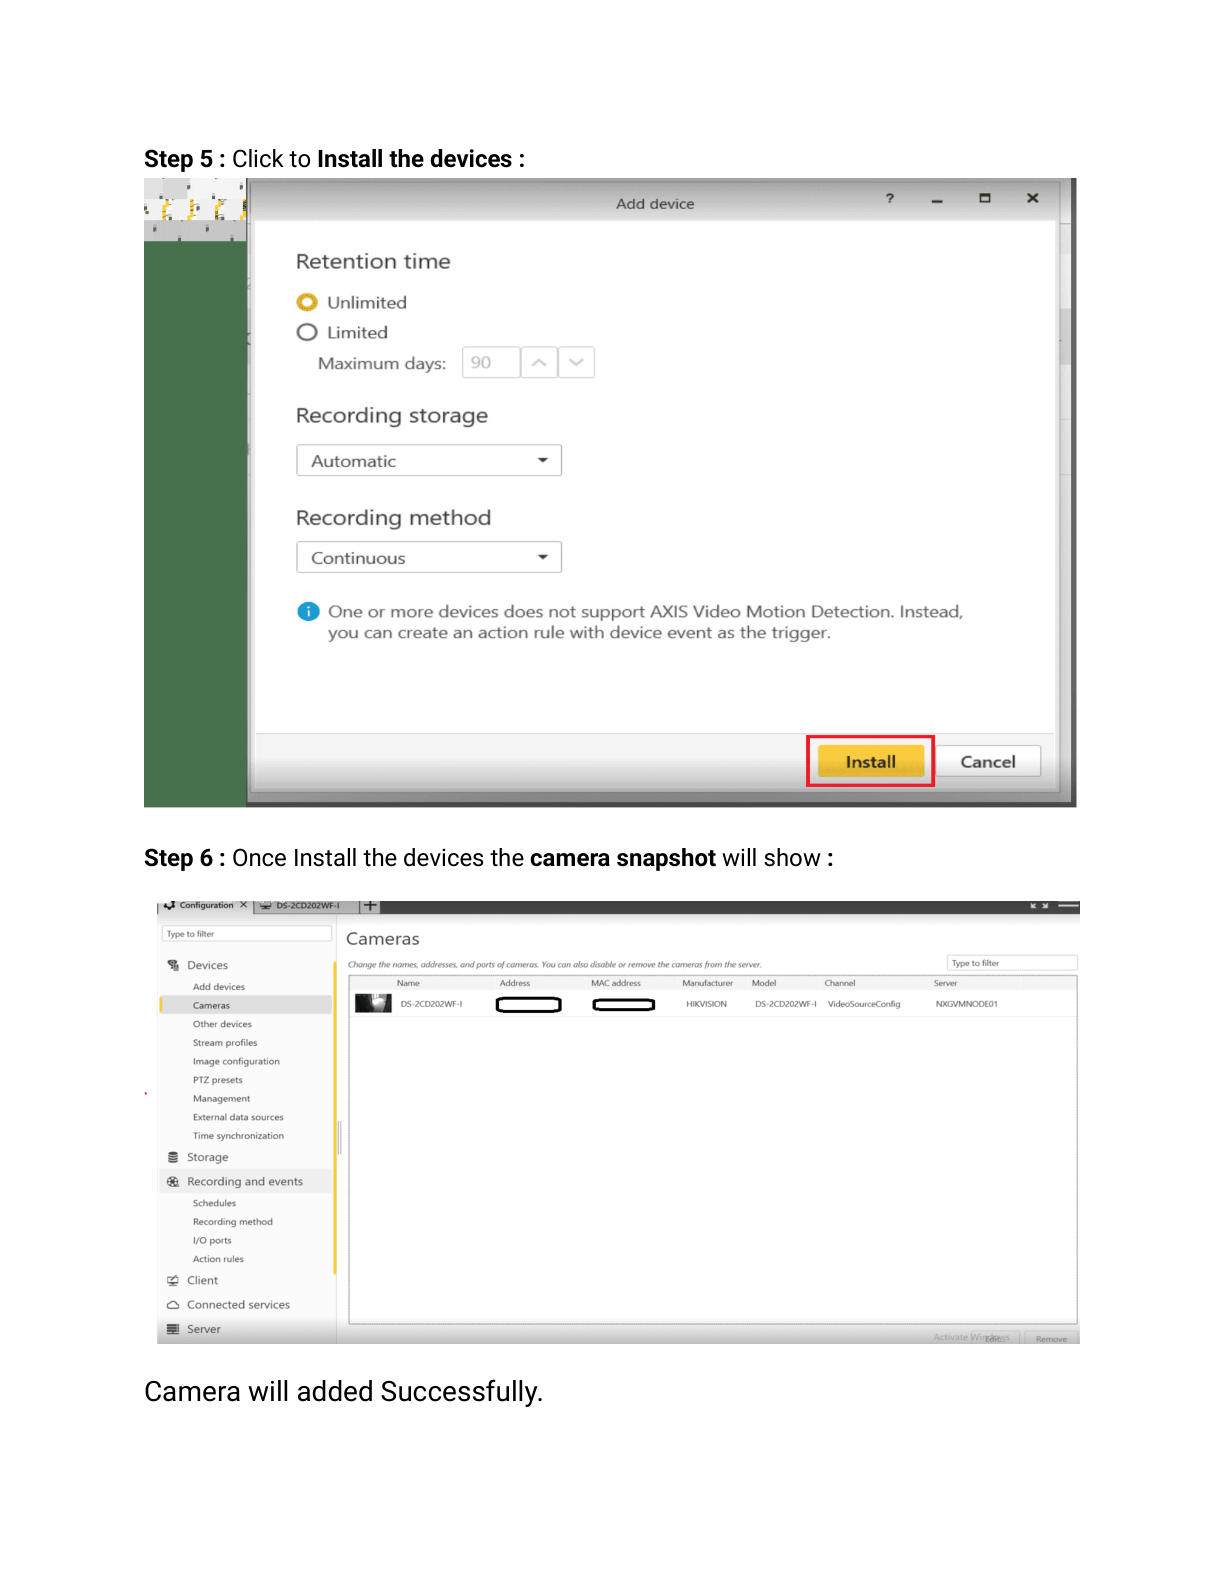
Expected Result: Camera Station successfully added and shows "Online" status in GCXONE.
Step 8: Configure Camera Mappings
UI Path: GCXONE → Devices → Camera Station → Cameras
Objective: Map Camera Station cameras to GCXONE for monitoring and management.
Configuration Steps:
- In GCXONE, navigate to the newly added Camera Station device
- Click Configure Cameras or Camera Management
- GCXONE will discover all cameras from Camera Station
- For each camera:
- Verify camera name and location
- Enable Cloud Streaming if desired
- Enable Event Forwarding to forward events to GCXONE
- Configure Stream Quality (high, medium, low)
- Assign cameras to Sites/Locations in GCXONE hierarchy
- Click Save Configuration
Expected Result: All cameras mapped and accessible in GCXONE with proper site assignments.
Step 9: Configure Event Rules and Notifications
UI Path: GCXONE → Camera Station → Event Configuration
Objective: Set up event forwarding and notification rules.
Configuration Steps:
- Navigate to Event Configuration for the Camera Station device
- Enable Event Forwarding:
- ✓ Motion Detection Events
- ✓ Video Analytics Events
- ✓ System Events (camera offline, disk full)
- ✓ I/O Trigger Events
- Configure Notification Rules:
- Select events to trigger notifications
- Configure notification channels (email, push, SMS)
- Set notification recipients
- Configure Event Actions:
- Auto-record on event
- Send to monitoring dashboard
- Trigger integrations (alarms, access control, etc.)
- Click Save to apply event rules
Expected Result: Events from Camera Station are forwarded to GCXONE and trigger configured actions.
Part 4: Verification and Testing
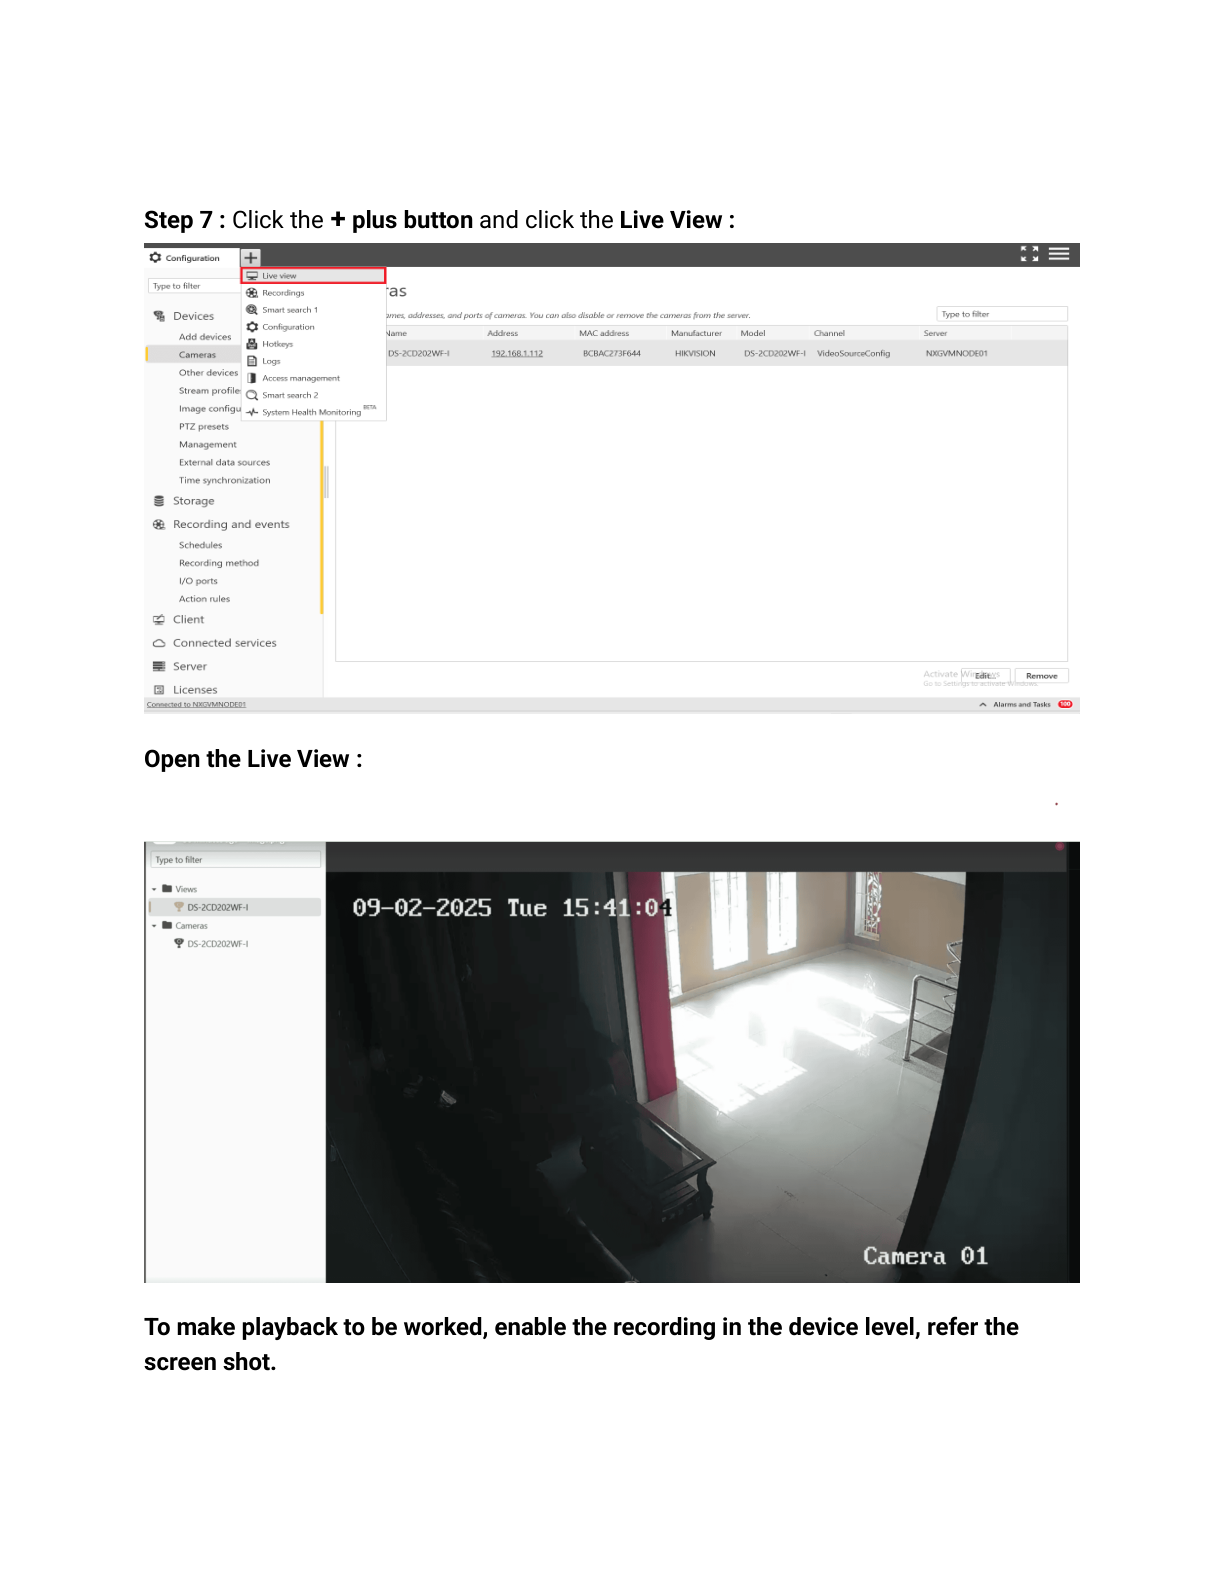
Step 10: Verify Live Streaming
UI Path: GCXONE → Cameras → Live View
Objective: Confirm live video streaming works from Camera Station through GCXONE.
Configuration Steps:
- In GCXONE, navigate to Cameras → Live View
- Select a camera from the Camera Station device
- Verify live video stream loads successfully
- Test stream quality and latency
- Test PTZ Controls (if camera supports PTZ):
- Pan left/right
- Tilt up/down
- Zoom in/out
- Preset positions
- Test Audio (if enabled):
- Listen to camera audio
- Test two-way audio if supported
Expected Result: Live video streams successfully with acceptable latency, PTZ and audio work correctly.
Step 11: Verify Playback and Timeline
UI Path: GCXONE → Cameras → Playback
Objective: Confirm video playback and timeline features work correctly.
Configuration Steps:
- Navigate to Cameras → Playback in GCXONE
- Select a camera and choose a time range
- Verify recorded video plays back smoothly
- Test Timeline Navigation:
- Scroll through timeline
- Click on event markers
- Verify event types are displayed
- Test Playback Controls:
- Play/Pause
- Fast forward/rewind
- Speed adjustment (1x, 2x, 4x)
- Snapshot capture
- Verify Video Export functionality
Expected Result: Playback works smoothly with timeline showing events, export functions properly.
Step 12: Test Event Detection and Forwarding
UI Path: GCXONE → Events Dashboard
Objective: Verify events are being detected and forwarded correctly.
Configuration Steps:
- Trigger a test event at a camera:
- Walk in front of camera to trigger motion detection
- Or manually trigger an I/O input if available
- Navigate to Events Dashboard in GCXONE
- Verify the event appears in real-time:
- Event type displayed correctly
- Timestamp accurate
- Camera source identified
- Event thumbnail/snapshot present
- Click on event to view details:
- Event video clip
- Event metadata
- Associated actions
- Verify notifications were sent (if configured)
Expected Result: Events are detected, forwarded to GCXONE immediately, and notifications sent as configured.
Advanced Configuration
PTZ Preset Configuration
If using PTZ cameras, you can configure preset positions:
- In GCXONE, navigate to camera PTZ settings
- Use PTZ controls to position camera at desired location
- Click Save Preset and name it (e.g., "Main Entrance", "Parking Lot")
- Repeat for additional preset positions
- Test presets by selecting them from the dropdown

I/O Configuration
For cameras with digital I/O ports:
- In Camera Station, navigate to Configuration → I/O Settings
- Configure Input Ports:
- Name each input (e.g., "Door Contact", "PIR Sensor")
- Set trigger type (normal open/closed)
- Configure recording and event actions
- Configure Output Ports:
- Name each output (e.g., "Alarm Siren", "Door Strike")
- Set default state
- In GCXONE, map I/O ports to automation rules

Genesis Audio (SIP) Configuration
To enable two-way audio via Genesis Audio:
- In Camera Station, enable SIP Audio Service
- Configure SIP server settings provided by GCXONE
- Register Camera Station as a SIP endpoint
- In GCXONE, configure audio routing rules
- Test two-way communication
Verification Checklist
Before completing configuration, verify all core functions:
- Live streaming works for all cameras (cloud and local)
- Playback and timeline navigation functional
- Events are detected and forwarded to GCXONE
- PTZ control works (if applicable)
- Audio streaming works (if enabled)
- I/O triggers work correctly (if configured)
- Notifications are sent as configured
- Mobile app access functional
- Integration status shows "Online" in GCXONE
- No error messages in Camera Station or GCXONE logs
Troubleshooting
If you encounter issues during configuration, see the Troubleshooting Guide for common problems and solutions.
Related Articles
- Axis Camera Station Overview
- Axis Camera Station Troubleshooting
- Firewall Configuration
- Required Ports
Need Help?
If you need assistance with Axis Camera Station configuration, contact support.