Avigilon Installer Configuration
This guide provides step-by-step instructions for configuring Avigilon Video Management System (VMS) to integrate with GCXONE. Follow these steps to ensure proper video streaming, analytics, event detection, and device connectivity.
Configuration
Step-by-Step
Prerequisites
Before You Begin
- ✅ Avigilon ACC client software installed
- ✅ ACC 7 Web Endpoint Service installed
- ✅ IT team responsible to set up port forwarding on firewall or router
- ✅ Administrative access to Avigilon system
- ✅ Network connectivity to Avigilon ACC server
Step 1: Install Essential Software Components
Step 1: Install Essential Software Components
Install WebAPI Endpoint
- In case of having Avigilon VMS, install WebAPI Endpoint
- Install the Avigilon WebAPI endpoint by following the instructions provided in the Avigilon WebAPI Endpoint Quick Start Guide
- This endpoint facilitates communication between the VMS and external applications
Ensure ACC Server Accessibility
- Confirm that the ACC (Avigilon Control Center) server is properly installed and operational
- The ACC server communicates with the external world through the configured server port, ensuring that the VMS can send and receive data as needed
Important: WebAPI Endpoint installation is mandatory for external communication with GCXONE. Ensure proper port forwarding is configured by your IT team.
Expected result: WebAPI Endpoint installed and ACC server accessible
Step 2: Login to Avigilon ACC Client
Step 2: Login to Avigilon ACC Client
UI path: ACC Client → Login
Configuration Steps
- In the ACC client login screen, locate the field to enter the device's IP address in the search bar
- Enter your username and password for the ACC client
Expected result: Successfully logged into ACC client
Step 3: Navigate to Camera Configuration
Step 3: Navigate to Camera Configuration
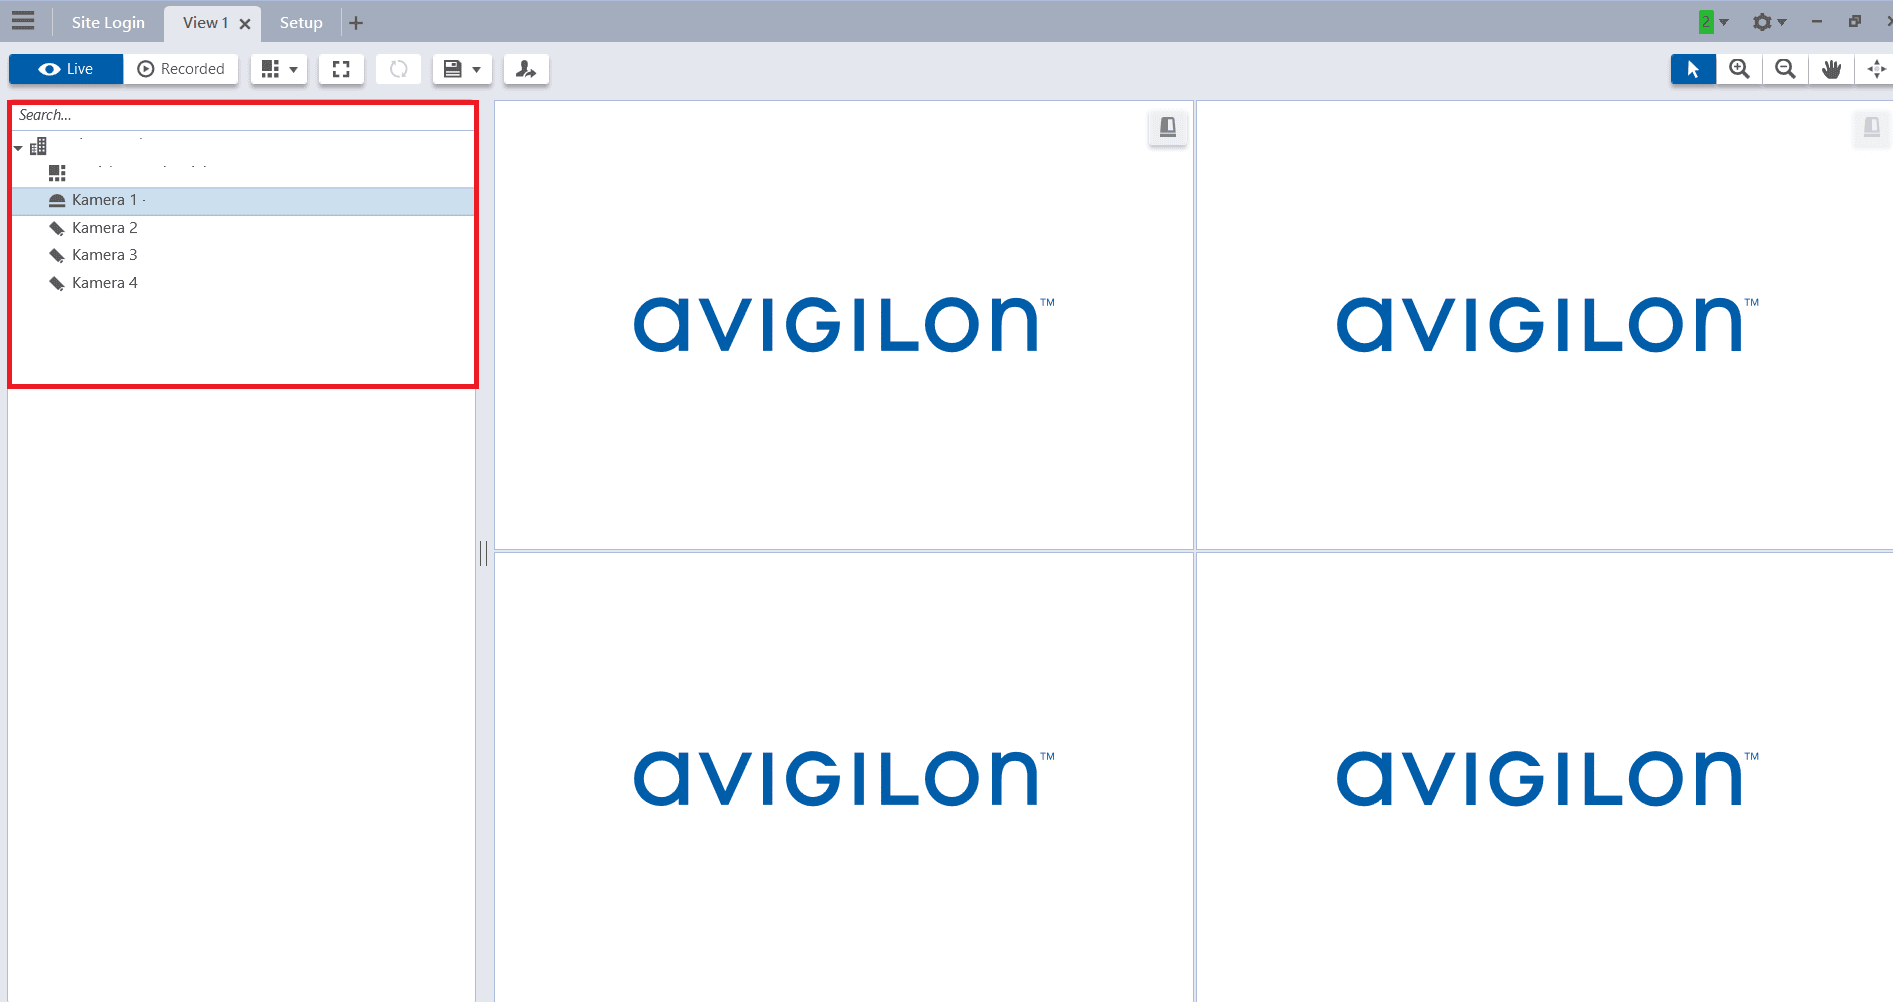
UI path: ACC Client → Camera Selection
Configuration Steps
- Once logged in, use the client interface to navigate to the specific camera or device you need to configure
Expected result: Camera interface accessible for configuration
Step 4: Access Camera Setup
Step 4: Access Camera Setup
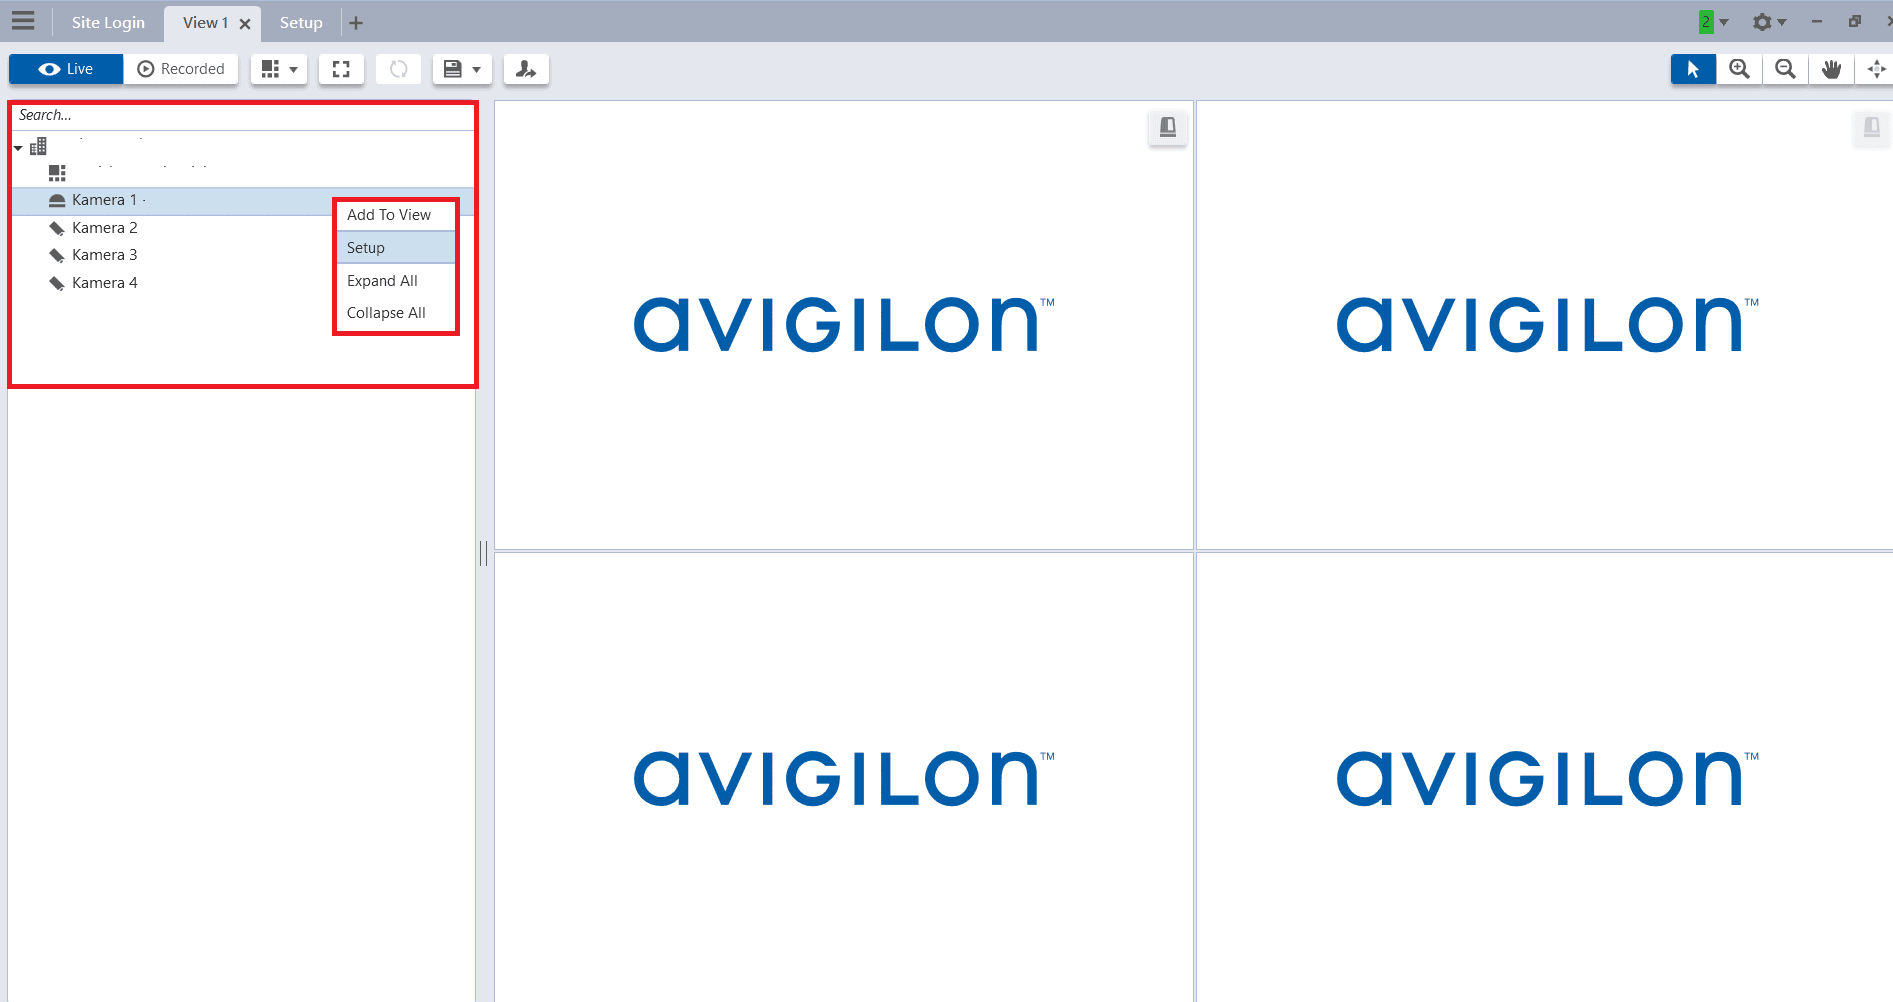
UI path: Camera → Right-Click → Setup
Configuration Steps
- Right-Click on the Camera you want to configure
- In the context menu that appears, click on "Setup"
- This will open the camera's configuration page
Expected result: Camera configuration page opened
Step 5: Configure Motion Detection Analytics
Step 5: Configure Motion Detection Analytics
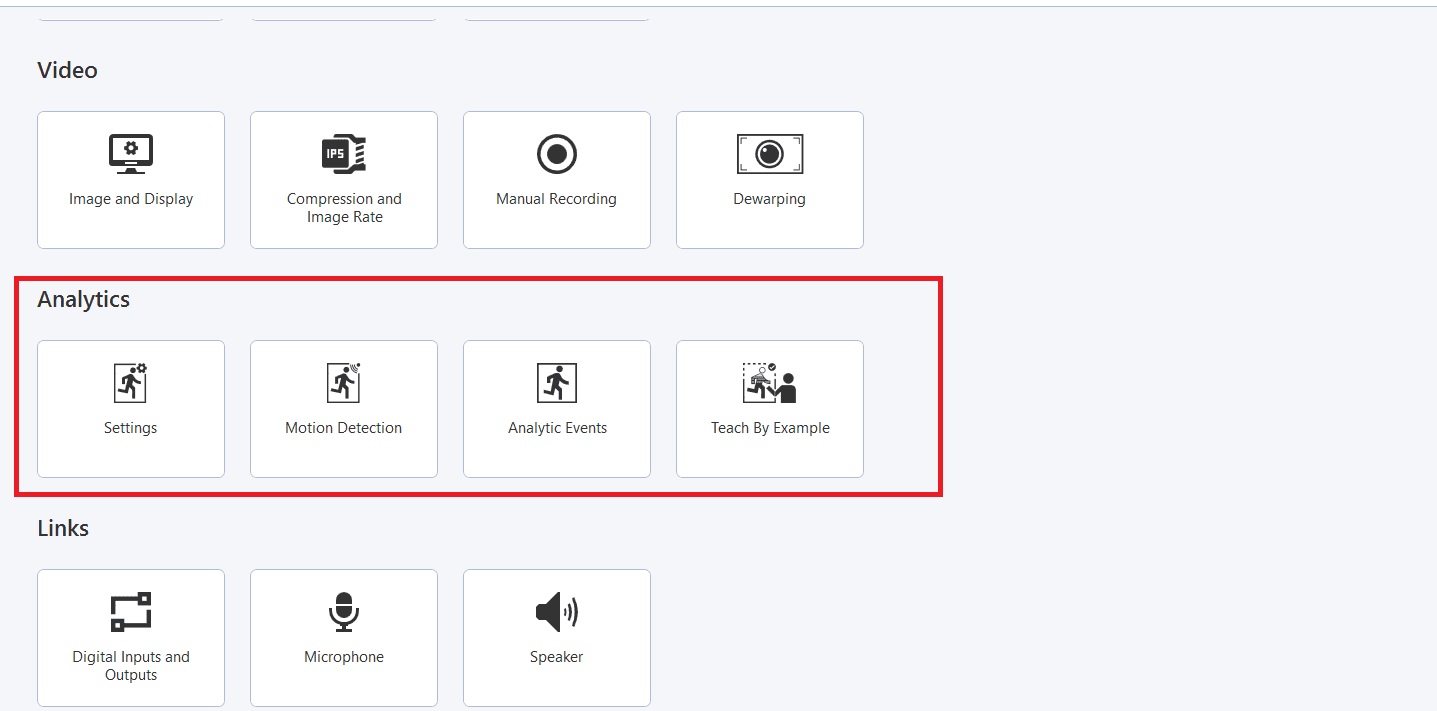
UI path: Camera Setup → Analytics → Motion Detection
Configuration Steps
- Choose and Configure the Type of Analytics
- After selecting the desired analytics type, you will be able to adjust various settings and parameters specific to that type
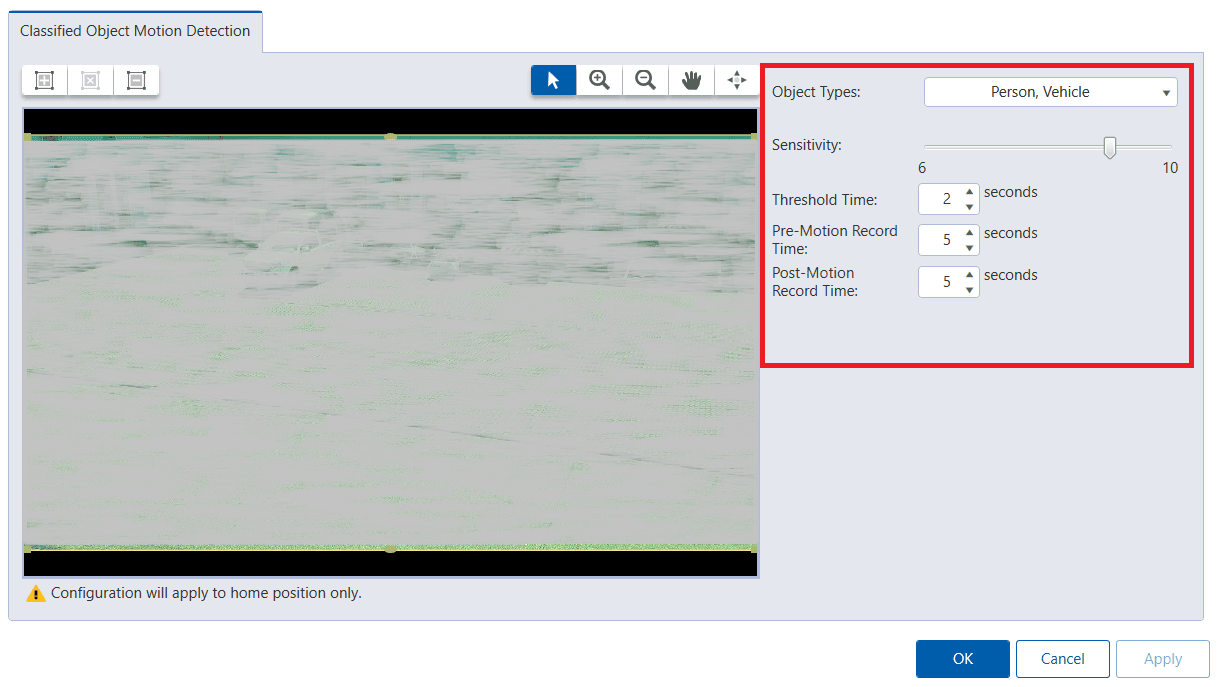
Configure Motion Detection parameters:
- Object Types: Select types of objects (Person, Vehicle)
- Sensitivity: Set sensitivity level (recommended 8-10)
- Threshold Time: Set minimum duration (recommended 2 seconds)
- Pre-Motion Record Time: Set recording time before event (recommended 10 seconds)
- Post-Motion Record Time: Set recording time after event (recommended 10 seconds)
Expected result: Motion detection analytics configured
Step 6: Configure Analytic Events
Step 6: Configure Analytic Events
UI path: Camera Setup → Analytics → Analytic Events
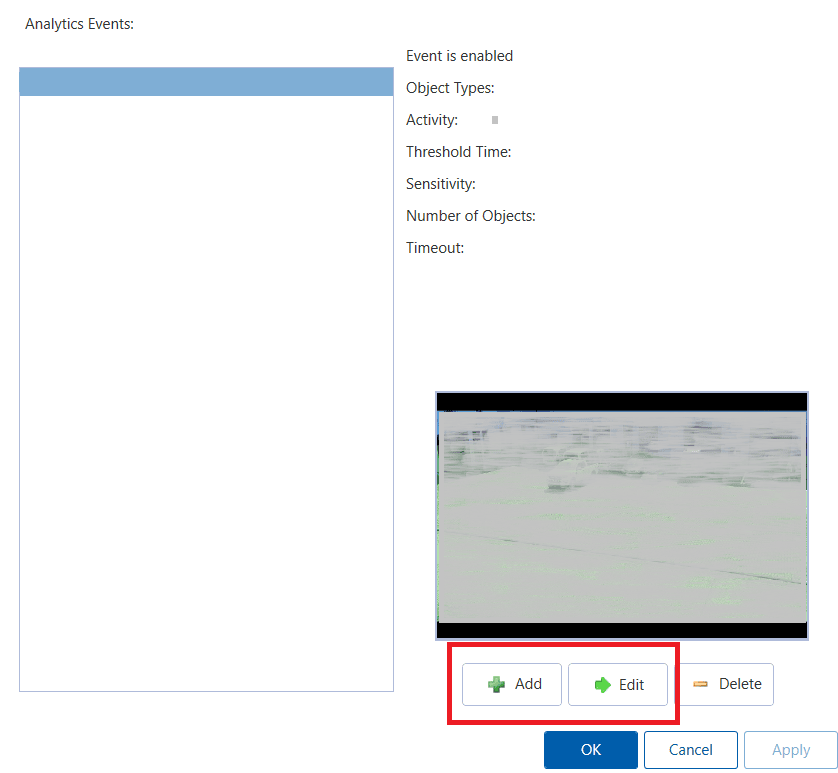
Setup Analytic Events
- Analytics process the video feed in real-time to detect and respond to specific activities or conditions
- Click on the button "Add"
- Define your Area of interest by clicking the icon on the top left of the screen


Configure Event Parameters
After you add the area of interest, setup the following:
- Enabled Checkbox: Check to enable the analytic event
- Activity: Select the type of activity to monitor within the defined zone
- Object Types: Specify what kinds of objects the system should detect
- Sensitivity: Set sensitivity level (recommended 8-10)
- Threshold Time: Set minimum duration (recommended 2 seconds)
- Number of Objects: Specify number of objects required to trigger event
- Timeout: Set wait time before resetting (recommended 10 seconds)
- Distance (feet): Set minimum distance an object must travel
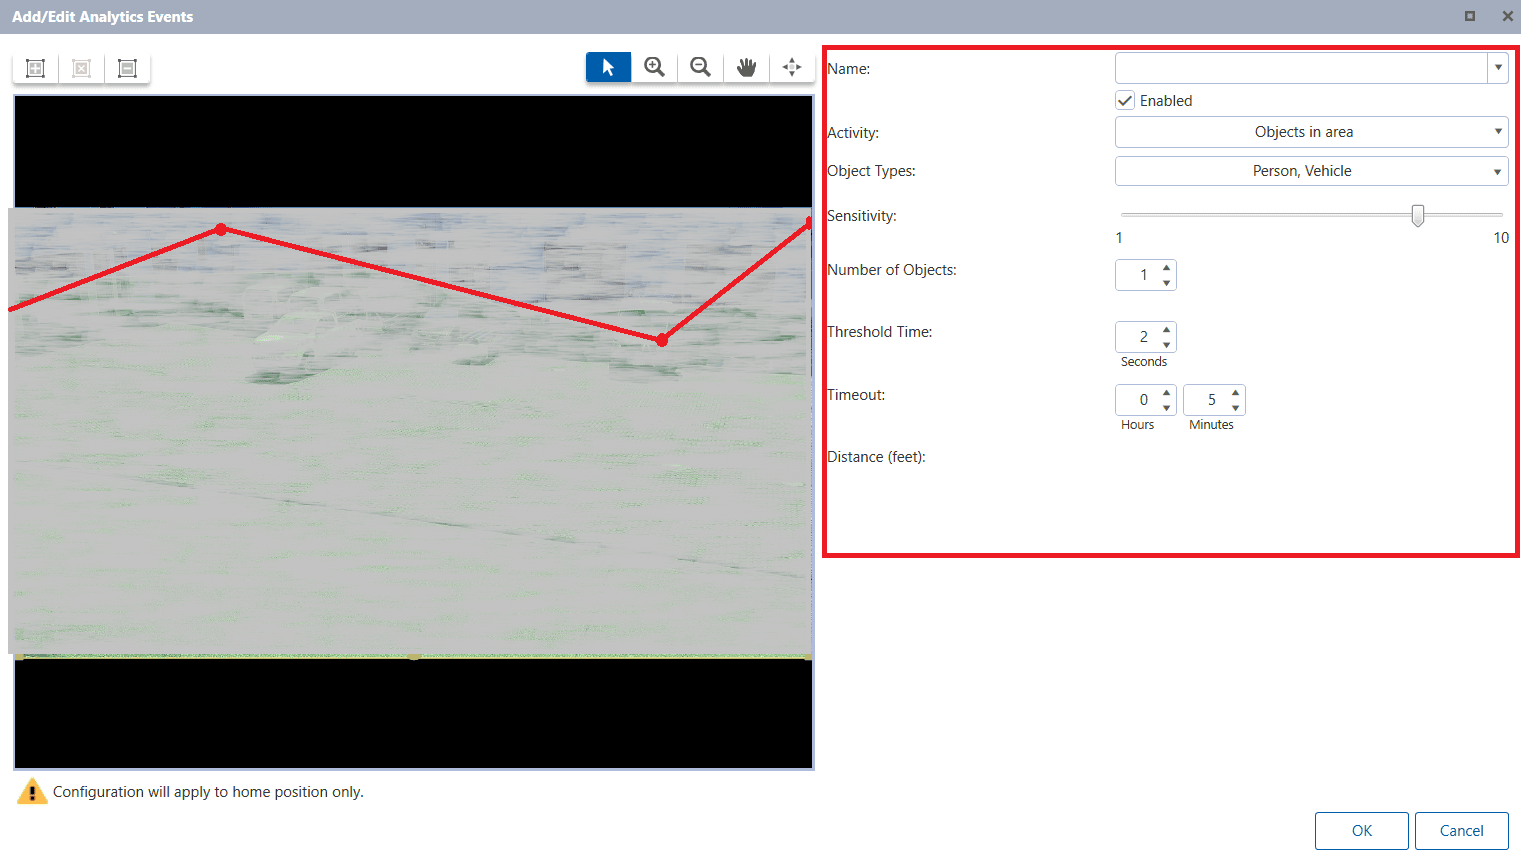
Expected result: Analytic events configured with area of interest
Step 7: Setup User Group for GCXONE
Step 7: Setup User Group for GCXONE
UI path: Site → Right-Click → Setup → User and Groups
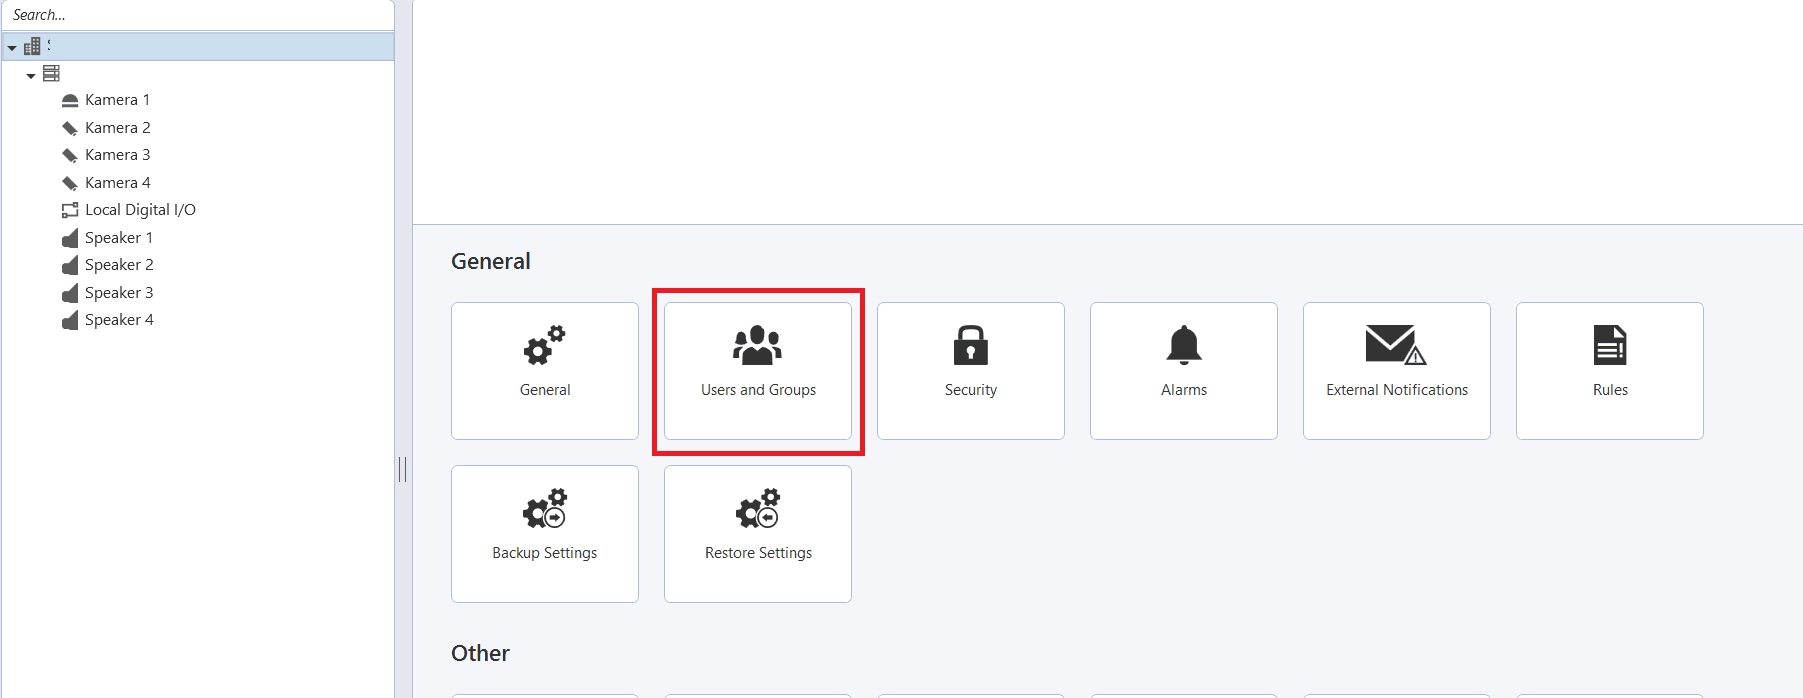
Access Site Configuration
- Right-Click on the Site you want to configure
- In the context menu that appears, click on "Setup"
- This will open the Site's configuration page
- Navigate to "User and groups"

Expected result: User and groups configuration accessed
Step 8: Create User Group
Step 8: Create User Group
UI path: Groups → Add
Configuration Steps
- Navigate to "Groups" and then click "Add"
- Add a copy permission, "Restricted Users" for NXGEN

Expected result: New user group created
Step 9: Configure Group Settings
Step 9: Configure Group Settings
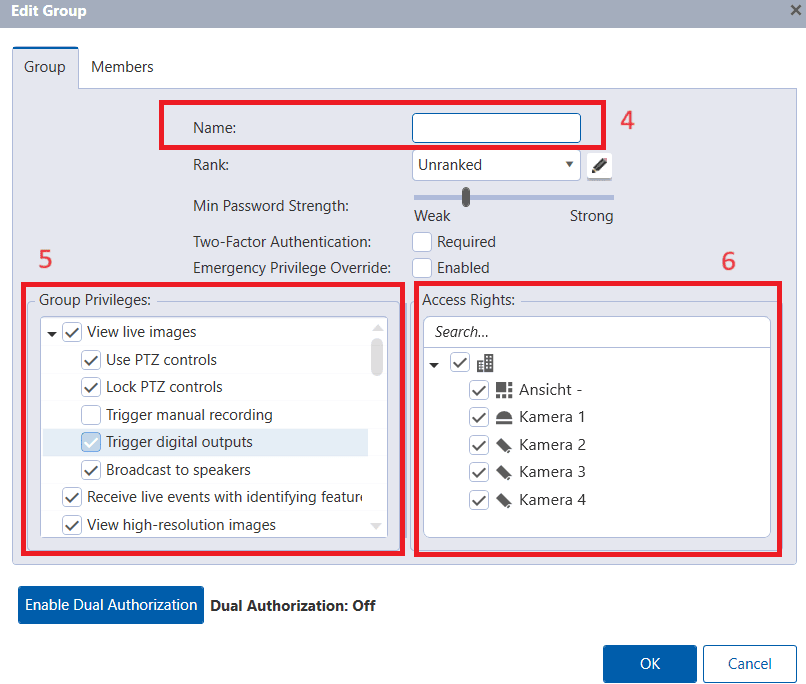
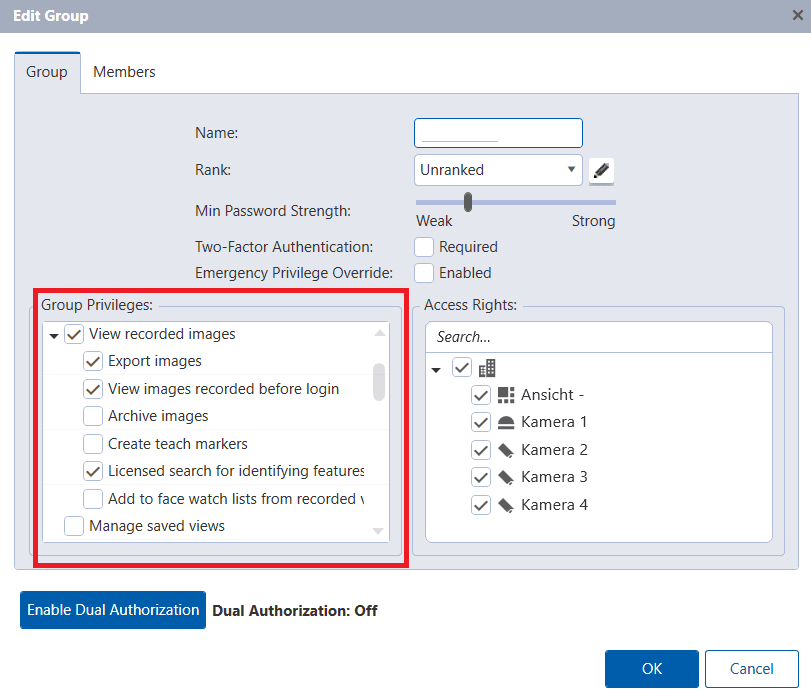
Configure Group Details
- Add the "Name" of the user, recommended to use "NXGEN" or "NXG" in the Name field
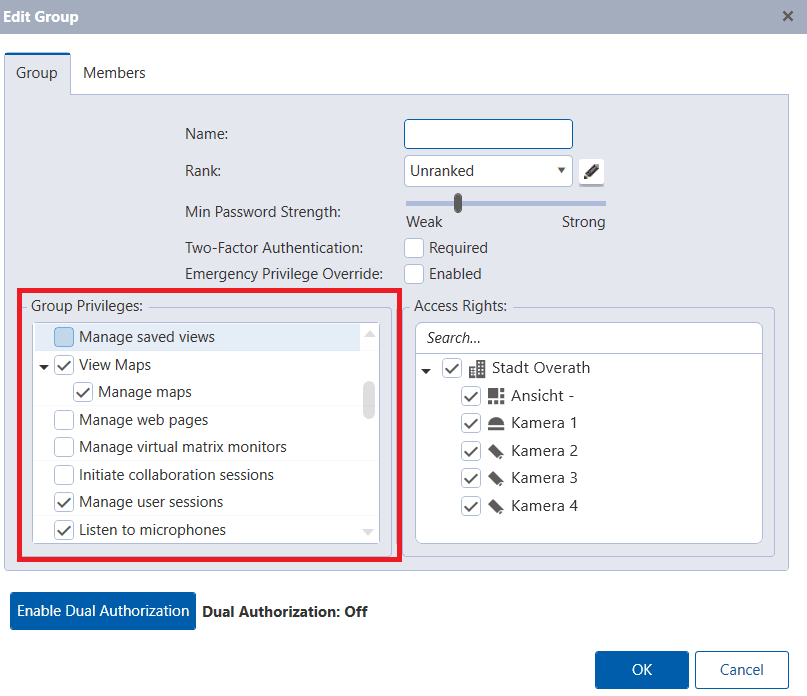
Add the privileges listed below in "Group Privileges":
View Live Images:
- Use PTZ controls
- Lock PTZ controls
- Trigger Digital Outputs
- Broadcast to speakers
- Receive live events with identifying features
- View high resolution images
View Recorded Images:
- Export images
- View images recorded before login
- Licensed search for identifying features
View Maps:
- Manage Maps
- Manage user sessions
- Listen to microphones
Expected result: Group privileges configured
Step 10: Add Cameras to Group
Step 10: Add Cameras to Group
Configuration Steps
- Add the cameras you want to appear on GCXONE platform
- Click "Ok" to save the changes
Expected result: Cameras assigned to user group
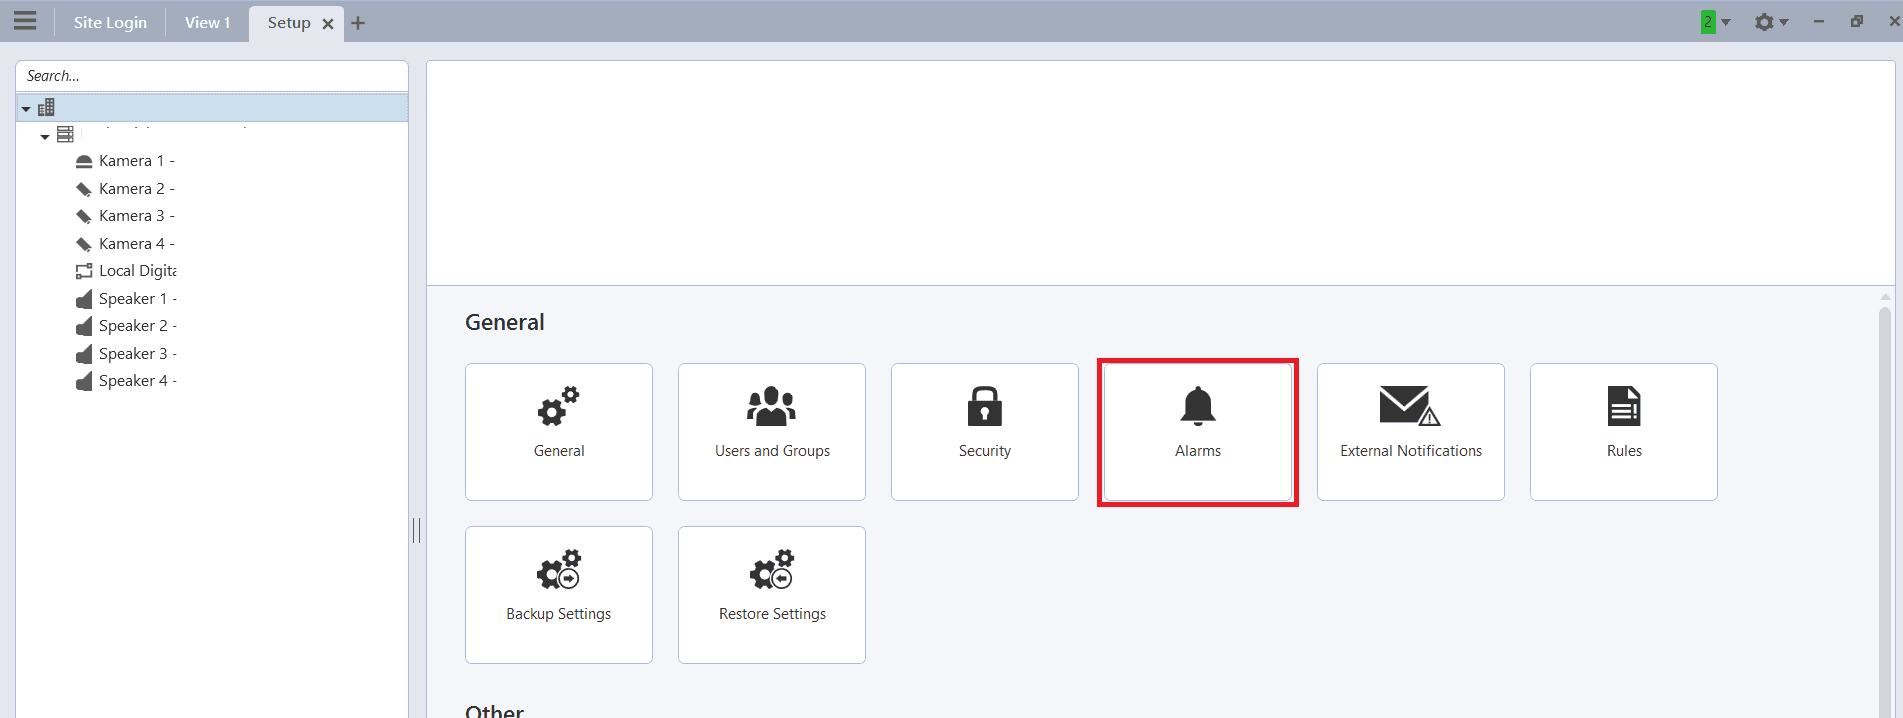
Step 11: Configure Alarms
Step 11: Configure Alarms
UI path: Setup → Alarms
Configuration Steps
- Back to the Setup page from previous step, Navigate to "Alarms"
- Click "Add"

Expected result: Alarm configuration page accessed
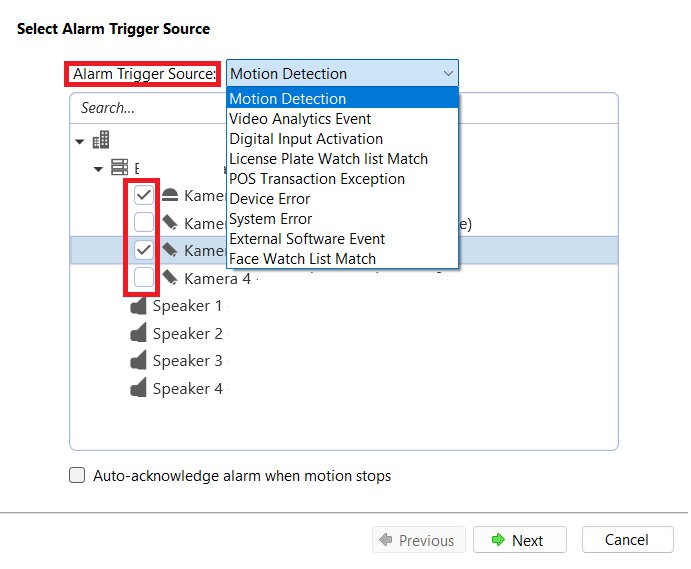
Step 12: Set Alarm Trigger Source
Step 12: Set Alarm Trigger Source
Configuration Steps
- Set the alarm trigger source, and select the cameras you are interested in
- Then click "Next"

Expected result: Alarm trigger source configured
Step 13: Configure Alarm Recording Settings
Step 13: Configure Alarm Recording Settings
Configuration Steps
- Select the devices you want to associate the type of alarm with
- Setup the "Pre-alarm recording time" (recommended 10 seconds)
- Setup the recording duration below
- Then click "Next"

Expected result: Alarm recording settings configured
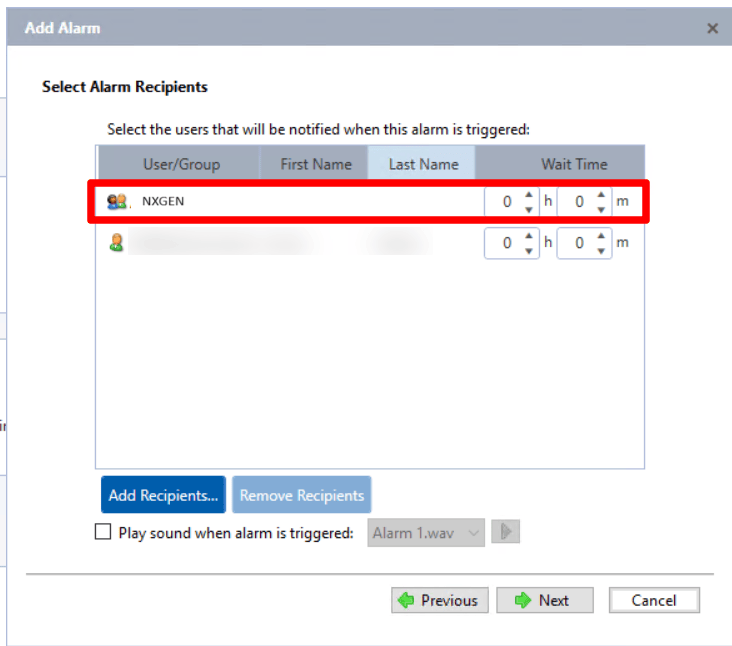
Step 14: Configure Alarm Recipients
Step 14: Configure Alarm Recipients
UI path: Alarm Recipients → Add Recipients
Configuration Steps
- Select alarm recipients
- Click on "Add Recipients" and ensure to select the group you configured earlier
- Click "Next"

Expected result: Alarm recipients configured
Step 15: Finalize Alarm Configuration
Step 15: Finalize Alarm Configuration
Configuration Steps
- Select the user as configured
- Then click "Add"
- Select the duration needed to notify the recipient when an alarm is triggered
- Don't forget to Save the changes
Expected result: Alarm configuration completed and saved
Step 16: Configure Device in GCXONE
Step 16: Configure Device in GCXONE
UI path: GCXONE → Site → Configuration App → Devices
Configuration Steps
- Go into the Site that you want to add the device to in GCXONE Configuration App
- Choose Avigilon as your device, and Fill in the Serial Number, UserName, and Password of the device
- Once the details are filled, click on Discover and you should see the sensors discovered
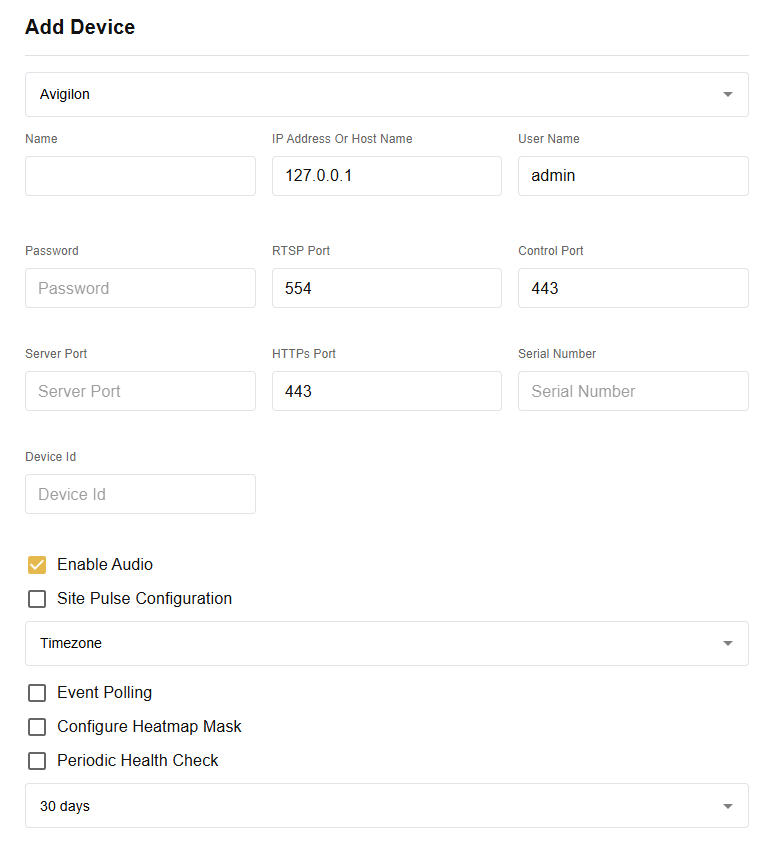
Expected result: Sensors discovered successfully in GCXONE
Step 17: Verify Integration
Step 17: Verify Integration
Verification Checks
- ✅ Verify WebAPI endpoint is functional
- ✅ Test user group access and permissions
- ✅ Confirm analytics are generating appropriate events
- ✅ Test alarm notifications
- ✅ Verify camera access through configured user group
- ✅ Check live view and playback functionality
Expected result: Complete Avigilon integration with GCXONE platform
Troubleshooting
Common Issues and Solutions
- WebAPI Endpoint Issues
- User Access Problems
- Analytics Not Working
- Alarm Configuration Issues
- Verify WebAPI endpoint is properly installed
- Check port forwarding configuration
- Ensure ACC server is accessible externally
- Verify user group permissions are correctly configured
- Check camera assignments to user group
- Ensure proper privileges are granted
- Check sensitivity settings (recommended 8-10)
- Verify area of interest is properly defined
- Confirm threshold time and timeout settings
- Verify alarm trigger sources are correctly selected
- Check recipient configuration matches user group
- Ensure recording settings are properly configured
Related Articles
Need Help?
If you're experiencing issues during configuration, check our Troubleshooting Guide or contact support.