Camect Installer Configuration
This guide provides step-by-step instructions for configuring Camect Hub/NVR devices to integrate with GCXONE. Follow these steps to ensure proper video streaming, AI event detection, and device connectivity.
Configuration
Step-by-Step
Prerequisites
Before You Begin
- ✅ Network: Reachable IP, correct VLAN and ports (80/443/554/RTSP/TCP as used)
- ✅ Time sync: Match Camect time zone with GCXONE. Enable NTP
- ✅ Access: Admin to Camect UI and GCXONE Config App
- ✅ IP allowlist: Update if your site uses whitelisting
- ✅ Test account: Create a dedicated user for GCXONE
Step 1: Prepare Camect (Users, Time, RTSP)
Step 1: Prepare Camect (Users, Time, RTSP)
UI path: Users
User Configuration
- Create a local user (e.g.,
NXG) with password Grant the following permissions:
- Live view
- Query Cameras
- Pan/Tilt Cameras
- View alerts
- View footage
- Share cameras
- Change operating modes
Time/NTP Configuration
- Set time zone to match GCXONE
- Enable NTP
- Save configuration
RTSP Configuration
- Ensure RTSP is enabled on the hub
Best Practice: Use a dedicated least-privilege user for GCXONE. Do not reuse admin account.
Expected result: Dedicated user exists; time is correct; RTSP is on
Step 2: Configure Alerts and Monitoring
Step 2: Configure Alerts and Monitoring
UI path: Hub Settings → Alert
Enable Alert Detection
- Check Detect alerts
- Choose objects under Detect objects in alerts
- Select required alert types
Make Events Available to GCXONE
- Click Add Monitoring → choose NXGEN
On the NXGEN page set:
- Site ID = 1 (or as provided by NXGEN support)
- TCP address =
3.122.169.231:10520(or as provided by NXGEN support)
- Click Add camera for each camera to forward
Important: Enable Detect alerts and set Monitoring → NXGEN so GCXONE receives events. This is critical for event transmission.
Expected result: Camect generates alerts and forwards them to GCXONE
Step 3: Enable Secondary Stream (Recommended)
Step 3: Enable Secondary Stream (Recommended)
UI path: Camera → Settings → Information → Edit Substream
Configuration Steps
- Change Substream from
0to1 - Save the changes
Purpose: Expose a smooth substream for Live view. This helps prevent stuttering in the GCXONE live view interface.
Expected result: Substream enabled for smooth live viewing
Step 4: Add Device in GCXONE
Step 4: Add Device in GCXONE
UI path: GCXONE → Customer → Site → Devices → Add Device
Configuration Steps
- Select Camect
- Fill: Host/Serial, Username, Password, Ports, Time Zone
- Click Discover. Review discovered sensors and I/O
- Click Save
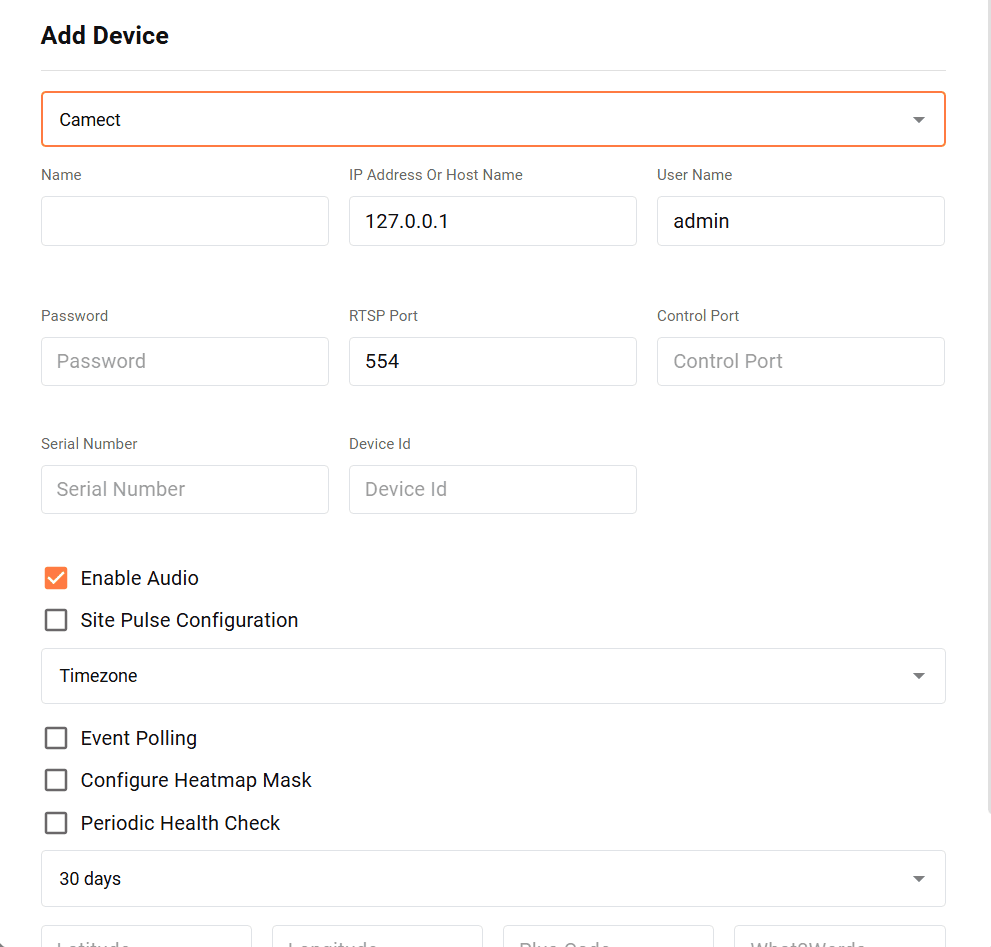
Expected result: GCXONE lists sensors under the Camect device
Step 5: Verify Integration
Step 5: Verify Integration
Verification Checks
- ✅ Send a test alert. It appears in Video Activity
- ✅ Live opens without stutter
- ✅ PTZ presets move if enabled
- ✅ Time synchronization is working
Expected result: Complete Camect integration with GCXONE platform
Troubleshooting
Common Issues and Solutions
- No Events in Video Activity
- Discovery Fails
- Live View Stutters
- No PTZ Control
- Ensure Detect alerts is on
- Confirm Monitoring → NXGEN is configured with the correct TCP address and Site ID
- Add the camera under NXGEN monitoring
- Check time sync/NTP
- Verify credentials, ports, and reachability
- Check network connectivity
- Ensure time zone matches GCXONE
- Enable the substream (set to
1) - Check network bandwidth
- Verify RTSP is enabled
- Grant Pan/Tilt Cameras permission to the GCXONE user
- Verify camera supports PTZ
Related Articles
Need Help?
If you're experiencing issues during configuration, check our Troubleshooting Guide or contact support.