Ajax Installer Configuration
This guide provides step-by-step instructions for configuring Ajax security hubs and NVRs to integrate with GCXONE. Follow these steps to ensure proper alarm monitoring, event detection, and device connectivity.
Configuration
Step-by-Step
Prerequisites
Before You Begin
- ✅ Ajax PRO Desktop application installed
- ✅ Valid Ajax Hub or NVR with devices/cameras
- ✅ Access to GCXONE platform
- ✅ Email invitation capability for Ajax system
Step 1: Invite NXGEN Technologies to Your Hub
Step 1: Invite NXGEN Technologies to Your Hub
UI path: AJAX PRO Desktop → Space Setting → Security Companies → Invite via Email
Configuration Steps
- Open AJAX PRO Desktop
- Navigate to: Space Setting → Security Companies → Invite via Email
- Enter the following email address for the invitation:
ajax@nxgen.io - Send the invitation and ensure it's accepted by NXGEN Technologies

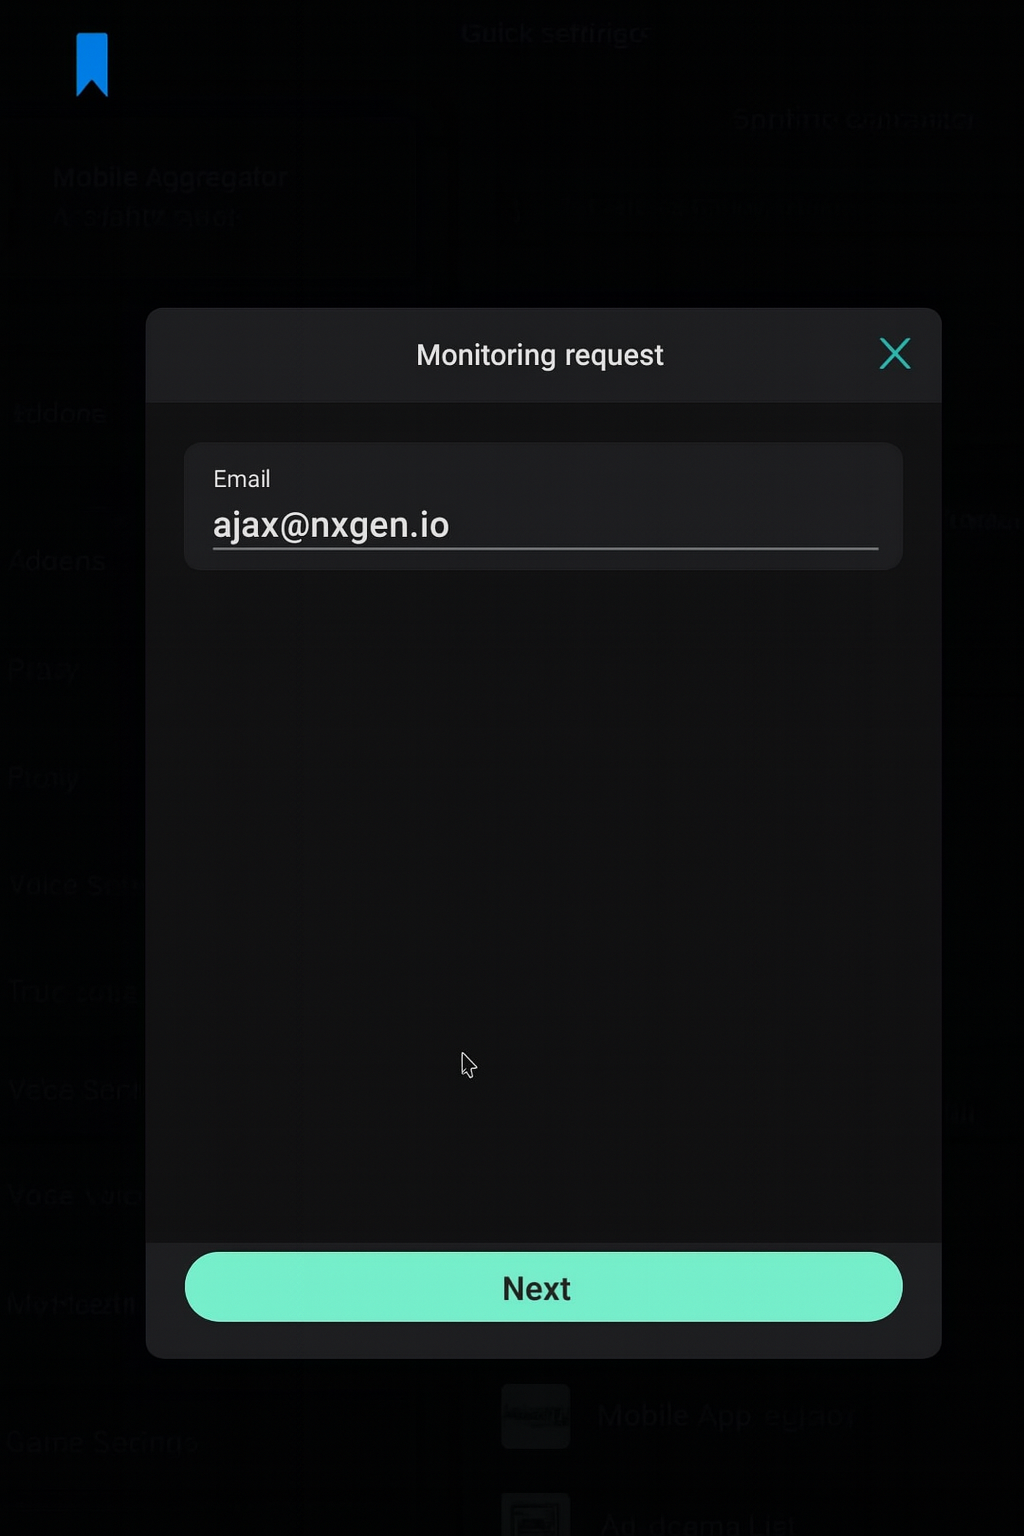
Expected result: NXGEN Technologies successfully invited and accepted to Ajax Hub
Step 2: Add Ajax Device in GCXONE Platform
Step 2: Add Ajax Device in GCXONE Platform
UI path: GCXONE → Devices → Add Device
Configuration Steps
- Login to the GCXONE platform with your credentials
- Navigate to Devices and choose Add Device
In the configuration form:
- Type: Select either Ajax Hub or Ajax NVR from the dropdown
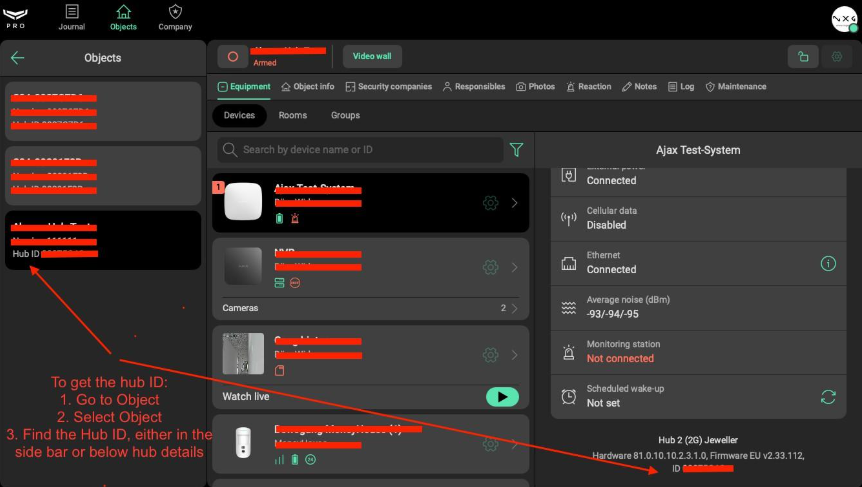
Hub ID / Device ID:
- If you selected Ajax Hub, enter your Hub ID
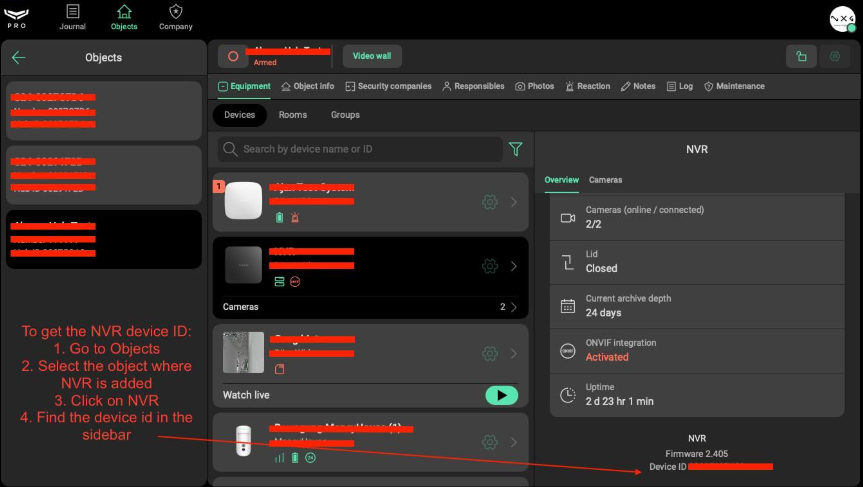
- If you selected Ajax NVR, enter your Device ID
- Timezone: Select the location's time zone
- Click Discover
- The platform will connect and verify the Hub/NVR
On success:
- For Hub: All devices associated with the Hub will be automatically fetched and displayed in a list
- For NVR: All cameras associated with the NVR will be automatically fetched and displayed in a list
- Review the discovered devices or cameras
- Click Save to add them to your account
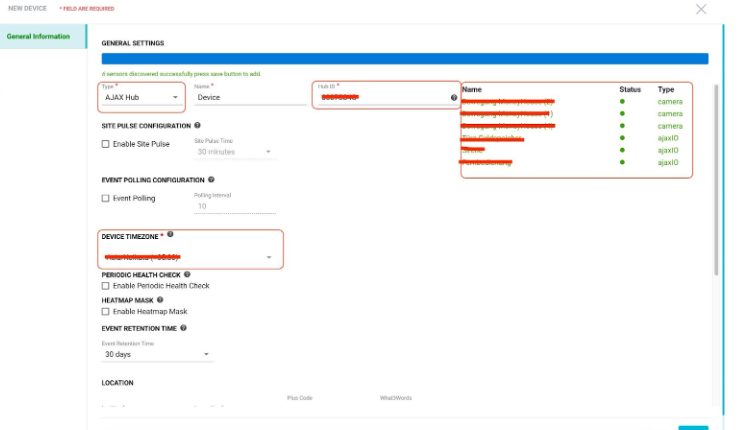
Expected result: Ajax device successfully added to GCXONE with all associated devices/cameras discovered
Step 3: Find SIA-DC09 Receiver Details on GCXONE
Step 3: Find SIA-DC09 Receiver Details on GCXONE
UI path: GCXONE → Devices → View Device
Configuration Steps
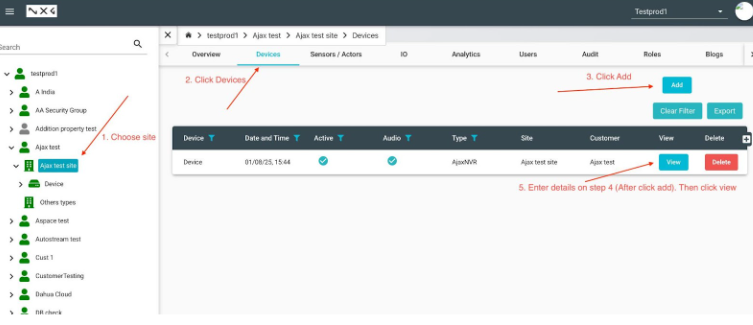
- After adding the device, locate your newly registered AJAX device in the device list
- Click the View button beside the device
On the device overview page, you will find the SIA-DC09 receiver information including:
- Account number
- Encryption key
- Receiver IP/Port
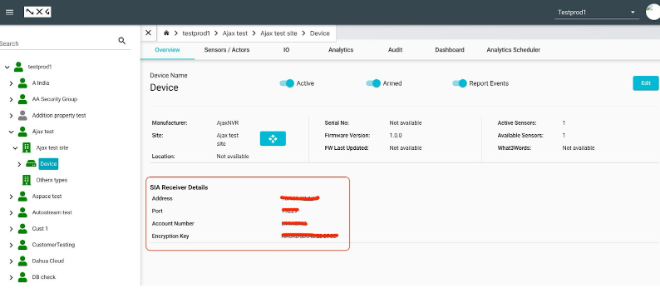
Expected result: SIA-DC09 receiver details obtained from GCXONE device overview
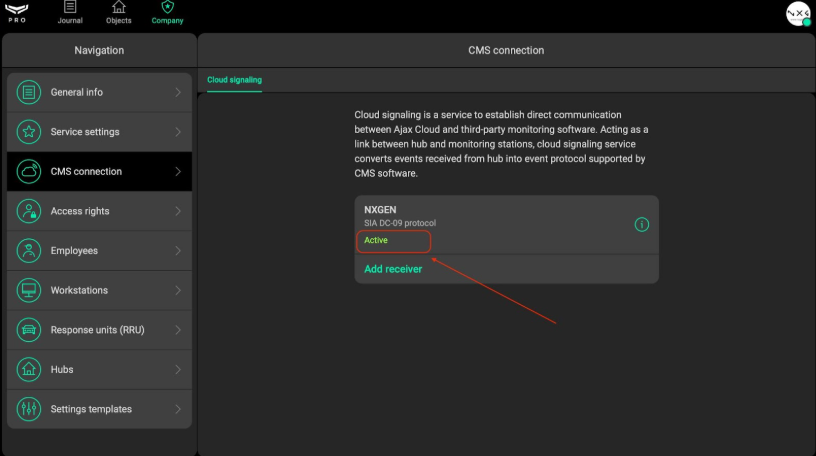
Step 4: Configure the Receiver in AJAX PRO Desktop
Step 4: Configure the Receiver in AJAX PRO Desktop
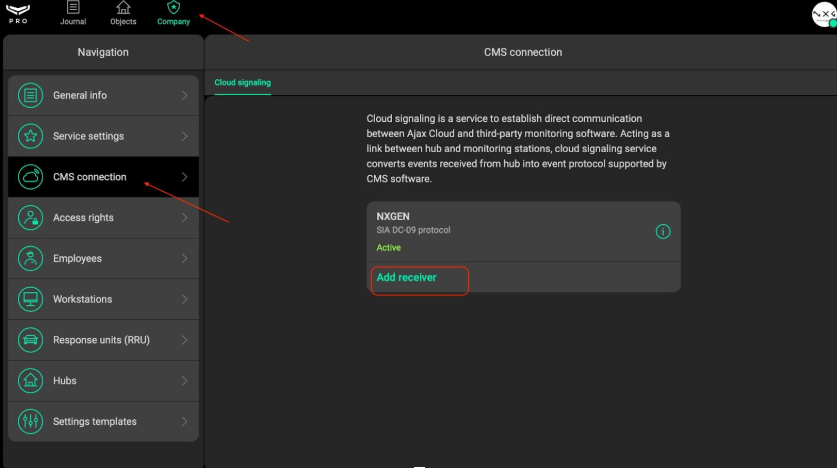
UI path: AJAX PRO Desktop → Company → CMS connection → Add Receiver
Configuration Steps
- Open AJAX PRO Desktop
- Navigate to: Company → CMS connection → Add Receiver
Input the receiver details from the GCXONE platform's device details page:
- Use the receiver IP/hostname, port, and the encryption key
- If you plan to use encrypted communication, enable encryption and copy the exact encryption key from GCXONE
- Enable "Transfer device or group name to CMS events" checkbox
- Save the receiver configuration
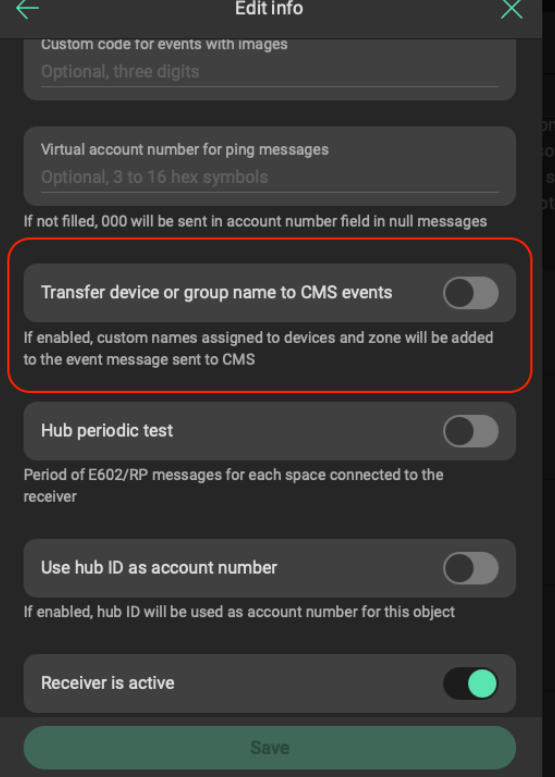
Expected result: Receiver configured in Ajax PRO Desktop with GCXONE connection details
Step 5: Enable the Receiver & Map Account Numbers
Step 5: Enable the Receiver & Map Account Numbers
UI path: AJAX PRO Desktop → Objects → Object → Maintenance → Monitoring via [Receiver Name]
Configuration Steps
- Go to the Objects section in AJAX PRO Desktop
- Click the Object from which you'd like to monitor events
- Open the Maintenance tab
- Find the Monitoring via [Receiver Name] option (where [Receiver Name] is the name you assigned to the receiver in step 4)
- On the right panel, you'll see a list of all the Hub and NVR associated with the object
- Select the device that you want to monitor and enter the account number as shown in the GCXONE device overview page and click save
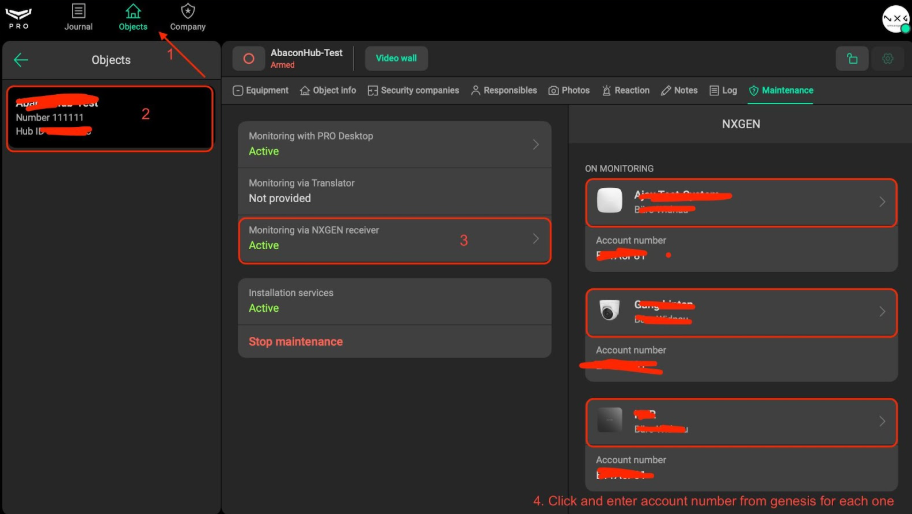
Important: Account number mapping is essential for proper event routing. Make sure the account number matches exactly what is shown in GCXONE device overview.
Expected result: Account numbers mapped for monitored devices with receiver enabled
Step 6: Verify Integration
Step 6: Verify Integration
Verification Checks
- ✅ Ensure the receiver status in AJAX PRO Desktop is active
- ✅ Verify account number mapping matches GCXONE device overview
- ✅ Trigger a test event on your AJAX device to verify that alerts populate in GCXONE
- ✅ Confirm events are received with proper device/group names
Expected result: Live AJAX device events received within GCXONE platform with integrated reporting and false alarm filtering
Troubleshooting
Common Issues and Solutions
- Invitation Issues
- Device Discovery Fails
- No Events Received
- Receiver Connection Issues
- Verify
ajax@nxgen.ioemail address is correct - Check that invitation was sent successfully
- Contact NXGEN support if invitation remains pending
- Verify Hub ID or Device ID is entered correctly
- Check network connectivity between Ajax system and GCXONE
- Ensure timezone selection is accurate
- Verify receiver status is active in Ajax PRO Desktop
- Check account number mapping matches GCXONE device overview
- Confirm encryption key is copied exactly if using encrypted communication
- Verify "Transfer device or group name to CMS events" is enabled
- Double-check receiver IP/hostname and port from GCXONE
- Verify encryption settings match between Ajax PRO Desktop and GCXONE
- Test network connectivity to receiver endpoint
Related Articles
Need Help?
If you're experiencing issues during configuration, check our Troubleshooting Guide or contact support.